Cooler Master A601BS.450
Cooler Master A601BS.450 ATX Mid Tower PC Case User Manual
Model: A601BS.450
Introdución
This manual provides detailed instructions for the installation, operation, and maintenance of your Cooler Master A601BS.450 ATX Mid Tower PC Case. Please read this manual thoroughly before beginning installation to ensure proper setup and optimal performance.
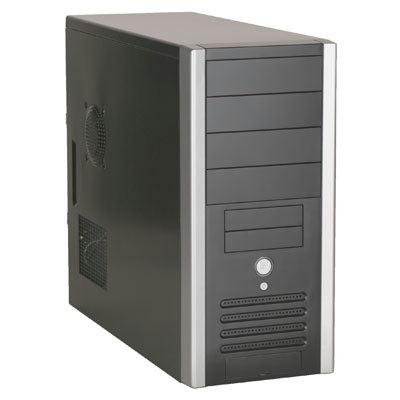
Imaxe: Fronte e lateral view of the Cooler Master A601BS.450 ATX Mid Tower PC Case. The case is black with silver trim on the front panel edges. The front panel features multiple 5.25-inch and 3.5-inch drive bays, a power button, and front I/O ports. The side panel includes ventilation grilles for airflow.
Características clave
- Supports ATX and microATX motherboards.
- Modern front panel design with convenient front audio and USB 2.0 ports.
- Includes one 12cm rear fan for efficient cooling.
- Front panel openings for optional 8cm, 9cm, or 12cm fans to enhance airflow.
- TAC 1.1 compliant side panel with 9cm fan duct and I/O ventilation, optimized for Intel Prescott CPUs.
- Removable hard drive cage for easier installation and cable management.
- Tool-less drive bay design for simplified component installation.
- Equipped with a 450W SPI Power Supply Unit (PSU).
Configuración e instalación
1. Preparación do caso
- Desembalar a caixa: Retire con coidado a carcasa do PC da súa embalaxe.
- Remove Side Panel: Locate the thumbscrews or latches on the rear of the case. Unscrew/unlatch and slide the side panel backward, then lift it off.
2. Instalación da placa base
- Instalar separadores: Ensure the correct standoffs are installed on the motherboard tray for your ATX or microATX motherboard.
- Instalar o protector de E/S: Snap your motherboard's I/O shield into the opening at the rear of the case.
- Montar a placa base: Carefully place the motherboard onto the standoffs, aligning the screw holes. Secure it with screws.
3. Drive Installation (Tool-less)
- 5.25-inch Devices (e.g., Optical Drives): Remove the desired front panel bay cover. Slide the 5.25-inch device into the bay from the front until it clicks into place.
- 3.5-inch External Devices (e.g., Card Readers): Remove the desired front panel bay cover. Slide the 3.5-inch device into the bay from the front. Secure with screws if the tool-less mechanism is not present for external 3.5-inch bays.
- 3.5-inch Internal Devices (Hard Drives): The case features a removable hard drive cage. Remove the cage, install your 3.5-inch hard drives using the provided tool-less rails or screws, then reinsert the cage into the case.
4. Instalación da tarxeta de expansión
- Retirar as cubertas das ranuras: Retire as tapas das ranuras de expansión necesarias da parte traseira da caixa.
- Instalar tarxeta: Insert your expansion card (e.g., graphics card) into the appropriate PCI/PCIe slot on the motherboard and secure it with the retention mechanism or screw.
5. Power Supply Unit (PSU) Connections
The 450W SPI PSU is pre-installed. Connect the appropriate power cables to your motherboard, graphics card, and storage devices.
6. Conexións do panel frontal
Connect the front panel cables (USB, Audio, Power LED, HDD LED, Power Switch, Reset Switch) to the corresponding headers on your motherboard. Refer to your motherboard manual for header locations.
7. Asemblea Final
- Xestión de cables Pasa os cables con coidado para mellorar a circulación do aire e a estética.
- Reattach Side Panel: Slide the side panel back into place and secure it with the thumbscrews or latches.
Instrucións de funcionamento
Once all components are installed and connected, and the side panel is secured:
- Encendido: Connect the power cord to the PSU and a wall outlet. Press the power button on the front of the case.
- Portos de E/S frontales: Use the front USB 2.0 ports for connecting peripherals and the audio jacks for headphones and microphones.
- Fluxo de aire: Ensure the case has adequate space around it for proper airflow, especially around the rear fan and side panel vents.
Mantemento
Un mantemento regular axuda a garantir a lonxevidade e o rendemento dos compoñentes do teu PC.
- Limpeza do po: Periodically clean dust from the interior of the case, especially from fans and ventilation grilles, using compressed air or a soft brush. Ensure the system is powered off and unplugged before cleaning.
- Inspección do ventilador: Check the 12cm rear fan and any optional front fans for proper operation and accumulation of dust.
- Xestión de cables Ensure cables remain neatly routed to prevent obstruction of airflow.
Resolución de problemas
Sen alimentación / O sistema non arranca
- Verify the power cord is securely connected to both the PSU and the wall outlet.
- Asegúrate de que o interruptor de alimentación da parte traseira da fonte de alimentación estea na posición "ON".
- Check all internal power connections, especially the 24-pin ATX and 4/8-pin CPU power cables to the motherboard.
- Confirm the front panel power switch cable is correctly connected to the motherboard header.
Problemas de sobrequecemento
- Ensure the 12cm rear fan is spinning correctly.
- Check if any optional front fans are installed and functioning.
- Clean any dust buildup from fans and vents.
- Verify that the side panel's TAC 1.1 fan duct is properly aligned with the CPU cooler.
- Ensure adequate space around the PC case for unrestricted airflow.
Front USB/Audio Ports Not Working
- Check that the front panel USB and audio cables are securely connected to the correct headers on the motherboard.
- Refer to your motherboard manual for the correct pin assignments for these headers.
Especificacións
| Número de modelo | A601BS.450 |
| Tipo de caso | Torre media ATX |
| Soporte de placa base | ATX, Micro-ATX |
| Cor | Negro |
| Compartimentos de unidades externas | 4 x 5.25", 2 x 3.5" (removable) |
| Baxas de unidades internas | 3 x 3.5" (removable) |
| Ranuras de expansión | 7 |
| Portos de E / S dianteiros | 2 x USB 2.0, 1 x Microphone Jack, 1 x Earphone Jack |
| Included Cooling | 1 x 12cm Rear Fan |
| Refrixeración opcional | Front: 1 x 8cm/9cm/12cm fan (not included) |
| Fonte de alimentación | 450W SPI PSU (included) |
| Dimensións (W x H x D) | Aprox. 19.05 cm x 40.96 cm x 44.45 cm (7.5" x 16.125" x 17.5") |
| Peso | 8.75 kg (19.29 lb) |
| Material | Aceiro aliado, plástico |
Garantía e Soporte
Para obter información sobre a garantía e asistencia técnica, consulte a páxina oficial de Cooler Master. websitio web ou póñase en contacto co seu departamento de atención ao cliente. Garde o comprobante de compra para reclamacións de garantía.
Oficial de Cooler Master Websitio: www.coolermaster.com