
1. Introdución
This manual provides essential instructions for the safe and effective operation of your Sperry Instruments ST-401A Electrical Voltage Tester. This device is designed to check AC/DC voltages up to 250V, continuity, and polarity. Please read this manual thoroughly before use and retain it for future reference.
2. Información de seguridade
AVISO: Electrical testing can be hazardous. Always follow safety precautions to prevent electric shock or injury.
- Always assume circuits are live until proven otherwise.
- Wear appropriate personal protective equipment (PPE), such as safety glasses and insulated gloves.
- Do not use the tester if it appears damaged or if the test leads are frayed or broken.
- Do not use the tester in wet conditions or in the presence of explosive gases or dust.
- Ensure the tester is functioning correctly before each use by testing it on a known live circuit.
- Non exceda o volume máximotage rating of 250V AC/DC.
- This device is UL listed, indicating compliance with safety standards.
3. Produto rematadoview
The Sperry Instruments ST-401A is a compact electrical voltage tester. It typically consists of a main body housing the indicator light, and two test leads with probes. One probe may be integrated into the main body, while the other is connected via a flexible lead.
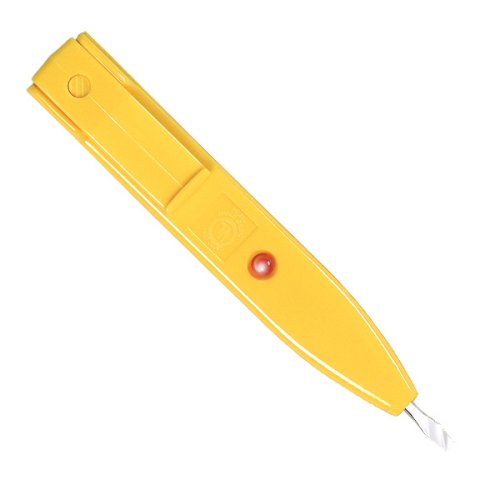
Image 1: Sperry Instruments ST-401A Electrical Voltage Tester. This image shows the yellow main body of the tester with its integrated probe and the second black test lead with its probe. The indicator window is visible on the main body.
4. Configuración: Instalación da batería
The ST-401A requires batteries for operation, which are included with the unit. Proper battery installation is crucial for functionality.
- Locate the battery compartment on the tester. This is typically on the back or side of the main body.
- Open the battery compartment cover. This may require a small screwdriver or simply sliding a latch.
- Introduza as pilas, asegurándose de manter a polaridade correcta (+ e -) tal e como se indica no interior do compartimento.
- Pecha a tapa do compartimento da batería de forma segura.
- Test the unit on a known live circuit to confirm proper battery installation and functionality before use.
5. Instrucións de funcionamento
Before each use, verify the tester's functionality on a known live circuit.
5.1. Vootage Testing (AC/DC up to 250V)
- Ensure the tester is clean and free from damage.
- Carefully touch one probe to the first point of the circuit to be tested (e.g., hot wire).
- Touch the second probe to the second point of the circuit (e.g., neutral wire or ground).
- Observe the indicator light. If voltage is present within the tester's range (up to 250V AC/DC), the light will illuminate. The brightness may vary with voltage nivel.
- Remove probes from the circuit.
5.2. Probas de continuidade
Continuity testing checks for a complete electrical path between two points.
- Ensure the circuit or component to be tested is completely de-energized and isolated from any power source.
- Touch one probe to one end of the component or wire.
- Touch the second probe to the other end.
- If the indicator light illuminates, there is continuity (a complete path). If it does not light up, there is an open circuit.
5.3. Polarity Testing
Polarity testing helps identify the positive and negative terminals in DC circuits or hot/neutral in AC circuits, depending on the tester's design and specific indicators.
- Connect the probes to the points where polarity needs to be determined.
- The tester's indicator may show different illumination patterns or specific lights for positive/negative or hot/neutral. Refer to the markings on your specific tester for interpretation.
6. Mantemento
- Limpeza: Wipe the tester with a dry, clean cloth. Do not use abrasive cleaners or solvents.
- Substitución da batería: If the indicator light appears dim or fails to illuminate on a known live circuit, replace the batteries. Follow the battery installation steps in Section 4. Dispose of old batteries responsibly.
- Almacenamento: Store the tester in a clean, dry environment, away from extreme temperatures and direct sunlight.
- Inspección: Regularly inspect the tester and its leads for any signs of damage, such as cracks, frayed insulation, or loose connections. Do not use a damaged tester.
7 Solución de problemas
| Problema | Causa posible | Solución |
|---|---|---|
| Tester does not light up on a known live circuit. | Baterías agotadas ou mal instaladas. Faulty connection inside the tester. Circuit is not live. | Substitúa as pilas, asegurándose de que a polaridade sexa correcta. Inspect for loose connections (if safely accessible and you are qualified). Verify the circuit with another known working device. |
| Indicator light is dim. | Pilas baixas. | Substitúe as pilas. |
| Tester does not indicate continuity. | Circuíto aberto. Component is faulty. | Ensure good contact with probes. Test the component separately if possible. |
8. Especificacións
- Modelo: ST-401A
- Marca: Instrumentos Sperry
- VoltagRango: Ata 250 V AC/DC
- Funcións: Voltage Testing, Continuity, Polarity
- Fonte de enerxía: Alimentado por pilas (pilas incluídas)
- Certificación: Listado UL
- Peso do artigo: Aproximadamente 8 onzas
- Cor: Amarelo
9. Garantía e soporte
For warranty information or technical support regarding your Sperry Instruments ST-401A Electrical Voltage Tester, please refer to the documentation included with your purchase or visit the official Sperry Instruments website. Contact their customer service for assistance with product issues, repairs, or replacement parts.
Fabricante: A. W. Sperry Instruments Inc.