1. Introdución
This manual provides essential information for the safe and effective use of your Brüder Mannesmann 92570 Mini Drill Bit Set. This versatile 80-piece hobby tool kit is designed for various tasks including drilling, milling, separating, and polishing. Please read these instructions thoroughly before operating the tool and retain them for future reference.
2. Instrucións de seguridade
Always observe basic safety precautions to reduce the risk of injury or damage. Failure to follow these instructions may result in electric shock, fire, and/or serious injury.
- Seguridade na zona de traballo: Manteña a súa área de traballo limpa e ben iluminada. As zonas desordenadas ou escuras invitan aos accidentes. Non manexe ferramentas eléctricas en atmosferas explosivas, como en presenza de líquidos, gases ou po inflamables.
- Seguridade eléctrica: Os enchufes das ferramentas eléctricas deben coincidir coa toma de corrente. Nunca modifique o enchufe de ningún xeito. Evite o contacto corporal con superficies conectadas á terra ou con toma de terra. Non expoña as ferramentas eléctricas á choiva nin a condicións de humidade.
- Seguridade persoal: Use sempre protección ocular. Use protección auditiva cando traballe durante períodos prolongados. Vístase axeitadamente; evite roupa solta ou xoias que poidan engancharse nas pezas móbiles.
- Uso e coidado da ferramenta: Non force a ferramenta eléctrica. Empregue a ferramenta eléctrica axeitada para a súa aplicación. Desconecte o enchufe da fonte de alimentación antes de facer axustes, cambiar accesorios ou gardar ferramentas eléctricas.
- Mantemento: Manter ferramentas eléctricas e accesorios. Comprobe a falta de aliñación ou a unión das pezas móbiles, a rotura de pezas e calquera outra condición que poida afectar o funcionamento da ferramenta eléctrica.
3. Contido do paquete
The Brüder Mannesmann 92570 Mini Drill Bit Set includes the following components:
- Mini Drill (130W)
- Fixación do eixe flexible
- Táboa Clamp / Stand
- Assortment of 80 accessories (various drill bits, grinding stones, sanding bands, cutting discs, polishing wheels, collets, wrenches)
- Estuche de almacenamento

Figura 3.1: Acabadoview of the Brüder Mannesmann 92570 Mini Drill Bit Set, showing the main drill unit, flexible shaft, table clamp, and a selection of the 80 included accessories.

Figura 3.2: The mini drill and its accessories neatly organized within the provided storage case, ready for transport or storage.
4. Produto rematadoview
The Brüder Mannesmann 92570 is a corded electric mini drill designed for precision tasks. It features a 130W motor and variable speed control, allowing for optimal performance across different materials and applications.
Características principais:
- Potencia: 130 vatios
- Voltage: 230 voltios
- Velocidade: Variable, 8,000 to 30,000 RPM
- Eixo flexible: For detailed work in hard-to-reach areas.
- Táboa Clamp/Stand: For stationary operation and improved control.
5. Configuración
5.1 Attaching Accessories to the Main Drill
- Asegúrate de que a ferramenta estea desconectada da fonte de alimentación.
- Press and hold the spindle lock button on the drill.
- Desaparafusa a porca da pinza.
- Insert the desired accessory shank into the appropriate collet.
- Tighten the collet nut securely using the provided wrench.
5.2 Using the Flexible Shaft
The flexible shaft allows for greater maneuverability and precision in intricate tasks.
- Unplug the main drill.
- Remove any accessory from the main drill's collet.
- Unscrew the collet nut and remove the collet from the main drill.
- Screw the flexible shaft coupling onto the main drill's spindle.
- Insert the flexible shaft's inner drive cable into the main drill's spindle opening.
- Secure the flexible shaft's handpiece collet nut and insert the desired accessory.

Figura 5.1: The mini drill mounted on its table clamp stand, with the flexible shaft attached for extended reach and detailed work.
5.3 Mounting the Tool on the Stand
The included table clamp and stand allow for stable, hands-free operation, particularly useful when using the flexible shaft.
- Asegurar as clavijas da mesaamp to a sturdy workbench or table.
- Assemble the vertical stand rod into the clamp.
- Hang the mini drill from the top hook of the stand.
6. Instrucións de funcionamento
Before starting, ensure your work area is clear and you are wearing appropriate personal protective equipment.
6.1 Powering On and Speed Adjustment
- Plug the tool into a 230V power outlet.
- Xire o interruptor de alimentación á posición "ON".
- Adjust the rotational speed using the variable speed dial. Start at a lower speed and gradually increase as needed for the material and task.
6.2 Aplicacións comúns
The mini drill is suitable for a variety of precision tasks:
- Perforación: Use appropriate drill bits for wood, plastic, or soft metals. Apply light, consistent pressure.
- Moenda: Attach grinding stones for shaping, sharpening, or deburring.
- Gravado: Use engraving bits for detailed work on various surfaces.
- Corte: Use cutting discs for small cuts in metal, plastic, or wood. Ensure the workpiece is secured.
- Lixado: Attach sanding bands or discs for smoothing surfaces.
- Pulido: Use polishing wheels with appropriate compounds for a high-gloss finish.

Figura 6.1: The mini drill being used to create a precise hole in a wooden plank.

Figura 6.2: A close-up of the mini drill performing a drilling operation on a metal surface.

Figura 6.3: The mini drill with a grinding stone attachment, smoothing the edge of a metal piece.

Figura 6.4: An engraving bit attached to the mini drill, used for intricate detailing on a metal lighter.

Figura 6.5: A cutting disc on the mini drill being used to cut a metal bolt secured to a wooden surface.
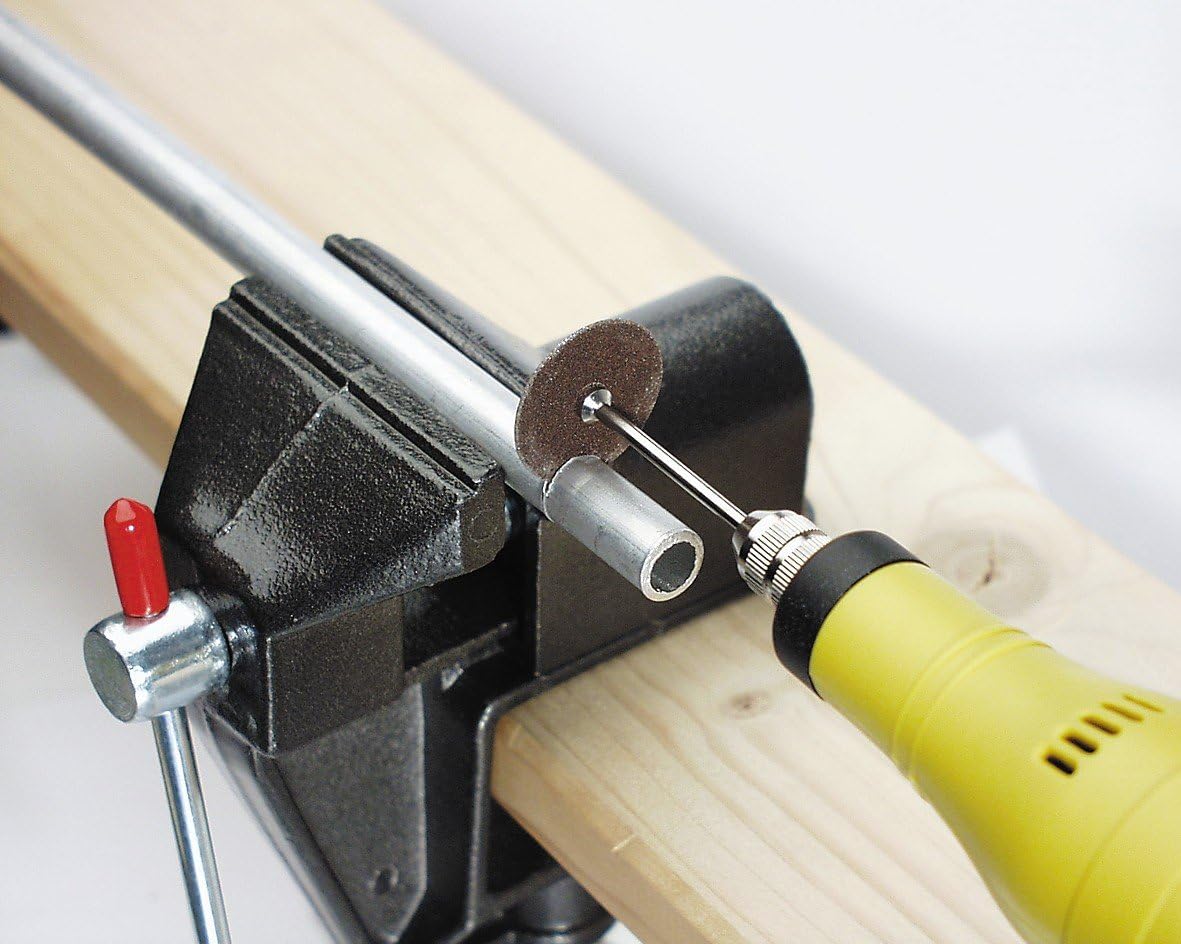
Figura 6.6: The mini drill with a cutting disc, performing a cut on a metal tube held in a vise.

Figura 6.7: A sanding band attachment on the mini drill, used for smoothing a wooden surface.
7. Mantemento
Un mantemento regular garante a lonxevidade e o rendemento óptimo da súa ferramenta.
7.1 Limpeza
- Desenchufe sempre a ferramenta antes de limpala.
- Wipe the tool housing with a clean, damp pano. Non use produtos químicos agresivos ou produtos de limpeza abrasivos.
- Limpa calquera po ou residuos das aberturas de ventilación para evitar o sobrequecemento.
- Clean collets and accessory shanks after each use to ensure proper fit and prevent seizing.
7.2 Almacenamento
- Store the tool and all accessories in the provided storage case.
- Keep the tool in a dry, secure location, out of reach of children.
- Evite o almacenamento baixo a luz solar directa ou a temperaturas extremas.
8 Solución de problemas
If you encounter issues with your mini drill, refer to the following common problems and solutions:
| Problema | Causa posible | Solución |
|---|---|---|
| A ferramenta non comeza | Sen fonte de alimentación; interruptor defectuoso | Check power connection and outlet; Contact customer support if switch is faulty. |
| Vibración excesiva | Accessory not properly seated or balanced; Damaged flexible shaft | Ensure accessory is correctly installed and tightened; Replace damaged accessories or flexible shaft. |
| A ferramenta sobrequenta | Ventilación bloqueada; Sobrecarga da ferramenta | Clean ventilation openings; Reduce pressure and allow tool to cool. |
| Rendemento reducido | Worn accessories; Incorrect speed setting | Replace worn accessories; Adjust speed to suit the material and task. |
9. Especificacións
| Característica | Detalle |
|---|---|
| Número de modelo | M92571 |
| Entrada de enerxía | 130 vatios |
| Voltage | 230 voltios |
| Velocidade de rotación | 8,000 - 30,000 RPM (variable) |
| Fonte de enerxía | Eléctrico con cable |
| Peso do elemento | 3.5 libras (aprox. 1.59 kg) |
| Dimensións do produto (L x W x H) | 12.6 x 9.06 x 3.54 polgadas (aprox. 32 x 23 x 9 cm) |
| Usos recomendados | Grinding, Cutting, Sanding, Polishing |
| GTIN | 04003315709299 |
10. Garantía e soporte
For warranty information and customer support, please refer to the documentation included with your purchase or contact Brüder Mannesmann directly. Spare part availability duration is typically 1 year from the date of purchase.