
1. Introdución
Grazas pola compraasing the Karcher KA 350 Compact Stereo System. This versatile audio system combines modern design with a wide range of playback options, including a 3-disc CD changer, dual cassette deck, turntable, USB port, SD card reader, and an integrated radio. This manual provides essential information for safe operation, setup, and maintenance of your device. Please read it thoroughly before use and retain it for future reference.
2. Instrucións de seguridade importantes
- Fonte de enerxía: Asegúrese de que a fonte de alimentación voltage coincide coa etiqueta de clasificación da unidade.
- Ventilación: Non bloquee ningunha abertura de ventilación. Deixe espazo suficiente arredor da unidade para un fluxo de aire axeitado.
- Auga e humidade: Do not expose the unit to rain, moisture, dripping, or splashing. Do not place objects filled with liquids, such as vases, on the apparatus.
- Calor: Manteña a unidade lonxe de fontes de calor como radiadores, rexistros de calor, estufas ou outros aparellos (incluídos amplificadores) que producen calor.
- Limpeza: Desconecte a unidade da toma de corrente antes de limpala. Use só un pano suave e seco.
- Servizo: Non intente atender este produto vostede mesmo. Remita todo o servizo a persoal de servizo cualificado.
- Nenos: Manteña a unidade e os seus accesorios fóra do alcance dos nenos.
- Seguridade con láser: This product uses a laser. Use of controls or adjustments or performance of procedures other than those specified herein may result in hazardous radiation exposure.
3. Contido do paquete
Comprobe que todos os elementos estean presentes e en bo estado:
- Karcher KA 350 Compact Stereo System (Main Unit)
- Control remoto
- Manual de instrucións
- Altofalantes estéreo (2 unidades)
- Cable de alimentación
- FM Antenna (wire type)
4. Produto rematadoview
4.1 Controis do panel frontal
The front panel provides access to all primary functions and controls for the KA 350 system.

Figura 4.1: Controis do panel frontal
- ON/STANDBY Button: Acende ou apaga a unidade.
- Botón de FUNCIÓN: Selects between CD, Tuner (Radio), Phono (Turntable), Tape (Cassette), and USB/SD modes.
- Botón VOLUME: Axusta o nivel de volume principal.
- Controles de CD: Play/Pause, Stop, Skip/Search (Forward/Backward), Open/Close CD tray.
- Cassette Deck Controls: Play, Record, Fast Forward, Rewind, Stop/Eject for Deck 1 and Deck 2.
- USB/SD Controls: Play/Pause, Stop, Skip/Search (Forward/Backward).
- Controis do sintonizador: Band selection (AM/FM), Tuning Up/Down, Memory presets.
- Visualización: Mostra o modo actual, a información da pista, a frecuencia de radio e a hora.
4.2 Conexións do panel traseiro
The rear panel houses all necessary input and output connections for the system.
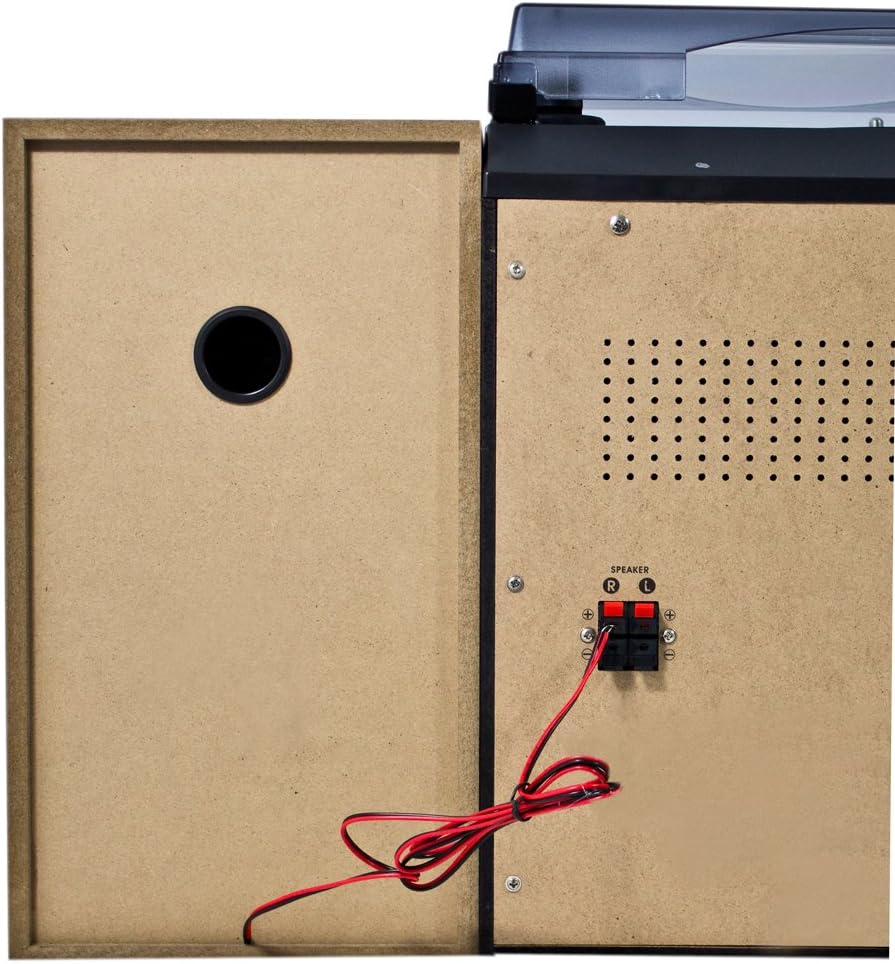
Figura 4.2: Conexións do panel traseiro
- Speaker Terminals (R/L): Connect the included stereo speakers. Ensure correct polarity (+ to + and - to -).
- Entrada de enerxía CA: Conecte o cable de alimentación aquí.
- Terminal de antena FM: Connect the supplied FM wire antenna for radio reception.
4.3 Principais compoñentes

Figure 4.3: Karcher KA 350 Main Components
- Plato xiratorio: Located on top, for playing vinyl records.
- 3-Disc CD Changer: Front-loading tray for multiple CDs.
- Dual Cassette Deck: Two cassette compartments for playback and recording.
- Porto USB: Para conectar unidades flash USB.
- Ranura para tarxetas SD: Para inserir tarxetas de memoria SD.
- Altofalantes estéreo: Two external speakers for audio output.
5. Configuración
5.1 Desembalaxe e colocación
- Retire coidadosamente todos os compoñentes da embalaxe.
- Coloque a unidade principal sobre unha superficie estable e plana.
- Position the speakers on either side of the main unit, ensuring they are at an equal distance for optimal stereo sound.
- Asegúrese de que haxa unha ventilación axeitada arredor da unidade.
5.2 Conexión dos altofalantes
Connect the supplied speakers to the speaker terminals on the rear of the main unit.

Figure 5.1: Speaker Unit
- Identify the speaker wires. Each wire typically has two strands, one marked for positive (+) and one for negative (-).
- Connect the positive (+) terminal of the left speaker to the 'L+' terminal on the main unit's rear panel.
- Connect the negative (-) terminal of the left speaker to the 'L-' terminal on the main unit's rear panel.
- Repeat the process for the right speaker, connecting it to the 'R+' and 'R-' terminals.
- Ensure all connections are secure to prevent sound distortion or damage.
5.3 Conexión da antena FM
For optimal radio reception, connect the supplied FM wire antenna.
- Insert the FM antenna plug into the FM antenna jack on the rear panel.
- Extend the wire antenna fully and position it for the best possible reception. You may need to experiment with its placement.
5.4 Conexión de alimentación
- Plug the AC power cable into the AC power input on the rear of the main unit.
- Conecta o outro extremo do cable de alimentación a unha toma de corrente estándar.
6. Instrucións de funcionamento
6.1 Encendido/apagado
Preme o ON / STANDBY botón do panel frontal ou do control remoto para acender ou apagar a unidade.
6.2 Selección de modo
Preme o FUNCIÓN button repeatedly to cycle through the available modes: CD, Tuner (Radio), Phono (Turntable), Tape (Cassette), and USB/SD.
6.3 Funcionamento do reprodutor de CD

Figure 6.1: CD Changer Tray
- Preme o FUNCIÓN para seleccionar o modo CD.
- Preme o ABRIR/PECHAR botón para abrir a bandexa de CD.
- Place up to three CDs onto the disc trays, label side up.
- Preme o ABRIR/PECHAR prema o botón de novo para pechar a bandexa.
- Preme o REPRODUCIR/PAUSA botón para iniciar a reprodución.
- Usa o SALTAR / BUSCAR buttons to navigate between tracks or fast forward/rewind.
6.4 Funcionamento do reprodutor/gravador de casetes
- Preme o FUNCIÓN botón para seleccionar o modo TAPE.
- Preme o PARAR/EXPULSIÓN button on either Deck 1 or Deck 2 to open the cassette compartment.
- Insira unha cinta de casete e pecha o compartimento.
- Preme o XOGAR botón para iniciar a reprodución.
- To record, insert a blank tape into Deck 2 (for recording from Deck 1 or other sources) or Deck 1 (for recording from external sources if applicable). Press the RECORDAR botón.
6.5 Turntable Operation
- Preme o FUNCIÓN botón para seleccionar o modo PHONO.
- Abra a tapa antipolvo.
- Coloca un disco de vinilo no prato.
- Seleccione a velocidade axeitada (33, 45 ou 78 RPM) usando o selector de velocidade.
- Carefully lift the tone arm and place the stylus onto the desired groove of the record.
- At the end of the record, manually return the tone arm to its rest.
6.6 Reprodución USB/SD
- Preme o FUNCIÓN button to select USB/SD mode.
- Insira unha unidade flash USB no porto USB ou unha tarxeta SD na ranura para tarxetas SD.
- A unidade detectará automaticamente e comezará a reproducir son compatible files (MP3, WMA, AAC).
- Usa o REPRODUCIR/PAUSA e SALTAR / BUSCAR botóns para controlar a reprodución.
6.7 Funcionamento da radio
- Preme o FUNCIÓN button to select TUNER mode.
- Preme o BANDA button to select between FM and AM bands.
- Usa o TUNING buttons to manually tune to a station or press and hold for automatic scanning.
- Para gardar unha emisora, prema a tecla MEMORIA botón e, a continuación, use o SALTAR / BUSCAR botóns para seleccionar un número predefinido e prema MEMORIA de novo para confirmar.
6.8 Control remoto
The included remote control allows convenient operation of all functions from a distance. Ensure batteries are correctly inserted.
7. Mantemento
7.1 Limpeza da unidade
- Desenchufe sempre a unidade da toma de corrente antes de limpala.
- Use un pano suave e seco para limpar as superficies exteriores.
- Non empregues produtos de limpeza abrasivos, ceras ou disolventes, xa que poden danar o acabado.
7.2 Turntable Stylus Care
- Handle the stylus with extreme care. Only touch the tone arm, not the stylus itself.
- Limpa o punteiro periodicamente cun cepillo suave, cepillando de atrás para adiante.
- Replace the stylus when it shows signs of wear (e.g., distorted sound, skipping).
7.3 Cassette Deck Care
- Limpe regularmente os cabezales da cinta, o cabrestante e o rodillo de presión cun hisopo de algodón lixeiramente.ampcon alcohol isopropílico.
- Demagnetize the tape heads periodically to maintain sound quality.
8 Solución de problemas
| Problema | Causa posible | Solución |
|---|---|---|
| Sen poder | Cable de alimentación non conectado; Toma de corrente non activa | Comprobe a conexión do cable de alimentación; probe cunha toma de corrente diferente |
| Sen son | Volume too low; Speakers not connected correctly; Incorrect function mode selected | Increase volume; Check speaker connections and polarity; Select correct function mode |
| O CD salta ou non se reproduce | CD is dirty or scratched; CD inserted incorrectly | Clean or replace CD; Insert CD label side up |
| Mala recepción de radio | Antenna not connected or poorly positioned; Weak signal | Connect and adjust FM antenna; Try repositioning the unit |
| Velocidade do tocadiscos incorrecta | Seleccionouse unha velocidade incorrecta | Adjust the speed selector switch (33/45/78 RPM) |
| Problemas de reprodución con USB/SD | Incompatible file formato; tarxeta USB/SD non inserida correctamente; danada files | Garantir files are MP3, WMA, or AAC; Reinsert USB/SD card; Try a different USB/SD card |
9. Especificacións
| Característica | Especificación |
|---|---|
| Marca | Karcher |
| Número de modelo | KA 350 |
| Tecnoloxía de conectividade | FM/MW Tuner, USB, SD |
| Cor | Negro |
| Tipo de altofalante | Stereo (2 speakers included) |
| Dimensións do artigo (L x W x H) | 70.5 x 41 x 37.3 cm |
| Fonte de enerxía | Eléctrico con cable |
| Dispositivos compatibles | Smartphone, Tablet, MP3 Player, Personal Computer |
| Peso do elemento | 10.8 quilogramos |
| Potencia de saída (RMS) | 2 x 5 W (Total 50 W) |
| Supported Media Standards | MP3, CD, Cassette, USB, SD |
| Formatos de audio admitidos | CD-DA, MP3, WMA, AAC |
| Soporte Bluetooth | Non |
| Número de falantes | 2 |
| Modo de saída de audio | Estéreo |
| Configuración de son envolvente | 2.0 |
| Compoñentes incluídos | Compact system, Remote control, Instruction manual |
10. Garantía e soporte
Para obter información sobre a garantía e asistencia técnica, consulte a tarxeta de garantía incluída co produto ou visite o sitio web oficial de Karcher. websitio. Garda o comprobante de compra para calquera reclamación de garantía.
Fabricante: Karcher