
Introdución
Grazas pola compraasing the SENTRY CL933 Big Screen Weather Alarm Clock. This device combines a digital alarm clock with a large LCD display, providing essential information such as time, date, indoor temperature, humidity, and a weather forecast. This manual will guide you through the setup, operation, and maintenance of your new alarm clock.
Información de seguridade
- Non expoña a unidade a temperaturas extremas, luz solar directa ou alta humidade.
- Evite deixar caer a unidade ou someterla a impactos fortes.
- Non mesture pilas antigas e novas, nin tipos diferentes de pilas.
- Retire as pilas se a unidade non se utiliza durante un período prolongado.
- Limpa a unidade cun pano suave e seco. Non empregues produtos de limpeza abrasivos nin solventes.
- Este produto é só para uso en interiores.
Contido do paquete
Comprobe que estean presentes todos os elementos:
- SENTRY CL933 Big Screen Weather Alarm Clock
- Manual de usuario (este documento)
Produto rematadoview
The SENTRY CL933 features a large, easy-to-read LCD display and intuitive controls. Familiarize yourself with the main components:
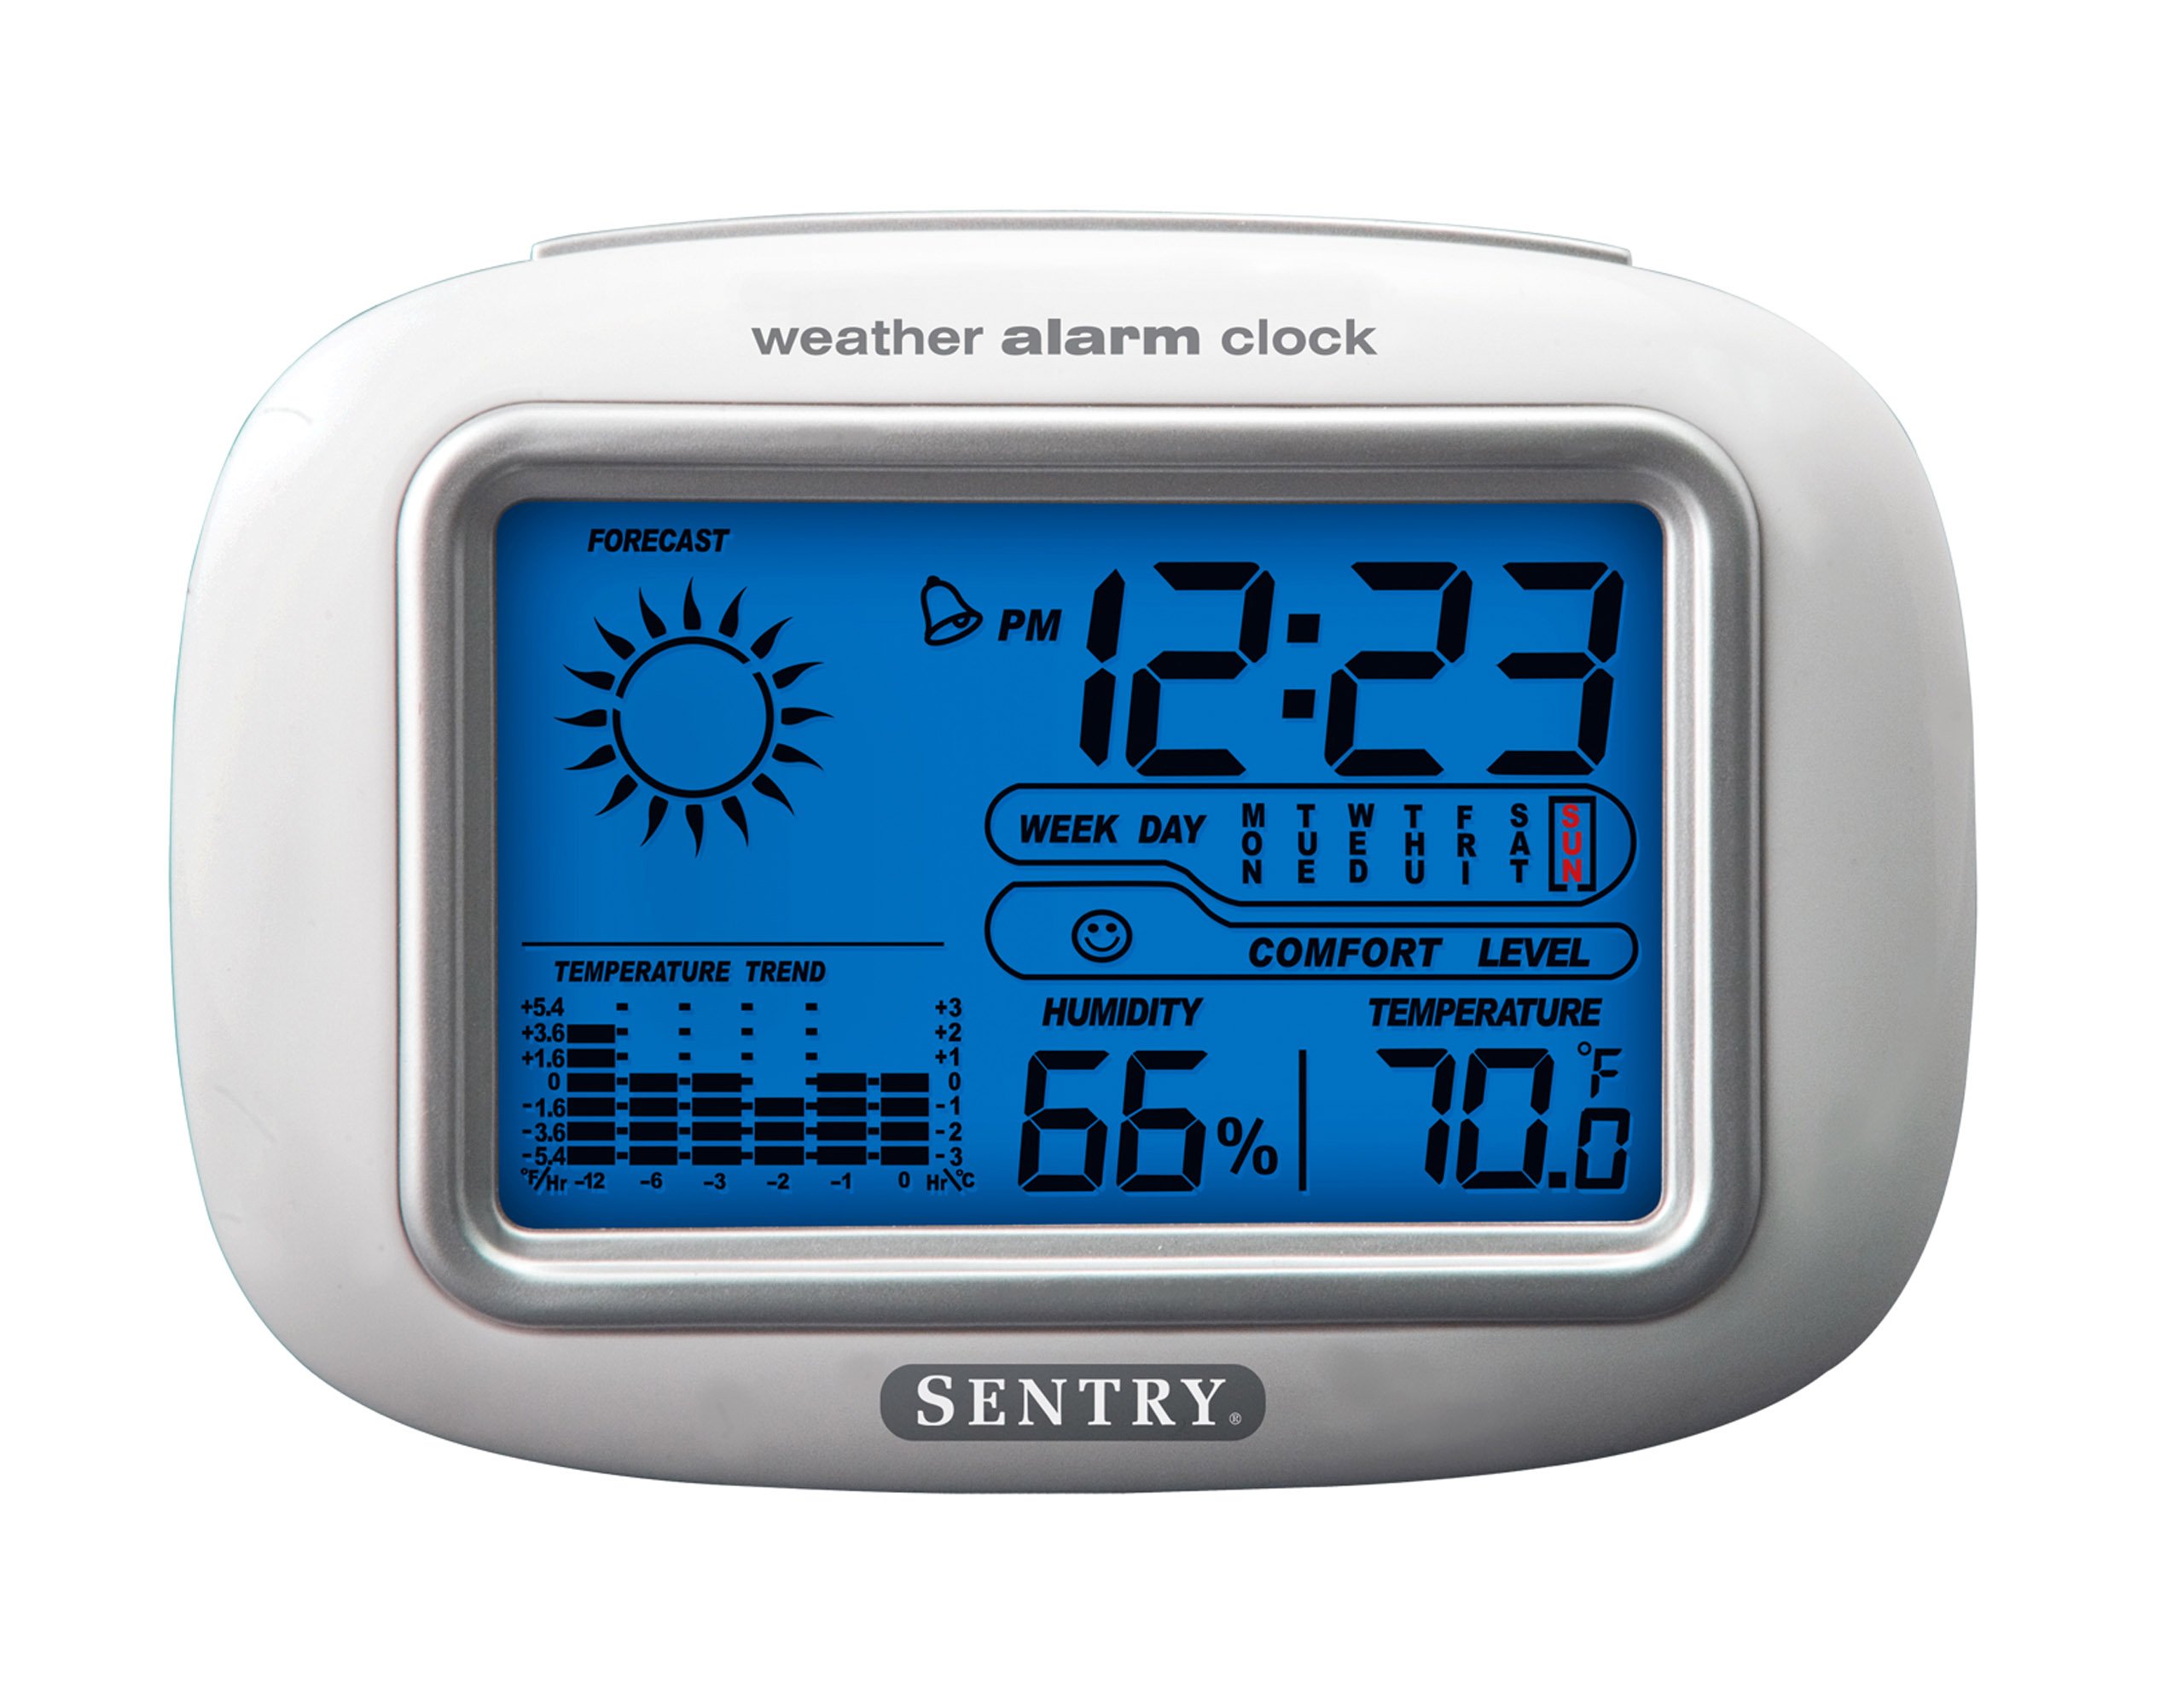
The SENTRY CL933 Big Screen Weather Alarm Clock displayed in its retail packaging, showing the clock face with time, weather forecast, humidity, and temperature readings.
Elementos de visualización:
- Visualización do tempo: Shows current time (12/24 hour format).
- Data e día da semana: Displays the current date and day.
- Icona de previsión meteorolóxica: Indicates predicted weather conditions (e.g., sunny, cloudy, rainy).
- Icona da fase lunar: Shows the current moon phase.
- Visualización da temperatura: Mostra a temperatura interior en graos Celsius ou Fahrenheit.
- Visualización de humidade: Shows indoor humidity percentage.
- Comfort Level Icon: Indicates the comfort level based on temperature and humidity.
- Indicador de tendencia de temperatura: Shows if the temperature is rising, falling, or stable over the last 12 hours.
- Icona de alarma: Indicates when the alarm is set.
Control Buttons (typically on the back or sides):
- Botón MODO/AXUSTAR: Used to switch between display modes and enter setting mode.
- Botóns ARRIBA/ABAIXO: Used to adjust values during setting and sometimes to toggle display options.
- Botón ALARMA: Used to set or activate/deactivate the alarm.
- Botón SNOOZE/LIGHT: Activates the backlight and functions as the snooze button when the alarm sounds.
- Botón °C/°F: Alterna entre a visualización da temperatura en graos Celsius e Fahrenheit.
Configuración
1. Instalación da batería
- Localice a tapa do compartimento da batería na parte traseira da unidade.
- Remove the cover by sliding or lifting it.
- Insert two (2) new AAA batteries (not included) according to the polarity indicators (+ and -) inside the compartment.
- Coloque a tapa do compartimento da batería de forma segura.
- The clock will power on and the display will activate.
2. Colocación inicial
Place the alarm clock on a stable, flat surface away from direct heat sources, strong vibrations, or areas with extreme temperature fluctuations for accurate readings.
Instrucións de funcionamento
1. Axuste da hora e da data
- Manteña premido o MODO/SET button for approximately 3 seconds to enter time setting mode. The hour digit will start flashing.
- Usa o UP or ABAIXO botóns para axustar a hora.
- Preme MODO/SET de novo para confirmar a hora e pasar ao axuste dos minutos.
- Repeat steps 2 and 3 for minutes, year, month, and day.
- Despois de axustar o día, prema MODO/SET unha última vez para saír do modo de configuración.
- To switch between 12-hour and 24-hour time format, press the UP botón mentres a hora parpadea durante o axuste da hora.
2. Configuración da alarma
- Preme o ALARMA botón unha vez para mostrar a hora actual da alarma.
- Manteña premido o ALARMA button for approximately 3 seconds. The alarm hour digit will start flashing.
- Usa o UP or ABAIXO botóns para axustar a hora da alarma.
- Preme ALARMA again to confirm the hour and move to the alarm minute setting.
- Usa o UP or ABAIXO botóns para axustar os minutos da alarma.
- Preme ALARMA one last time to confirm and exit alarm setting mode.
- Para activar ou desactivar a alarma, prema o botón ALARMA button briefly when the current time is displayed. An alarm icon will appear on the display when the alarm is active.
3. Función de repetición e retroiluminación
- Cando soe a alarma, prema o botón SNOOZE / LUZ button to activate the snooze function. The alarm will temporarily stop and sound again after a few minutes (typically 5-10 minutes).
- Para desactivar a alarma completamente, prema calquera outro botón (por exemplo, ALARMA, MODO/SET) when the alarm is sounding.
- Preme o SNOOZE / LUZ button at any time to activate the backlight for a few seconds, illuminating the display for easy viewing in low light conditions. The backlight is not designed to stay on continuously to conserve battery life.
4. Temperature Unit Selection (°C/°F)
Preme o ° C / ° F button (usually located on the back or side) to toggle the temperature display between Celsius and Fahrenheit.
5. Understanding Weather and Environmental Displays
- Pronóstico do tempo: The icon (e.g., sun, clouds, rain) represents a prediction of the weather for the next 12-24 hours based on atmospheric pressure changes detected by the internal sensor. This is an estimate and may not always match official weather reports.
- Humidade: Displays the current indoor relative humidity percentage.
- Nivel de confort: An icon (e.g., smiley face, neutral face, frowny face) indicates the indoor comfort level based on the combination of temperature and humidity.
- Temperature Trend: The arrow indicator shows if the indoor temperature has been rising, falling, or remaining stable over the past 12 hours.
- Fase da Lúa: The moon icon changes to reflect the current phase of the moon.
Mantemento
- Limpeza: Limpe a unidade cun suave, lixeiramente damp pano. Non use produtos químicos agresivos ou materiais abrasivos.
- Substitución da batería: When the display becomes dim or functions become erratic, replace the two AAA batteries. Ensure correct polarity.
- Almacenamento: Se garda o reloxo durante un período prolongado, retire as pilas para evitar fugas.
Resolución de problemas
| Problema | Posible causa/solución |
|---|---|
| A pantalla está en branco ou escura. | Batteries are low or incorrectly installed. Replace with new AAA batteries, ensuring correct polarity. |
| Time/Date cannot be set. | Ensure you are pressing and holding the MODO/SET botón durante 3 segundos para entrar en modo de configuración. |
| Non soa a alarma. | The alarm may not be activated. Press the ALARMA button briefly to ensure the alarm icon is displayed. Check alarm time setting. |
| Temperatura/humidade inexacta. | The unit may be placed near a heat source, vent, or in direct sunlight. Move the clock to a more stable environment. Readings are for indoor conditions only. |
| A previsión meteorolóxica semella incorrecta. | The weather forecast is an estimate based on internal barometric pressure changes and may not always align with local weather reports. It is a general trend indicator. |
Especificacións
- Modelo: CL933
- Marca: SENTIRÍA
- Tipo de visualización: LCD dixital con retroiluminación
- Fonte de enerxía: Alimentado por batería
- Pilas necesarias: 2 x AAA (non incluído)
- Dimensións: 6.5 x 2.25 x 4.25 polgadas (16.5 x 5.7 x 10.8 cm)
- Peso: 6.2 onzas (176 gramos)
- Características: Time, Date, Day of Week, Alarm, Snooze, Indoor Temperature (°C/°F), Indoor Humidity, Weather Forecast Icons, Moon Phase, Comfort Level Indicator, 12-hour Temperature Trend.
- Tipo de montaxe: Mesa
Garantía e Soporte
SENTRY products are designed for reliability and performance. For any questions, technical support, or warranty inquiries, please refer to the contact information provided with your purchase or visit the official SENTRY websitio. Garde o comprobante de compra para reclamacións de garantía.