
Gallery A83-SILVER/1/21510/15+1SW
Gallery Empress Crystal Chandelier Instruction Manual
Model: A83-SILVER/1/21510/15+1SW
1. Introdución
This manual provides comprehensive instructions for the safe installation, operation, and maintenance of your Gallery Empress Crystal Chandelier, Model A83-SILVER/1/21510/15+1SW. Please read all instructions carefully before beginning installation and retain this manual for future reference.
The Gallery Empress Crystal Chandelier is a sophisticated lighting fixture designed to enhance various indoor spaces such as bedrooms, dining rooms, and living rooms. It features Empress Crystal components, known for their clarity and light reflection properties.
2. Información importante de seguridade
WARNING: RISK OF ELECTRIC SHOCK. DISCONNECT POWER AT THE FUSE BOX OR CIRCUIT BREAKER BEFORE INSTALLATION OR SERVICING.
- Installation must be performed by a qualified electrician or a person with experience in electrical wiring.
- Ensure the mounting surface can support the weight of the chandelier.
- Non conecte este aparello a un sistema eléctrico sen toma de terra.
- Handle crystal components with care to prevent breakage or injury.
- Non exceda a potencia máximatage specified for bulbs (40 watts per bulb).
- Manteña os materiais de embalaxe lonxe dos nenos.
3. Contido do paquete
Carefully unpack all components and inspect for any damage. Retain all packaging materials until you are satisfied with the product. If any parts are missing or damaged, contact Gallery customer support immediately.
- Chandelier Frame (Silver finish)
- Empress Crystal components (various shapes and sizes)
- Kit de hardware de montaxe
- Assembly diagram and instructions (provided by Gallery)
- Note: Light bulbs are typically not included. Please refer to the "Specifications" section for compatible bulb types.
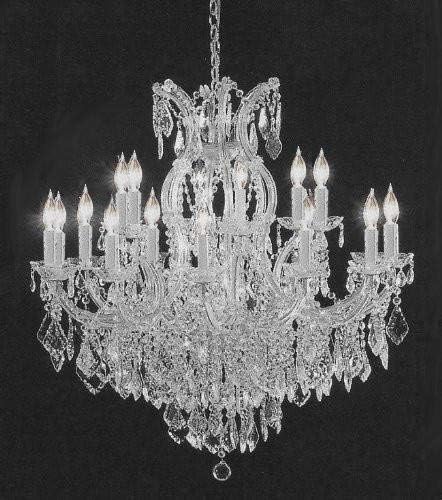
Figura 1: Assembled Gallery Empress Crystal Chandelier. This image illustrates the complete chandelier with its crystal elements and light sockets.
4. Instrucións de instalación
Assembly of this chandelier requires careful attention to detail and patience. It is highly recommended to have two people for installation. Refer to the included Gallery-verified diagram and instructions for specific steps.
4.1. Ferramentas necesarias (non incluídas)
- Desaparafusador (Phillips e Flathead)
- Descascados de fíos
- Alicates
- Cinta eléctrica
- Escaleira
- Gloves (optional, for handling crystals)
4.2. Pasos previos á instalación
- Apagar a enerxía: Locate the circuit breaker or fuse box and turn off the power to the junction box where the chandelier will be installed. Verify power is off using a voltagprobador.
- Review Diagrama: Carefully study the provided assembly diagram and instructions. Familiarize yourself with all components and their intended placement.
- Preparar compoñentes: Lay out all chandelier components on a clean, soft surface to prevent scratches.
4.3. Montaxe do aparello
- Fixe o soporte de montaxe á caixa de conexións do teito cos parafusos proporcionados. Asegúrese de que estea ben fixado.
- Conecte os cables eléctricos:
- Connect the bare copper ground wire from the fixture to the ground wire from the junction box (usually bare copper or green).
- Conecta o cable branco (neutro) da luminaria ao cable branco (neutro) da caixa de conexións.
- Connect the black (live) wire from the fixture to the black (live) wire from the junction box.
- Asegure todas as conexións con porcas e cinta eléctrica.
- Carefully lift the chandelier frame and attach it to the mounting bracket, following the specific instructions in your diagram. Ensure all connections are tight and secure.
4.4. Attaching Crystal Components
This step requires significant time and precision. The Empress Crystal components are individually attached to the chandelier frame. Refer to the provided diagram for the correct placement of each crystal strand and individual crystal piece.
- Identify the different crystal shapes and sizes.
- Match each crystal component to its corresponding hook or attachment point on the chandelier frame as indicated in the diagram.
- Gently attach each crystal, ensuring it is securely fastened. Avoid forcing components.
- Note: Some crystal strands may require minor adjustments or re-arrangement to achieve the desired aesthetic.
4.5. Installing Light Bulbs
- Once all crystals are in place, carefully screw in the appropriate E12 candelabra base bulbs (not included) into each socket.
- Non supere os 40 watts por lámpada.
4.6. Comprobación final
Before restoring power, double-check all electrical connections and ensure all crystal components are securely attached. Clear the work area of tools and debris.
5. Funcionamento
After successful installation, restore power at the circuit breaker. The chandelier can be operated using a standard wall switch connected to the fixture's electrical circuit. This model supports various bulb types including LED, incandescent, halogen, and compact fluorescent bulbs.
The chandelier is designed for indoor use only and features a touch control method, implying it can be integrated with compatible touch-sensitive wall switches or dimmers (sold separately) if desired. Consult a qualified electrician for dimmer compatibility and installation.
6. Coidados e mantemento
Regular cleaning will help maintain the brilliance of your Empress Crystal Chandelier.
- Limpeza do cadro: Dust the metal frame with a soft, dry cloth. For more thorough cleaning, lightly dampen a cloth with a mild, non-abrasive cleaner and wipe gently. Dry immediately.
- Cleaning the Crystals:
- Turn off the power to the chandelier before cleaning.
- Use a soft, lint-free cloth or a specialized crystal cleaning glove.
- For deeper cleaning, spray a crystal cleaning solution onto a cloth (not directly onto the crystals or electrical components) and gently wipe each crystal.
- Avoid harsh chemicals or abrasive materials, as these can damage the crystal finish.
- Substitución da lámpada: Always turn off power before replacing bulbs. Allow old bulbs to cool completely before removal. Use only E12 candelabra base bulbs, not exceeding 40 watts.
7 Solución de problemas
If you encounter issues with your chandelier, refer to the following common problems and solutions:
| Problema | Causa posible | Solución |
|---|---|---|
| Chandelier does not light up. |
|
|
| Luces parpadeantes. |
|
|
| Crystals appear dull. |
|
|
If troubleshooting steps do not resolve the issue, please contact Gallery technical support.
8. Especificacións
| Marca | Galería |
| Número de modelo | A83-SILVER/1/21510/15+1SW |
| Dimensións (H x An) | 38 polgadas (altura) x 37 polgadas (anchura) |
| Material | Cristal |
| Tipo de acabado | Crystal (Silver frame) |
| Número de luces | 16 |
| Base de bulbo | E12 Candelabro |
| Max Wattage por bulbo | 40 vatios |
| Tipos de bombillas compatibles | LED, Incandescent, Halogen, Compact Fluorescent |
| Voltage | 120 voltios |
| Tipo de instalación | Semi Flush Mount / Ceiling Mount |
| Uso interior/exterior | Interior |
| Requírese montaxe | Si |
| UPC | 804879403739 |
9. Información da garantía
Your Gallery Empress Crystal Chandelier is backed by a Gallery warranty (Established 1978). Each item comes with a Certificate of Authenticity, certifying this product as an authentic Gallery lighting fixture. For specific warranty terms and conditions, please refer to the documentation included with your purchase or contact Gallery customer support.
10. Atención ao cliente
For any questions regarding installation, operation, maintenance, or troubleshooting, Gallery provides dedicated technical support.
Toll-Free Technical Support Number: 1-800-XXX-XXXX (Please refer to your product packaging or Certificate of Authenticity for the exact number.)
When contacting support, please have your model number (A83-SILVER/1/21510/15+1SW) and purchase information readily available.
Ask a question about this manual
Ask about setup, troubleshooting, compatibility, parts, safety, or missing instructions. Manuals+ will review the question and use this page’s manual context to help answer it.