
1. Introdución
This manual provides detailed instructions for the installation, operation, and maintenance of your JL AUDIO JX360/2 2-Channel Amplifier. Please read this manual thoroughly before attempting installation or operation to ensure proper use and to prevent damage to the unit or associated components.
The JX360/2 is a Class A/B full-range amplifier designed to deliver reliable power and high-quality audio performance. It features a high-mass heatsink for improved thermal capacity, captured power and speaker connectors for easier installation and enhanced safety, and comprehensive signal processing capabilities.
2. Configuración e instalación
Unha instalación axeitada é fundamental para un rendemento e unha seguridade óptimos. Se tes algunha dúbida sobre calquera parte do proceso de instalación, consulta cun profesional cualificado.
2.1 Montaxe do Ampmáis vivo
Select a mounting location that provides adequate ventilation and protection from moisture and excessive heat. Ensure the amplifier is securely fastened to a solid surface to prevent movement during vehicle operation.

Imaxe 1: De arriba abaixo view of the JL AUDIO JX360/2 ampvidador, mostrarasing its brushed aluminum finish and model number.
2.2 Conexións de enerxía
Conecta o amplifier to the vehicle's electrical system using appropriate gauge wiring. The JX360/2 features captured power and speaker connectors for secure and simplified wiring.
- Conecta o +12 VDC terminal to the positive terminal of the vehicle's battery via a fuse or circuit breaker (not included). The fuse/breaker should be located within 18 inches (45 cm) of the battery.
- Conecta o Terra terminal to a clean, unpainted metal surface of the vehicle chassis. Ensure a solid electrical connection.
- Conecta o Mando a distancia terminal to the remote turn-on output of your head unit. This wire signals the amplifier to turn on and off with the head unit.

Imaxe 2: View of the JL AUDIO JX360/2 amplifier's power input (+12VDC, Ground, Remote) and speaker output terminals (Bridged, R, L).
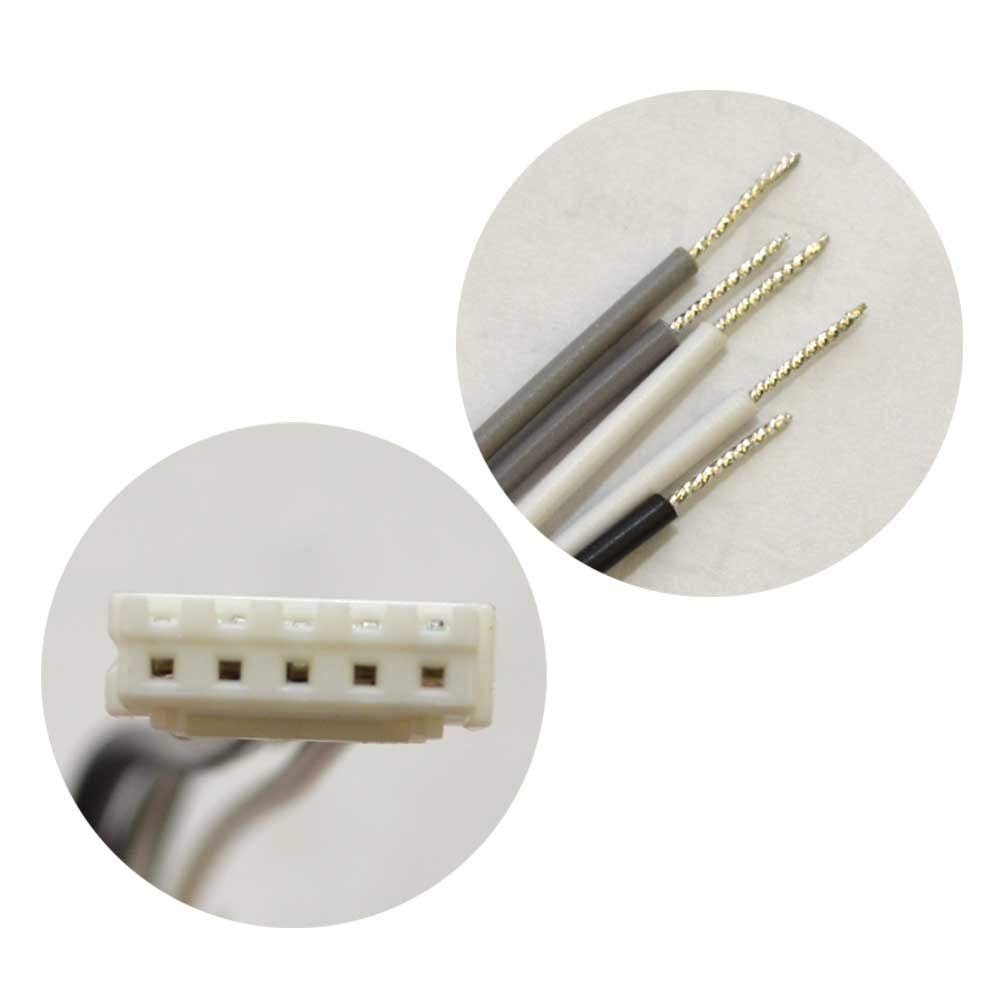
Imaxe 3: Primeiro plano view of the captured wiring connectors for the JL AUDIO JX360/2 amplifier, showing the pre-tinned wire ends for easy insertion.
2.3 Conexións de entrada de audio
The JX360/2 supports both high-level (speaker level) and low-level (RCA) inputs.
- Entradas de baixo nivel (RCA): Connect RCA cables from your head unit's preamp saídas ao amplifier's "Low-Level Inputs."
- Entradas de alto nivel: If your head unit does not have RCA outputs, connect the speaker wires directly to the amplifier's "Hi-Level Inputs" using the provided connector.
2.4 Conexións de saída de altofalantes
Conecta os teus altofalantes ao ampterminais de saída do altofalante do adaptador. Asegúrese de que a polaridade sexa correcta (+ a + e - a -) para cada altofalante.
- For 2-channel stereo operation, connect one speaker to the Left (+) and Left (-) terminals, and another speaker to the Right (+) and Right (-) terminals.
- For bridged mono operation (e.g., for a subwoofer), connect the speaker to the "Bridged" terminals as indicated on the amplifier. The JX360/2 can deliver 360W into a 4-ohm load when bridged.

Imaxe 4: View of the JL AUDIO JX360/2 amplifier's input and control panel, including RCA inputs, high-level inputs, filter controls, and input sensitivity adjustment.
3. Funcionamento do Ampmáis vivo
3.1 Encendido inicial
After all connections are made, turn on your head unit. The amplifier should power on automatically via the remote turn-on wire. Observe the power indicator light on the ampmáis vivo.
3.2 Adjusting Input Sensitivity (Gain)
The "Input Sens." control matches the ampsensibilidade de entrada do lificador ao volume de saídatage of your head unit. Start with the control at its minimum setting. Play a dynamic piece of music through your system. Slowly increase the "Input Sens." control until you hear distortion, then back it off slightly. This ensures maximum clean output from the ampmáis vivo.
3.3 Filter Settings
The JX360/2 features a 12 dB/octave variable filter, adjustable from 50 Hz to 500 Hz. This allows you to optimize the frequency response for your speakers.
- HP (Paso alto): Use this setting to block low frequencies from reaching your full-range speakers, preventing distortion and improving clarity.
- LP (paso baixo): Use this setting when driving a subwoofer, allowing only low frequencies to pass through.
- Completo: Disables the filter, allowing the full frequency range to pass.
Adjust the "Filter Freq." knob to select the desired crossover point.
3.4 Pass-Through Preamp Saídas
O amplifier includes pass-through preamp outputs, allowing you to send the audio signal to another amplifier in your system without requiring additional RCA outputs from your head unit.
4. Mantemento
The JL AUDIO JX360/2 amplifier is designed for reliable operation with minimal maintenance. Follow these guidelines to ensure longevity:
- Limpeza: Limpar periodicamente o ampo exterior do lifador cun pano suave e seco. Non empregue produtos químicos agresivos nin produtos de limpeza abrasivos.
- Ventilación: Asegúrese de que o amplifier's heatsink fins are not obstructed. Adequate airflow is essential for proper cooling.
- Conexións: Occasionally check all power, ground, and speaker connections to ensure they remain secure. Loose connections can lead to performance issues or damage.
5 Solución de problemas
Se tes problemas co teu amplifier, consulte os seguintes problemas e solucións comúns:
5.1 No Power / Amplifier Does Not Turn On
- Check the main fuse or circuit breaker on the +12VDC power line.
- Verify the ground connection is secure and making good contact with the chassis.
- Ensure the remote turn-on wire is connected and receiving +12V from the head unit when it is on.
- Check all power and ground connections at the ampterminais máis vivos.
5.2 Sen saída de audio
- Confirme o amplifier is powered on (power indicator light is illuminated).
- Check all RCA or high-level input connections from the head unit to the ampmáis vivo.
- Verify speaker wire connections at both the amplifier and the speakers. Ensure correct polarity.
- Comproba o volume e a selección de fonte da unidade principal.
- Ensure the "Input Sens." control is not set to minimum.
5.3 Distortion or Poor Sound Quality
- Adjust the "Input Sens." (gain) control. If set too high, it can cause distortion.
- Check speaker impedance. Ensure it is within the amplifier's recommended range (2 ohms stereo, 4 ohms bridged).
- Verify filter settings (HP/LP/Full) are appropriate for your speakers.
- Inspect speaker wires for shorts or frayed strands.
- Ensure adequate power supply to the amplificador. Voltage drops can cause distortion.
5.4 Amplifier Overheats (Protection Mode)
- Asegurar o amplifier has sufficient ventilation. Clear any obstructions around the heatsink.
- Check speaker impedance. Running speakers with too low an impedance can cause overheating.
- Reduce the "Input Sens." (gain) setting.
- Verify the power and ground connections are secure and of adequate gauge.
- Permitir o amplifier to cool down. If the issue persists, consult a professional.
6. Especificacións
| Característica | Detalle |
|---|---|
| Modelo | JX360/2 |
| Ampclase máis viva | Clase A/B |
| Canles | 2 canles |
| Rated Power (RMS) @ 14.4V | 2 x 110 W @ 4 ohms 2 x 180 W @ 2 ohms 1 x 360 W @ 4 ohms (bridged) |
| Potencia máxima de saída | 360 vatios |
| Vol. Operativotage | 14.4 Volts (nominal) |
| Procesamento do sinal | 12 dB/octave High-Pass or Low-Pass Filter |
| Rango de frecuencia de filtro | 50 - 500 Hz (variable) |
| Entradas | Low-Level (RCA), High-Level (Speaker Level) |
| Saídas | Pass-Through Preamp Saídas |
| Dimensións (L x W x H) | 41.4 x 24.13 x 9.65 cm (aprox. 16.3 x 9.5 x 3.8 polgadas) |
| Peso | 3.86 kg (8.5 lb) |
7. Garantía e soporte
For warranty information, please refer to the documentation included with your purchase or visit the official JL AUDIO websitio. Garde o recibo da compra como xustificante de compra para reclamacións de garantía.
For technical support or service inquiries, please contact JL AUDIO customer service or an authorized JL AUDIO dealer. Contact information can typically be found on the manufacturer's websitio web ou na embalaxe do produto.
Nota: O fabricante non proporciona información sobre a dispoñibilidade de pezas de reposto.