1. Introdución
Grazas pola compraasing the Caliber RMD 068-2 Car Radio USB/SD Player. This manual provides detailed instructions for the installation, operation, and maintenance of your new car radio. Please read this manual thoroughly before using the product to ensure proper functionality and safety. Keep this manual for future reference.
2. Información de seguridade
- Instalación: Ensure the unit is installed by a qualified technician to prevent damage to the vehicle's electrical system. Incorrect wiring can cause fire or electrical shock.
- Fonte de alimentación: Connect the unit only to a 12V DC car battery with a negative ground.
- Fusibles: Always replace fuses with new ones of the specified rating. Using an incorrect fuse can cause damage to the unit or vehicle.
- Nivel de volume: Do not operate the unit at excessively high volume levels, as this may impair your ability to hear external traffic sounds and could be dangerous.
- Limpeza: Use un pano suave e seco para a limpeza. Non use produtos de limpeza ou disolventes abrasivos.
- Humidade: Non expoña a unidade á humidade ou á auga.
3. Contido do paquete
Comprobe que estean presentes todos os elementos:
- Caliber RMD 068-2 Car Radio Unit
- Panel frontal desmontable
- Arnés de cableado ISO
- Marco de montaxe
- Chaves de desmontaxe (2 unidades)
- Manual de usuario (este documento)
4. Produto rematadoview
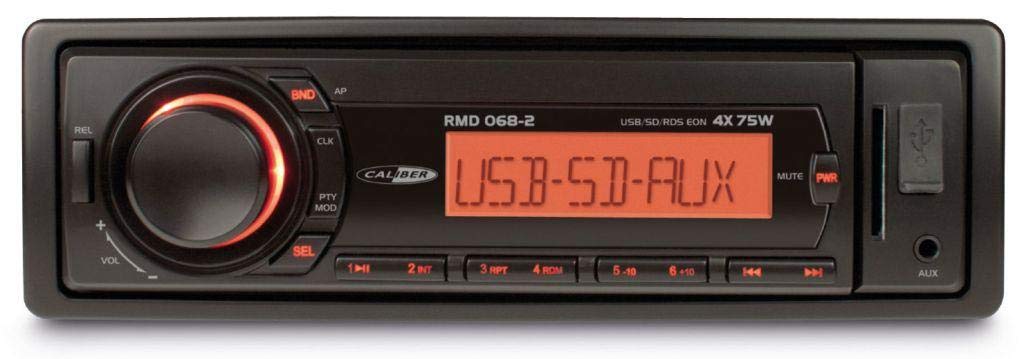
Figura 1: Fronte view of the Caliber RMD 068-2 Car Radio. This image shows the main unit with its detachable front panel, including the display, control buttons, USB port, and SD card slot.
4.1 Controis do panel frontal
- Botón de ENCENDIDO/MODO: Press to turn on/off. Short press to switch between Radio, USB, SD, AUX modes.
- Botón VOLUME: Rotate to adjust volume. Press to access audio settings (Bass, Treble, Balance, Fader).
- MOSTRA: Shows current time, radio frequency, track information, etc.
- Porto USB: Conecta unidades flash USB para reproducir contido multimedia.
- Ranura para tarxetas SD: Insira tarxetas SD para reproducir contido multimedia.
- Entrada AUX (conector de 3.5 mm): Conecta dispositivos de audio externos.
- Botón BAND/AMS: In radio mode, press to select radio band (FM1, FM2, FM3). Long press for Automatic Memory Store.
- PRESET Buttons (1-6): Store and recall radio stations. In USB/SD mode, use for direct track selection.
- Botón REPRODUCIR/PAUSA: Play or pause media playback.
- FORWARD/BACKWARD Buttons: Skip tracks or tune radio frequency.
- EJECT Button: Release the detachable front panel.
4.2 Conexións traseiras
The rear of the unit features standard ISO connectors for power and speakers, along with an antenna input.
- ISO Power Connector: For connecting to the vehicle's power supply (constant 12V, ignition 12V, ground).
- ISO Speaker Connector: For connecting to the vehicle's speakers (Front Left, Front Right, Rear Left, Rear Right).
- Entrada de antena: Para conectar a antena de radio do coche.
5. Configuración
5.1 Instalación
- Desconectar batería: Before starting, disconnect the negative terminal of your car battery to prevent short circuits.
- Eliminar a unidade antiga: Carefully remove your existing car radio from the dashboard.
- Instalar o marco de montaxe: Insert the supplied mounting frame into the dashboard opening and bend the tabs to secure it.
- Conectar cableado: Refer to the wiring diagram in section 5.2. Connect the ISO wiring harness to the car's wiring and then to the Caliber RMD 068-2 unit. Connect the antenna cable.
- Slide Unit In: Carefully slide the Caliber RMD 068-2 unit into the mounting frame until it clicks into place.
- Volver conectar a batería: Reconnect the negative terminal of your car battery.
- Fixar o panel frontal: Attach the detachable front panel to the main unit.
5.2 Diagrama de cableado
The Caliber RMD 068-2 uses standard ISO connectors. Ensure correct connections as shown below. If your vehicle does not have ISO connectors, an adapter may be required.
| Pin No. | Cor do cable (típica) | Función |
|---|---|---|
| 4 | Amarelo | 12 V constantes (batería) |
| 7 | Vermello | 12 V conmutado (encendido) |
| 8 | Negro | Terra |
| 5 | Azul | Antenna Remote Out |
| Pin No. | Cor do cable (típica) | Función |
|---|---|---|
| 1 | Roxo | Parte traseira dereita (+) |
| 2 | Morado/Negro | Parte traseira dereita (-) |
| 3 | Verde | Parte traseira esquerda (+) |
| 4 | Verde/Negro | Traseiro Esquerdo (-) |
| 5 | Gris | Fronte dereita (+) |
| 6 | Gris/Negro | Fronte dereita (-) |
| 7 | Branco | Fronte esquerdo (+) |
| 8 | Branco/Negro | Fronte Esquerdo (-) |
Note: Wire colors may vary depending on vehicle manufacturer. Always consult your vehicle's wiring diagram.
6. Instrucións de funcionamento
6.1 Funcións básicas
- Encendido/apagado: Preme o POTENCIA / MODO botón para acender ou apagar a unidade.
- Control de volume: Xire o VOLUME botón no sentido das agullas do reloxo para aumentar o volume, no sentido antihorario para diminuír.
- Selección de modo: Prema brevemente o POTENCIA / MODO button to cycle through available modes: Radio (FM), USB, SD, AUX.
- Configuración de audio: Preme o VOLUME knob to enter audio settings. Rotate the knob to select settings like BASS, TREBLE, BALANCE, FADER. Press the knob again to confirm or move to the next setting.
6.2 Funcionamento da radio
- Selección de bandas: No modo Radio, prema a tecla BANDA / AMS button to switch between FM1, FM2, and FM3 bands.
- Sintonización manual: Prema brevemente o ADIANTE/ATRÁS botóns para axustar con precisión a frecuencia.
- Busca automática: Mantén presionado ADIANTE/ATRÁS botóns para buscar automaticamente a seguinte emisora con boa frecuencia.
- Almacenar presets: Tune to your desired station. Long press one of the PRESET (1-6) buttons until you hear a beep. The station is now stored.
- Recuperar presets: Short press one of the PRESET (1-6) buttons to recall a stored station.
- Almacenamento automático na memoria (AMS): Mantén presionado BANDA / AMS para buscar e gardar automaticamente as emisoras máis fortes nas presintonías da banda actual.
6.3 Reprodución USB/SD
- Inserir soporte: Insert a USB flash drive into the USB port or an SD card into the SD card slot. The unit will automatically switch to USB/SD mode and begin playback.
- Reproducir/Pausa: Preme o REPRODUCIR/PAUSA botón para pausar ou retomar a reprodución.
- Saltar pista: Prema brevemente o ADIANTE/ATRÁS botóns para saltar á pista seguinte ou anterior.
- Avance/Rebobinado rápido: Mantén presionado ADIANTE/ATRÁS botóns para avanzar ou retroceder rapidamente dentro dunha pista.
- Navegación de cartafoles: Usa o PRESET 5 e PRESET 6 buttons to navigate between folders on your USB/SD media.
6.4 Entrada AUX
- Conectar dispositivo: Connect your external audio device (e.g., smartphone, MP3 player) to the 3.5mm AUX input jack on the front panel using an audio cable.
- Seleccionar o modo AUX: Preme o POTENCIA / MODO button repeatedly until "AUX" is displayed.
- Control de reprodución: Control playback (play, pause, skip) directly from your connected external device. The car radio will control the volume.
7. Mantemento
- Limpeza da unidade: Use a soft, dry cloth to wipe the front panel and display. Do not use harsh chemicals, cleaning sprays, or abrasive cloths, as these can damage the surface.
- Panel frontal extraíble: When detaching the front panel, handle it carefully. Store it in a protective case (if supplied) to prevent scratches or damage.
- Portos USB/SD: Keep the USB port and SD card slot free from dust and debris.
8 Solución de problemas
| Problema | Causa posible | Solución |
|---|---|---|
| Sen poder | Fusible fundido; Cableado incorrecto; Conexión solta | Check and replace fuse; Verify wiring connections (Yellow to constant 12V, Red to ignition 12V, Black to ground); Ensure front panel is securely attached. |
| Sen son | Volume too low; Mute activated; Incorrect speaker wiring; Damaged speakers | Increase volume; Check if mute is active; Verify speaker connections; Test with known good speakers. |
| Mala recepción de radio | Antenna not connected; Damaged antenna; Weak signal area | Ensure antenna is securely connected; Check antenna for damage; Try tuning to a stronger station or move to a different location. |
| Non se reproduce o USB/SD | Non é compatible file format; Corrupted media; Incorrectly inserted media; Max capacity exceeded | Garantir files are MP3/WMA format; Try a different USB/SD card; Reinsert media correctly; Check media capacity (max 32GB recommended). |
| Front panel cannot be detached | Eject button not fully pressed; Mechanism jammed | Press the EJECT button firmly; Do not force the panel. |
If the problem persists after trying these solutions, please contact your dealer or a qualified service center.
9. Especificacións
- Modelo: Caliber RMD 068-2
- Potencia de saída: 4 x 75 Watts Max
- Fonte de alimentación: 12V DC (10.8V-15.6V), Negative Ground
- Fusible: 10A
- Formatos de audio admitidos: MP3, WMA (via USB/SD)
- USB/SD Compatibility: Ata 32 GB (formato FAT32)
- Sintonizador FM: RDS, 18 Presets
- Entrada AUX: Conector estéreo de 3.5 mm
- Panel frontal extraíble: Si
- Peso: Aproximadamente 0.95 kg (2.09 lbs)
10. Garantía e soporte
This Caliber product is covered by a warranty in accordance with applicable European laws. For detailed warranty terms and conditions, please refer to the warranty card included with your product or visit the official Caliber website. For technical support, troubleshooting assistance, or service inquiries, please contact your authorized Caliber dealer or the customer service department in your region. Please have your product model number (RMD 068-2) and proof of purchase ready when contacting support.
Note: Specifications and design are subject to change without notice for improvement.