
Irritrol RD900-INT-R
Irritrol Rain Dial RD900-INT-R 9-Station Indoor Irrigation Controller User Manual
Model: RD900-INT-R
1. Introdución
This manual provides comprehensive instructions for the installation, setup, operation, and maintenance of your Irritrol Rain Dial RD900-INT-R 9-Station Indoor Irrigation Controller. This controller is designed for residential indoor use, offering efficient and flexible irrigation management for your landscape. Please read this manual thoroughly before installation and operation to ensure proper function and longevity of your device.

Image 1.1: Irritrol Rain Dial RD900-INT-R controller, power adapter, and user manual.
The image displays the Irritrol Rain Dial RD900-INT-R irrigation controller, which is gray with a blue control panel. The control panel features an LCD screen, a large rotary dial for mode selection, and various buttons for programming. A power adapter and a printed instruction manual are also visible next to the controller.
2. Información de seguridade
- Read all instructions carefully before operating the controller.
- Asegúrese de desconectar a fonte de alimentación antes de realizar calquera cableado ou mantemento.
- This controller is designed for indoor use only. Do not expose it to outdoor elements unless specifically housed in a weather-resistant enclosure.
- Do not attempt to repair or modify the controller. Refer all servicing to qualified personnel.
- Keep the controller away from water sources and excessive humidity.
3. Contido do paquete
Verifica que todos os elementos estean presentes no paquete:
- Irritrol Rain Dial RD900-INT-R Irrigation Controller
- Power Adapter (24Vac, 60Hz, 1.25A)
- Manual de usuario
- Ferraxes de montaxe (parafusos, ancoraxes)

Image 3.1: Contents of the Irritrol Rain Dial package.
This image shows the Irritrol Rain Dial controller in its closed gray casing, alongside its black power adapter and the printed instruction manual. The controller's front cover features the "RAIN DIAL" logo.
4. Instalación
4.1 Montaxe do controlador
- Choose a suitable indoor location that is protected from direct sunlight, extreme temperatures, and moisture.
- Use the provided mounting hardware to securely attach the controller to a wall. Ensure it is mounted vertically.
- Allow sufficient space around the controller for ventilation and access to wiring terminals.

Imaxe 4.1: Traseira view of the controller for mounting.
The image shows the back of the gray Irritrol Rain Dial controller, highlighting the molded plastic structure and a keyhole-shaped mounting point at the top center, along with two circular mounting points at the bottom.
4.2 Cableado do controlador
AVISO: Asegúrese de desconectar a alimentación antes de conectar o cableado.
- Open the controller's front cover to access the wiring terminal board.
- Conecta o cable común das túas válvulas de rega ao terminal marcado COM.
- Conecte cada cable da válvula de zona ao terminal numerado correspondente (1-9).
- If using a rain sensor, connect its wires to the designated sensor terminals.
- Conecte o adaptador de corrente fornecido ao ENTRADA 24 VAC terminais.
- Once all wiring is complete, plug the power adapter into a standard electrical outlet.

Image 4.2: Internal wiring connections.
The image displays the open Irritrol Rain Dial controller, revealing the internal components. A black plastic housing covers the main electronics, and a circuit board with screw terminals is visible. The terminals are labeled for zones 1 through 9, "COM" (common), and "24 VAC INPUT". A ribbon cable connects the main unit to the terminal board.
5. Configuración e programación iniciais
The Rain Dial controller features a user-friendly interface with a rotary dial and push buttons for programming.
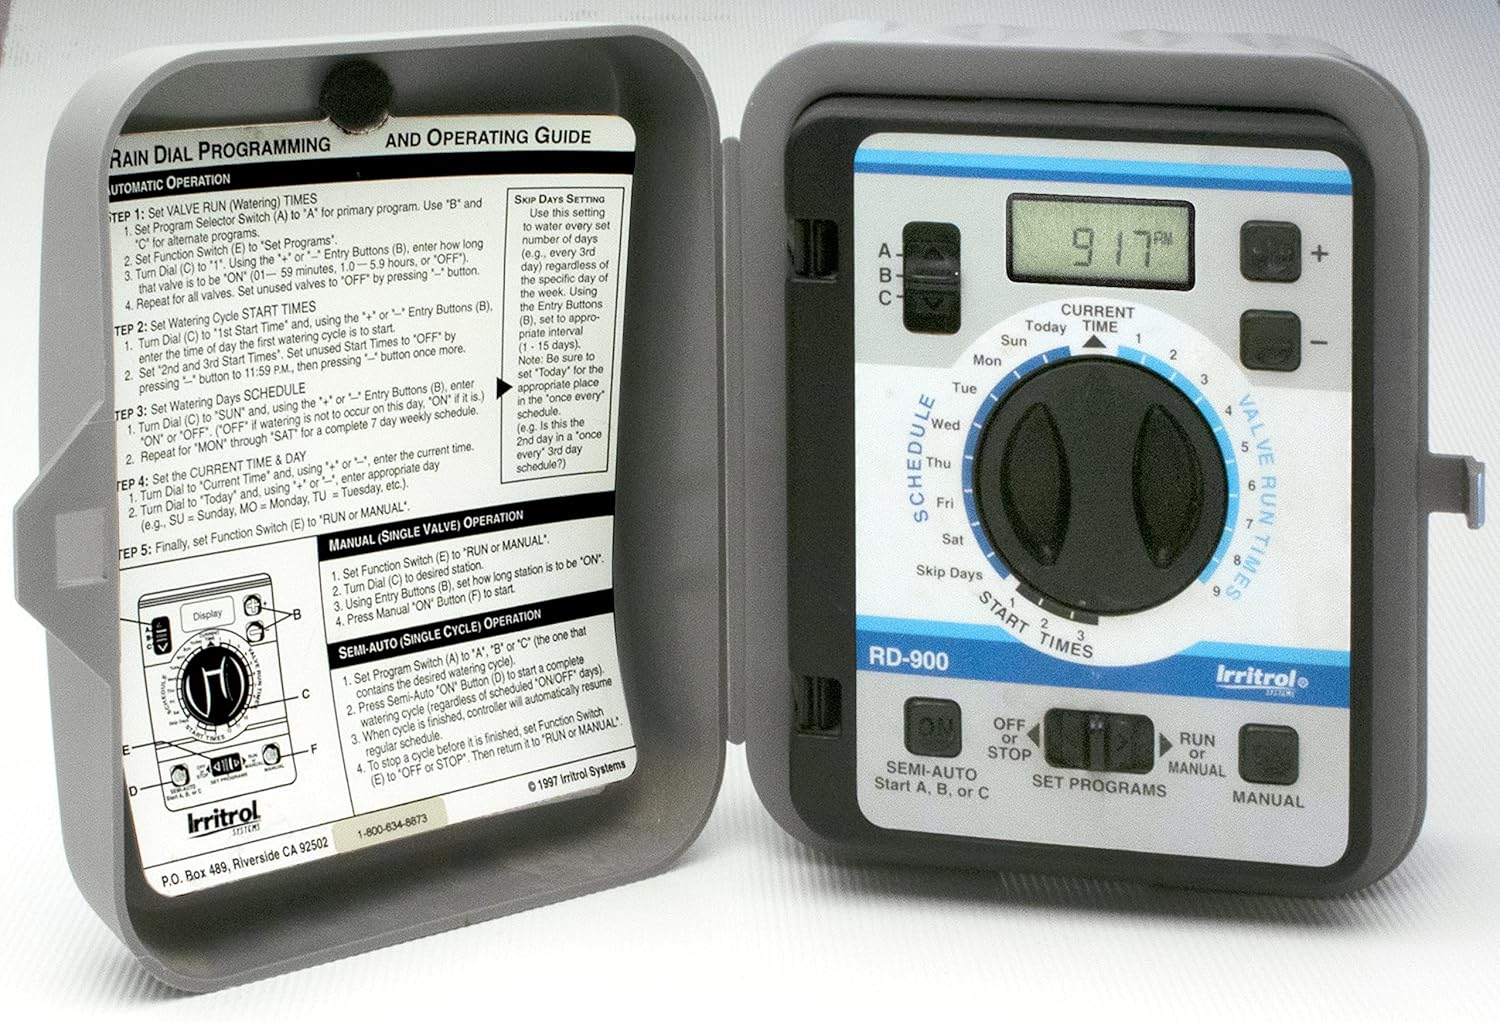
Image 5.1: Control panel and programming guide.
This close-up image shows the blue control panel of the Irritrol Rain Dial controller. The LCD screen displays "9:17 PM". The rotary dial is set to "CURRENT TIME". Various buttons for adjusting time, schedule, and programs are visible. A printed programming guide is attached to the inside of the controller's door, detailing steps for automatic and manual operation.
5.1 Axuste da hora e do día actuais
- Xire o dial rotativo para HORA ACTUAL.
- Usa o + e - botóns para axustar a hora actual.
- Usa o DÍA botón para configurar o día actual da semana.
5.2 Programación de horarios de rego
The controller supports three independent programs (A, B, C) for flexible watering.
- Xire o dial rotativo para SET PROGRAMS.
- Select the desired program (A, B, or C) using the A / B / C cambiar.
- Xire o disco para HORARIOS DE INICIO to set up to three start times per program. Use + e - botóns para axustar.
- Xire o disco para HORARIOS DA ESTACIÓN to set the watering duration for each station (valve). Use + e - botóns para axustar.
- Xire o disco para HORARIO to select watering days (e.g., specific days of the week, odd/even days, or interval watering).
- Once programming is complete, turn the dial to CORRER para o funcionamento automático.
Tip: Use the "Watering Schedule" chart inside the controller door to record your program settings for easy reference.
6. Funcionamento do controlador
6.1 Funcionamento automático
With the rotary dial set to CORRER, the controller will execute the programmed watering schedules automatically.
6.2 Funcionamento manual
To manually operate a station or program:
- Manual Station: Xire o disco para MANUAL. Usa o + e - buttons to select the station and set its run time. Press CORRER para comezar.
- Semi-Automatic Program: Xire o disco para SEMI-AUTO. Select program A, B, or C. Press CORRER para iniciar o programa seleccionado.
6.3 Funcións especiais
- Climate Logic Ready: The controller is compatible with the optional CLIMATE LOGIC Wireless Weather Sensing System. When connected, it automatically adjusts watering based on weather conditions, optimizing water usage.
- Rain Sensor Ready: A rain sensor can be connected to automatically suspend watering during rainfall. The controller includes a sensor bypass switch.
- Water Well Recovery: This feature allows for a delay between stations, which is beneficial for systems drawing water from a well, preventing pump overload.
7. Mantemento
- Keep the controller's exterior clean with a soft, damp pano. Non use produtos de limpeza abrasivos.
- Comprobe periodicamente as conexións dos cables para asegurarse de que estean ben fixadas.
- In areas prone to power outages, consider a surge protector for the power adapter.
- If the controller is stored for an extended period, remove the power adapter.
8 Solución de problemas
| Problema | Causa posible | Solución |
|---|---|---|
| A pantalla do controlador está en branco. | Sen corrente, adaptador de corrente defectuoso. | Check power outlet, ensure adapter is securely connected. Test adapter if possible. |
| Stations do not water. | Controller in OFF mode, rain sensor active, wiring issue, faulty valve. | Ensure dial is on RUN. Check rain sensor bypass. Verify wiring connections. Test valves manually. |
| Incorrect watering times/days. | Programación incorrecta. | Review and re-program start times, run times, and watering days as per Section 5.2. |
9. Especificacións
- Modelo: RD900-INT-R
- Estacións: 9
- Entrada: 24Vac, 60Hz, 1.25A (30VA)
- Saída: 24Vac, 60Hz, 1.0A Max Total, 0.5A Max Per Station
- Dimensións: 7.75 x 3.75 x 7 polgadas
- Peso do artigo: 4 libras
- Tipo de visualización: LCD ou LED
- Material: Plástico
- Fabricante: Irritrol
- UPC: 090258051817

Image 9.1: Product specification label.
The image shows a product label for the Irritrol Rain Dial controller, model RD900-INT. It lists electrical specifications including input (24Vac, 60Hz, 1.25A) and output (24Vac, 60Hz, 1.0A Max Total, 0.5A Max Per Station). It also indicates "FOR INDOOR USE ONLY" and includes UL listing marks.
10. Garantía e soporte
For warranty information and technical support, please refer to the documentation included with your product or visit the official Irritrol websitio. Garde o recibo da compra como xustificante da mesma.
Ask a question about this manual
Ask about setup, troubleshooting, compatibility, parts, safety, or missing instructions. Manuals+ will review the question and use this page’s manual context to help answer it.