
1. Introdución
The Emsco Group 2370 Hydropickers is a compact, non-electric hydroponic grow box designed to simplify hydroponic gardening. This system allows plants to grow without soil by suspending their roots directly in nutrient-rich water. Its non-electric design eliminates the need for pumps by shielding the water reservoir from sunlight, preventing algae growth and maintaining oxygen levels. The unit's compact size and integrated casters provide mobility, making it suitable for various indoor and outdoor settings.

Image 1.1: The Emsco Group 2370 Hydropickers system with various plants growing, showcasing its compact design and integrated casters.
2. Produto rematadoview
The Hydropickers system offers an accessible entry into hydroponic gardening. Key features include:
- Non-Electric Operation: No power source required, allowing flexible placement.
- Deseño compacto: Measures approximately 24" x 20", fitting in small spaces.
- Mobilidade: Equipped with 4 casters for easy relocation.
- Accelerated Growth: Direct nutrient delivery to roots promotes faster plant development compared to soil-based methods.
- Protección contra a luz solar: A closed top prevents sunlight from reaching the water reservoir, reducing algae growth and maintaining water quality without aeration pumps.
3. Lista de compoñentes
Comprobe que todos os compoñentes estean presentes antes de comezar a montaxe:
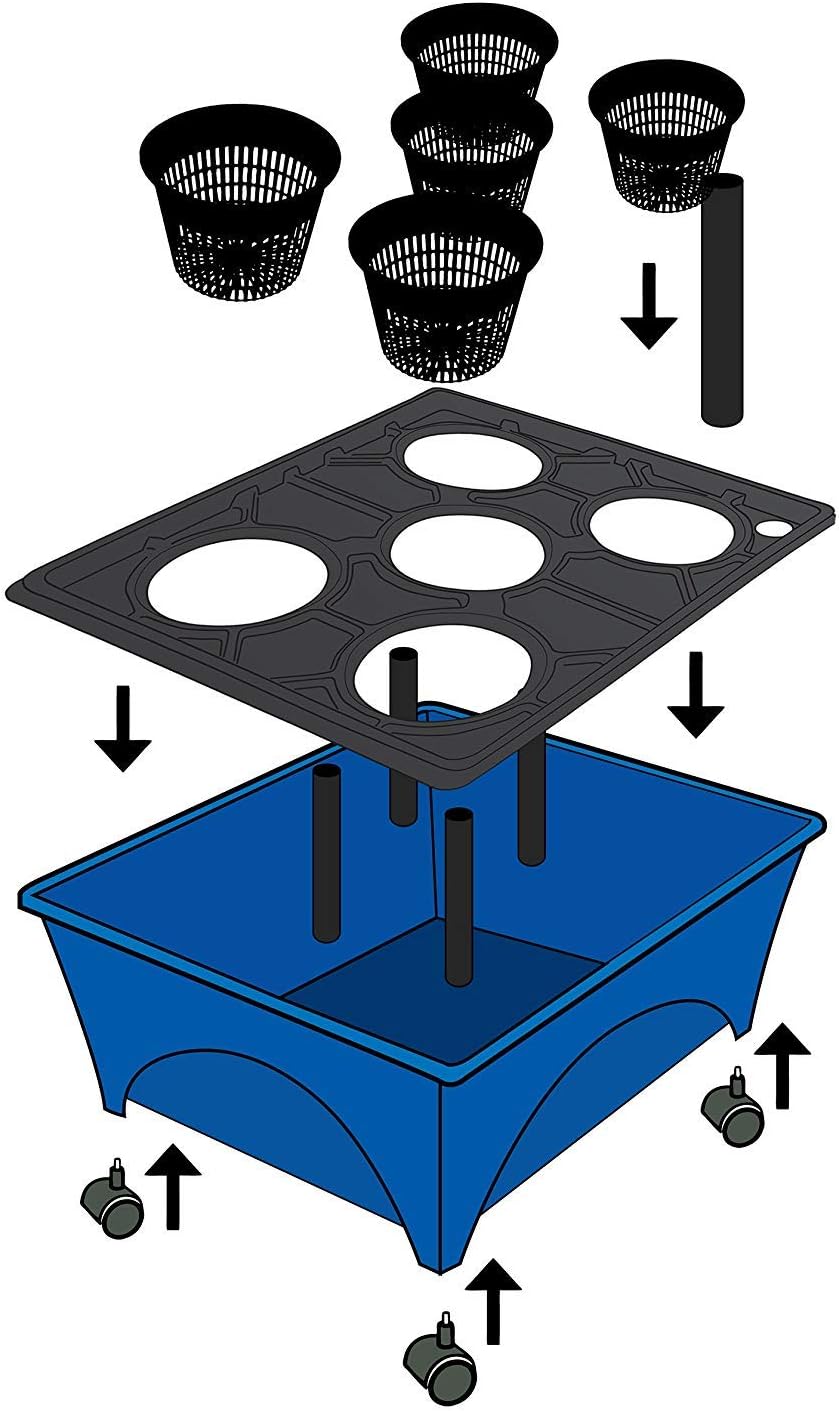
- 1 x Blue Grow Box (Reservoir)
- 1 x Tray (Lid with plant openings)
- 1 x Water Fill Tube
- 5 x Net Pots
- 4 x Rodas
- Coconut Coir Growth Media (included)
- Growth Nutrients (included)
- pH Testing Kit (included)

Imaxe 3.1: Explosión view illustrating the individual components of the Hydropickers system for assembly reference.
4. Instrucións de configuración
Follow these steps to assemble and prepare your Hydropickers system:
- Fixar rodas: Turn the blue grow box upside down. Insert the four casters into the designated holes at each corner of the base until they click securely into place.
- Place the Tray: Position the black tray (lid) onto the top of the blue grow box, ensuring it sits flush and covers the reservoir opening completely.
- Insert Water Fill Tube: Locate the small circular opening on the tray. Insert the water fill tube into this opening. This tube will be used for adding water and nutrients.
- Prepare Net Pots: Place a small amount of the provided coconut coir growth media into each net pot. This media will support your seedlings or young plants.
- Plant Seedlings: Gently place your desired seedlings or young plants into the net pots, ensuring their roots are positioned to grow downwards. Fill around the plant with more coconut coir if needed to secure it.
- Insert Net Pots: Place the filled net pots into the larger circular openings on the tray. Ensure they are seated firmly.
- Fill with Water and Nutrients: Using the water fill tube, carefully fill the reservoir with water. Add the recommended amount of hydroponic growth nutrients according to the nutrient package instructions. The water level should be high enough to reach the bottom of the net pots, allowing the roots to access the nutrient solution.
- Test pH: Use the included pH testing kit to measure the pH of the nutrient solution. Adjust as necessary to the optimal range for your specific plants (typically between 5.5 and 6.5 for most vegetables).
Imaxe 4.1: Fronte view of the assembled Hydropickers unit, ready for planting.
5. Instrucións de funcionamento
Consistent monitoring and replenishment are crucial for successful hydroponic growth.
5.1. Water and Nutrient Management
- Monitor de nivel de auga: Regularly check the water level through the fill tube. Replenish with fresh water as needed to ensure plant roots remain submerged in the nutrient solution.
- Reposición de nutrientes: As plants grow, they consume nutrients. Follow the instructions provided with your hydroponic nutrients for recommended replenishment schedules and concentrations. Typically, the entire nutrient solution should be replaced every 1-2 weeks to prevent nutrient imbalances and buildup.
- Monitorización do pH: Continue to use the pH testing kit to monitor the pH of the nutrient solution every few days. Maintain the pH within the optimal range for your plants to ensure proper nutrient uptake.
5.2. Plant Care
- Requisitos de luz: Ensure your plants receive adequate light. Place the Hydropickers in a location with sufficient natural light or supplement with grow lights if necessary.
- Poda: Prune plants as needed to encourage bushier growth and prevent overcrowding.
- Colleita: Harvest mature leaves or fruits as they become ready.

Image 5.1: A plant being removed from a net pot, illustrating the ease of access for plant care or harvesting.

Image 5.2: Harvesting fresh herbs from a plant grown in the Hydropickers system.
6. Mantemento
Regular maintenance ensures the longevity and efficiency of your Hydropickers system.
- Limpeza de depósitos: When replacing the nutrient solution, it is recommended to thoroughly clean the reservoir to prevent algae and bacterial buildup. Drain the old solution, rinse the reservoir with clean water, and gently scrub any residue.
- Net Pot Cleaning: After each growing cycle, clean the net pots and replace the coconut coir growth media.
- Inspección de fugas: Periodically inspect the grow box for any signs of leaks, especially around the base and seams. If a leak is detected, the unit may require sealing with a waterproof sealant.
7 Solución de problemas
Abordar os problemas habituais que poden xurdir durante a operación:
| Problema | Causa posible | Solución |
|---|---|---|
| Slow Plant Growth | Incorrect pH, insufficient nutrients, inadequate light, water temperature issues. | Check and adjust pH. Replenish or change nutrient solution. Ensure proper lighting. Maintain optimal water temperature (65-75°F / 18-24°C). |
| Algae Growth in Reservoir | Lid not fully sealed, allowing light into the reservoir. | Ensure the lid is securely in place and completely blocks light. Clean the reservoir thoroughly. |
| Fuga de auga | Cracked reservoir or poor seal. | Empty and dry the unit. Inspect for cracks. Apply a waterproof sealant to affected areas. |
| Wilting Plants | Lack of water, nutrient deficiency, root rot. | Check water level. Ensure roots are submerged. Verify nutrient concentration. Inspect roots for signs of rot (slimy, brown). |
8. Especificacións
| Característica | Detalle |
|---|---|
| Número de modelo | 2370 |
| Marca | Grupo Emsco |
| Material | Plástico |
| Cor | Azul cobalto |
| Dimensións do produto | 20" D x 24" W x 9.75" H |
| Peso do elemento | 9.7 libras |
| Capacidade | Approximately 1870 Fluid Ounces (55 Liters) |
| Características especiais | Portable, Self-Watering, Non-Electric |
| Uso interior/exterior | Interior |
| Compoñentes incluídos | Tray, Water Fill Tube, 5 Net Pots, 4 Casters, Blue Grow Box |
| UPC | 072358023703 |
9. Garantía e soporte
Specific warranty information for the Emsco Group 2370 Hydropickers is not provided in this manual. For details regarding product warranty, returns, or technical support, please refer to the product packaging or contact Emsco Group customer service directly.
Tamén podes visitar o sitio oficial Emsco Group Store on Amazon para obter información adicional sobre o produto e recursos de asistencia.