1. Introdución
The THOMSON CT390 is a compact and versatile radio alarm clock designed to provide timekeeping, radio entertainment, and alarm functions. It features an intuitive LCD display with touch controls, FM/MW radio tuning, dual alarms with a weekend function, and connectivity options including USB and AUX for external audio playback. This manual provides detailed instructions for setting up and operating your CT390 unit.
2. Información de seguridade
- Ensure the power adapter is connected to a compatible power outlet.
- Do not expose the unit to water, moisture, or extreme temperatures.
- Evite colocar a unidade preto de fontes de calor ou baixo a luz solar directa.
- Limpa a unidade cun pano suave e seco. Non empregues produtos de limpeza líquidos nin materiais abrasivos.
- Non intente desmontar nin reparar a unidade vostede mesmo. Encargue todo o mantemento a persoal cualificado.
3. Contido do paquete
Comprobe que todos os elementos estean presentes no paquete:
- THOMSON CT390 Radio Alarm Clock Unit
- Adaptador de alimentación
- External Temperature Sensor (for outdoor temperature display)
- Manual de usuario (este documento)
4. Produto rematadoview
4.1 Panel frontal e pantalla
The front panel features a large LCD display and touch-sensitive controls for various functions.
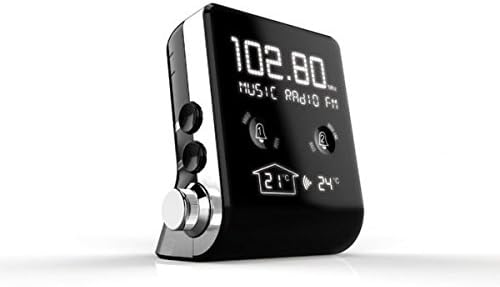
Imaxe 1: Fronte view of the THOMSON CT390, showing the LCD display with radio frequency (e.g., 102.80 MHz), 'MUSIC RADIO FM' text, two alarm bell icons, and indoor (21°C) and outdoor (24°C) temperature readings.

Imaxe 2: Fronte view of the THOMSON CT390, showing the LCD display with the current time (e.g., 0:20) and date (e.g., SU 01 JAN 2012). This view also shows the alarm icons and temperature readings at the bottom.
4.2 Side and Rear Controls/Ports
The side and rear panels house physical buttons, a rotary knob, and connection ports.

Imaxe 3: Laterais e traseiros view of the THOMSON CT390. Visible controls include 'SYNC TIME', 'DIMMER', 'SET', 'MODE' buttons, a 'TUNING/ADJUST' rotary knob, a USB port, and an AUX input jack.
4.3 Sensor de temperatura externo
The unit includes an external sensor for displaying outdoor temperature.

Imaxe 4: The THOMSON CT390 unit displayed alongside its compact white external temperature sensor, which wirelessly transmits outdoor temperature data to the main unit.
5. Configuración
5.1 Conexión de alimentación
- Connect the power adapter to the DC input jack on the rear of the CT390.
- Plug the power adapter into a standard wall outlet. The unit will power on and the display will illuminate.
5.2 Configuración inicial da data e da hora
The CT390 supports automatic time adjustment via RDS (Radio Data System) when tuned to an FM station that broadcasts time information. Manual setting is also possible.
- Automatic Setting (via RDS): Tune to an FM radio station. If the station broadcasts RDS time, the clock will automatically synchronize.
- Configuración manual:
- Press and hold the 'SET' button (refer to Image 3) to enter time setting mode.
- Use the 'TUNING/ADJUST' knob to adjust the hour, then press 'SET' to confirm.
- Repita para minutos, ano, mes e día.
- Press 'SET' again to exit the setting mode.
5.3 External Temperature Sensor Pairing
The external sensor should automatically pair with the main unit upon power-up. Ensure the sensor is placed in a suitable outdoor location, protected from direct rain and sunlight, for accurate readings.
6. Instrucións de funcionamento
6.1 Time and Date Display
The LCD display continuously shows the current time and date. Indoor and outdoor temperatures are also displayed.
6.2 Funcionamento da radio
- Encendido/apagado: Press the 'MODE' button to switch between radio and other modes.
- Selección de bandas: In radio mode, press 'MODE' to cycle between FM and MW bands.
- Afinación: Use the 'TUNING/ADJUST' knob to manually tune to a desired frequency.
- Escaneado automático: Press and hold the 'TUNING/ADJUST' knob to automatically scan for the next available station.
- Axuste de volume: Use the dedicated volume control (if present, otherwise the 'TUNING/ADJUST' knob might double as volume in certain modes).
6.3 Configuración da alarma
The CT390 features two independent alarms (Alarm 1 and Alarm 2) and a weekend function.
- Configurar unha alarma:
- Press the Alarm 1 or Alarm 2 touch icon on the front display to activate/deactivate.
- Press and hold the respective alarm icon to enter alarm setting mode.
- Use the 'TUNING/ADJUST' knob to set the alarm time (hour and minute), then press the alarm icon to confirm each step.
- Select the alarm source: Radio, Buzzer, or USB (if a USB device is connected).
- Confirm the alarm settings to exit.
- Weekend Function: Activate the weekend function to disable alarms on Saturdays and Sundays. This option is typically set during the alarm setup process.
- Función de Snooze: When an alarm sounds, press the 'SNOOZE' button (often a large button on top or a specific touch area) to temporarily silence the alarm for a few minutes.
- Deter unha alarma: To turn off a sounding alarm, press any button other than 'SNOOZE'. The alarm will reset for the next day.
6.4 Configuración da pantalla
Axusta o brillo da pantalla para un nivel óptimo viewing.
- Reguladores: Press the 'DIMMER' button (refer to Image 3) to cycle through different brightness levels for the LCD display.
Reprodución USB e AUX 6.5
Connect external audio devices for playback through the CT390's speaker.
- Reprodución USB: Insira unha unidade flash USB con MP3 files into the USB port. The unit should automatically switch to USB mode or require selection via the 'MODE' button.
- Entrada AUX: Connect an external audio device (e.g., smartphone, MP3 player) to the AUX input jack using a 3.5mm audio cable. Select AUX mode via the 'MODE' button.
7. Mantemento
To ensure the longevity and optimal performance of your THOMSON CT390:
- Wipe the unit with a soft, dry, lint-free cloth.
- Non empregues produtos de limpeza abrasivos, ceras ou disolventes, xa que poden danar o acabado.
- Manteña a unidade libre de po e residuos.
8 Solución de problemas
If you encounter issues with your CT390, refer to the following common problems and solutions:
| Problema | Causa posible | Solución |
|---|---|---|
| Time is inaccurate or drifts. | No RDS signal; manual setting error; internal clock drift. | Tune to an FM station with RDS. Manually reset the time. Ensure the unit is not subject to frequent power interruptions. |
| Non soa a alarma. | Alarm not activated; volume too low; weekend function active. | Ensure the alarm icon is displayed. Increase volume. Check weekend function settings. |
| Mala recepción de radio. | Weak signal; antenna not extended; interference. | Extend the FM wire antenna fully. Reposition the unit. Avoid placing near electronic devices that may cause interference. |
| A pantalla está demasiado escura ou demasiado brillante. | Axuste do regulador de intensidade. | Press the 'DIMMER' button to adjust brightness. |
| Outdoor temperature not displayed. | External sensor not paired or out of range; sensor battery low (if applicable). | Ensure the external sensor is within range of the main unit. Check for any battery compartment on the sensor. |
9. Especificacións
- Marca: Thomson
- Número de modelo: CT390
- Cor: Negro
- Material: Plástico
- Tipo de visualización: LCD dixital
- Bandas de radio: FM, MW
- Características especiais: Calendar, Alarm Function, Integrated Speakers, Indoor/Outdoor Temperature Display, USB Port, AUX Input
- Fonte de enerxía: AC (Mains Power)
- Peso do artigo: Aproximadamente 760 g
- Dimensións do paquete: 20.4 x 16.8 x 12.4 cm
10. Garantía e soporte
For warranty information and customer support, please refer to the documentation provided at the time of purchase or contact your local Thomson service center. Keep your proof of purchase for warranty claims.