Garantías importantes
Cando se utilicen aparellos eléctricos, deben seguirse sempre as precaucións básicas de seguridade para reducir o risco de incendio, descarga eléctrica e/ou lesións ás persoas, incluíndo as seguintes:
- Le todas as instrucións.
- Non toque superficies quentes. Use asas ou botóns.
- Para protexerse contra descargas eléctricas, non mergulle o cable, os enchufes ou o aparello en auga ou noutro líquido.
- É necesaria unha estreita supervisión cando calquera aparello é usado por nenos ou preto de eles.
- Desenchufe da toma cando non estea en uso e antes de limpalo. Deixar arrefriar antes de poñer ou quitar pezas e antes de limpar o aparello.
- Non fagas funcionar ningún electrodoméstico cun cable ou enchufe danados, ou despois de que o electrodoméstico funcione de forma avariada ou se dane de calquera xeito. Ponte en contacto co servizo de atención ao cliente para examinalo, reparalo ou axustalo.
- O uso de accesorios non recomendados polo fabricante do aparello pode provocar incendios, descargas eléctricas ou lesións ás persoas.
- Non use ao aire libre.
- Non deixes que o cable colgue do bordo da mesa ou do mostrador nin toque superficies quentes.
- Non o coloque sobre ou preto dun queimador eléctrico ou de gas quente, nin nun forno quente.
- Para desconectar, desactive calquera control e, a continuación, retire o enchufe da toma de corrente.
- Non use o aparello para outros usos que os previstos.
- A garrafa está deseñada para usar con este aparello. Nunca debe usarse nunha parte superior da cociña.
- Non coloque unha garrafa quente sobre unha superficie húmida ou fría.
- Non use unha garrafa rachada ou unha garrafa que teña o mango solto ou debilitado.
- Non limpe a garrafa con produtos de limpeza, almofadas de la de aceiro ou outros materiais abrasivos.
- Este aparello non está pensado para o seu uso por persoas (incluídos nenos) con capacidades físicas, sensoriais ou mentais reducidas, ou con falta de experiencia e coñecementos, a menos que teñan supervisión ou instrucións sobre o uso do aparello por unha persoa responsable da súa seguridade.
Produto rematadoview
The BLACK+DECKER 12-Cup Mill and Brew Coffee Maker offers integrated grinding and brewing for fresh coffee. It features programmable settings and a reusable filter for convenience.
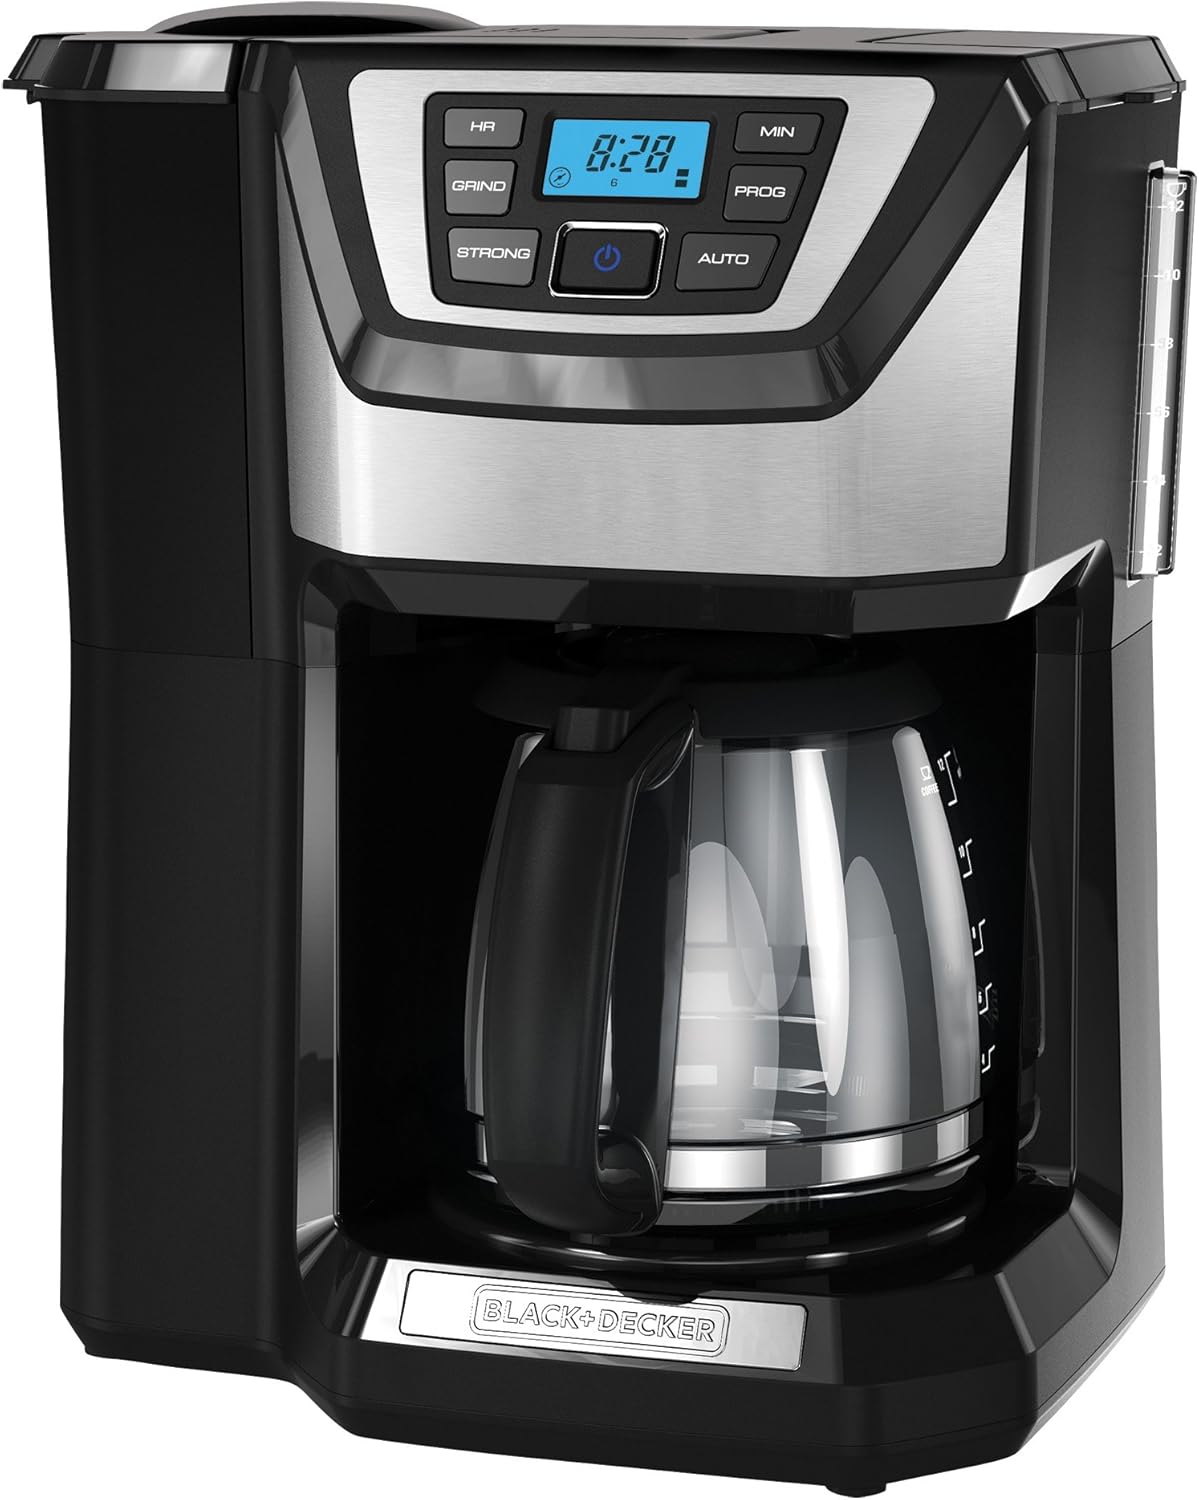
Imaxe: Fronte view of the BLACK+DECKER 12-Cup Mill and Brew Coffee Maker, black and stainless steel finish.
Características principais:
- Moedor integrado: Grinds whole beans directly before brewing for optimal flavor. Can be turned off for pre-ground coffee.
- Customizable Brew Strength: Select from regular, bold, or strong settings.
- Quick Touch Programming: 24-hour auto-brew feature with a backlit display.
- Función de Sneak-A-Cup: Temporarily stops coffee flow to allow pouring a cup mid-brew.
- Filtro reutilizable: Permanent bronze-tone filter eliminates the need for paper filters.

Image: Close-up of the QuickTouch programming panel with digital display and control buttons (HR, MIN, GRIND, STRONG, PROG, AUTO, Power).
Compoñentes incluídos:
- Coffee Maker Base Unit
- Xerra de vidro (capacidade para 12 cuncas)
- All-in-One Grinder/Filter Basket
- Bola de café

Image: The coffee maker base unit, glass carafe, and a coffee scoop displayed on a kitchen counter.
Configuración e primeiro uso
Antes do primeiro uso:
- Remove all packing materials, stickers, and plastic bands from the coffee maker.
- Wash the glass carafe, lid, and the all-in-one grinder/filter basket in warm, soapy water. Rinse thoroughly and dry.
- Limpe o exterior do aparello cun anuncioamp pano.
Priming the Coffee Maker:
To ensure proper operation and clean the internal components, run a cycle with water only.
- Fill the water reservoir with cold water up to the 12-cup mark.
- Place the empty all-in-one grinder/filter basket into its position.
- Coloque a xerra baleira coa tapa sobre a placa de quecemento.
- Conecta a cafeteira a unha toma de corrente.
- Prema o botón de acendido para iniciar o ciclo de preparación.
- Deixa que o ciclo se complete. Desbota a auga da xerra.
- Desenchufe o aparello e deixe arrefriar antes de limpalo.
Instrucións de funcionamento
Configuración do reloxo:
- Plug in the coffee maker. The display will flash '12:00'.
- Press the 'HR' button to set the hour. The 'PM' indicator will light up for PM hours.
- Prema o botón "MIN" para axustar os minutos.
- The clock will set automatically after a few seconds of inactivity.
Brewing Coffee with Whole Beans:
- Open the lid and fill the water reservoir with cold water to the desired level (e.g., 8 cups for 8 servings).
- Add whole coffee beans to the all-in-one grinder/filter basket. Use approximately 1 tablespoon of whole beans per cup. Do not exceed the 'MAX' fill line in the basket.
- Ensure the grinder/filter basket is securely in place.
- Place the carafe with its lid on the warming plate.
- Press the 'GRIND' button to activate the grinding function. The indicator light will illuminate.
- Select your desired brew strength by pressing the 'STRONG' button (Regular, Bold, Strong).
- Press the power button to start brewing. The coffee maker will grind the beans, then begin the brewing cycle.

Imaxe: De arriba abaixo view of the integrated grinder and permanent filter basket within the coffee maker.
Brewing Coffee with Pre-Ground Coffee:
- Follow steps 1-3 from 'Brewing Coffee with Whole Beans'.
- Add pre-ground coffee to the all-in-one grinder/filter basket. Use approximately 1 tablespoon of ground coffee per cup. Do not exceed the 'MAX' fill line.
- Press the 'GRIND' button to ensure the grinding function is desactivado (indicator light should be off).
- Select your desired brew strength by pressing the 'STRONG' button.
- Preme o botón de acendido para comezar a elaborar.
Using the Sneak-A-Cup Feature:
Esta función permíteche servir unha cunca de café antes de que remate o ciclo de preparación.
- During the brewing cycle, carefully remove the carafe from the warming plate. The flow of coffee will automatically pause.
- Verte a cantidade de café desexada.
- Immediately return the carafe to the warming plate to resume brewing. Do not leave the carafe off the plate for more than 20 seconds to prevent overflow.

Image: A stream of coffee being poured into a white mug, illustrating the Sneak-A-Cup feature.
Programming Auto Brew:
Set the coffee maker to automatically brew at a specific time.
- Asegúrate de que a hora actual estea configurada correctamente.
- Prepare the coffee maker with water and coffee (whole beans or ground) as described in the brewing sections.
- Press the 'PROG' button. The display will flash '12:00'.
- Press the 'HR' and 'MIN' buttons to set the desired auto-brew time.
- Press the 'PROG' button again to confirm the setting. The 'AUTO' indicator light will illuminate.
- A cafeteira comezará a preparar café automaticamente á hora programada.
Coidados e Limpeza
Regular cleaning helps maintain the performance and longevity of your coffee maker.
Limpeza diaria:
- Desenchufe sempre o aparello e deixe que se arrefríe completamente antes de limpalo.
- Remove the all-in-one grinder/filter basket. Discard used coffee grounds.
- Wash the grinder/filter basket and carafe (including lid) in warm, soapy water. These parts are also top-rack dishwasher safe.
- Limpe as superficies exteriores da cafeteira cun pano suave eamp pano. Non utilice produtos de limpeza abrasivos nin estropajos.
- Non mergulle a base da cafeteira en auga nin en ningún outro líquido.

Image: The all-in-one grinder and permanent filter assembly removed from the coffee maker, showing its components for easy cleaning.
Descalcificación (eliminación de depósitos minerais):
Mineral deposits (calcium) can build up in your coffee maker over time, affecting performance. Descale every 60-80 uses or monthly, depending on water hardness.
- Pour 4 cups of undiluted white vinegar into the water reservoir.
- Coloque unha xerra baleira no prato de quecemento.
- Prema o botón de acendido para iniciar un ciclo de preparación.
- Allow half of the vinegar solution to brew into the carafe, then press the power button to turn off the coffee maker.
- Let the coffee maker soak for at least 15 minutes to soften deposits.
- Press the power button to resume the brewing cycle and brew the remaining vinegar solution.
- Desbota a solución de vinagre da garrafa.
- Fill the water reservoir with fresh, cold water and run a full brewing cycle to rinse the system. Repeat this rinsing cycle at least twice.
Resolución de problemas
| Problema | Causa posible | Solución |
|---|---|---|
| O café non se prepara. | Coffee maker not plugged in; power button not pressed; auto-brew not set correctly. | Ensure appliance is plugged in. Press the power button. Check auto-brew settings. |
| O café é demasiado débil. | Not enough coffee grounds/beans; incorrect brew strength selected; mineral buildup. | Add more coffee. Select 'Bold' or 'Strong' brew strength. Descale the coffee maker. |
| O café reborda da cesta do filtro. | Too much coffee grounds/beans; filter basket not seated correctly; carafe not on warming plate. | Reduce amount of coffee. Ensure filter basket is properly inserted. Ensure carafe is on warming plate. |
| O moedor fai ruído ou non moe. | Beans jammed; grinder needs cleaning; 'GRIND' button not activated. | Clear any jammed beans. Clean the grinder thoroughly. Ensure 'GRIND' button is pressed for whole beans. |
| Water leaks from coffee maker. | Water reservoir overfilled; components not properly assembled. | Do not overfill water reservoir. Ensure all removable parts are correctly in place. |
Especificacións
- Marca: BLACK+DECKER
- Nome do modelo: Mill and Brew Coffee Maker
- Número de modelo: CM5000B
- Capacidade: 12-Copa
- Cor: Negro/Aceiro inoxidable
- Dimensións do produto: 10" D x 13.5" W x 15.5" H
- Peso do artigo: 9.5 libras
- Voltage: 110 V
- Características especiais: Permanent Filter, Programmable, Timer, Integrated Grinder, Sneak-A-Cup
- Tipo de entrada de café: Both Whole Beans and Grounds
- UPC: 050875802438

Image: The coffee maker with dimensions labeled: 15.5 inches height, 13.5 inches width, 10 inches depth.
Garantía e Atención ao Cliente
Para obter información sobre a garantía, o rexistro do produto ou a atención ao cliente, consulte a tarxeta de garantía incluída co produto ou visite o sitio web oficial de BLACK+DECKER websitio. Garde o recibo da compra como proba de compra para calquera reclamación de garantía.
Soporte en liña: www.blackanddecker.com/apoio
Asistencia telefónica: Consulte a documentación do produto para obter os números de contacto rexionais.