D-Link G403/E
Manual do usuario do enrutador intelixente 4G D-Link EAGLE PRO AI N300 (modelo G403/E)
Guía completa para a configuración, o funcionamento e o mantemento
1. Introdución
This manual provides detailed instructions for the installation, configuration, and operation of your D-Link EAGLE PRO AI N300 4G Smart Router, Model G403/E. Please read this manual thoroughly before using the device to ensure proper setup and optimal performance.
The D-Link G403/E is a versatile 4G LTE Router designed to provide high-speed internet access via a SIM card, offering Cat 4 150 Mbps LTE speeds and WiFi N 300 Mbps for your local network. It includes multiple LAN ports and a WAN port for flexible connectivity.
2. Contido do paquete
Before proceeding with the installation, please verify that your package contains the following items:
- D-Link EAGLE PRO AI N300 4G Smart Router (Model G403/E)
- Adaptador de alimentación
- Cable Ethernet
- Quick Installation Guide (This manual serves as a detailed guide)
- Adaptador de tarxeta SIM (se corresponde)
If any items are missing or damaged, please contact your retailer or D-Link support immediately.
3. Acabado o hardwareview
3.1 Panel frontal

Figura 3.1: Fronte view of the D-Link G403/E router, showing the D-Link logo and LED indicators for Power, Internet, Wi-Fi, and Signal Strength.
O panel frontal do enrutador inclúe varios indicadores LED que proporcionan información de estado en tempo real:
- LED de alimentación: Indica o estado de alimentación do dispositivo.
- LED de Internet: Shows the status of the internet connection (4G LTE or WAN).
- LED Wi-Fi: Indica o estado da rede sen fíos.
- LED de intensidade do sinal: Mostra a intensidade do sinal 4G LTE.
3.2 Panel posterior

Figura 3.2: Traseira view of the D-Link G403/E router, displaying the SIM card slot, LAN ports, WAN port, power input, and power button.
The rear panel provides all the necessary connection ports and buttons:
- Ranura para tarxeta SIM: Insira aquí a súa tarxeta SIM 4G LTE.
- Portos LAN (LAN1-LAN4): Four Fast Ethernet ports for connecting wired devices.
- Porto WAN: One Fast Ethernet port for connecting to a traditional broadband modem (e.g., DSL/Cable) if not using 4G LTE.
- Power Input (12V 1A): Conecte aquí o adaptador de corrente fornecido.
- Botón de acendido / apagado: Úsase para acender ou apagar o router.
- Botón de reinicio: A small pinhole button to restore factory default settings.
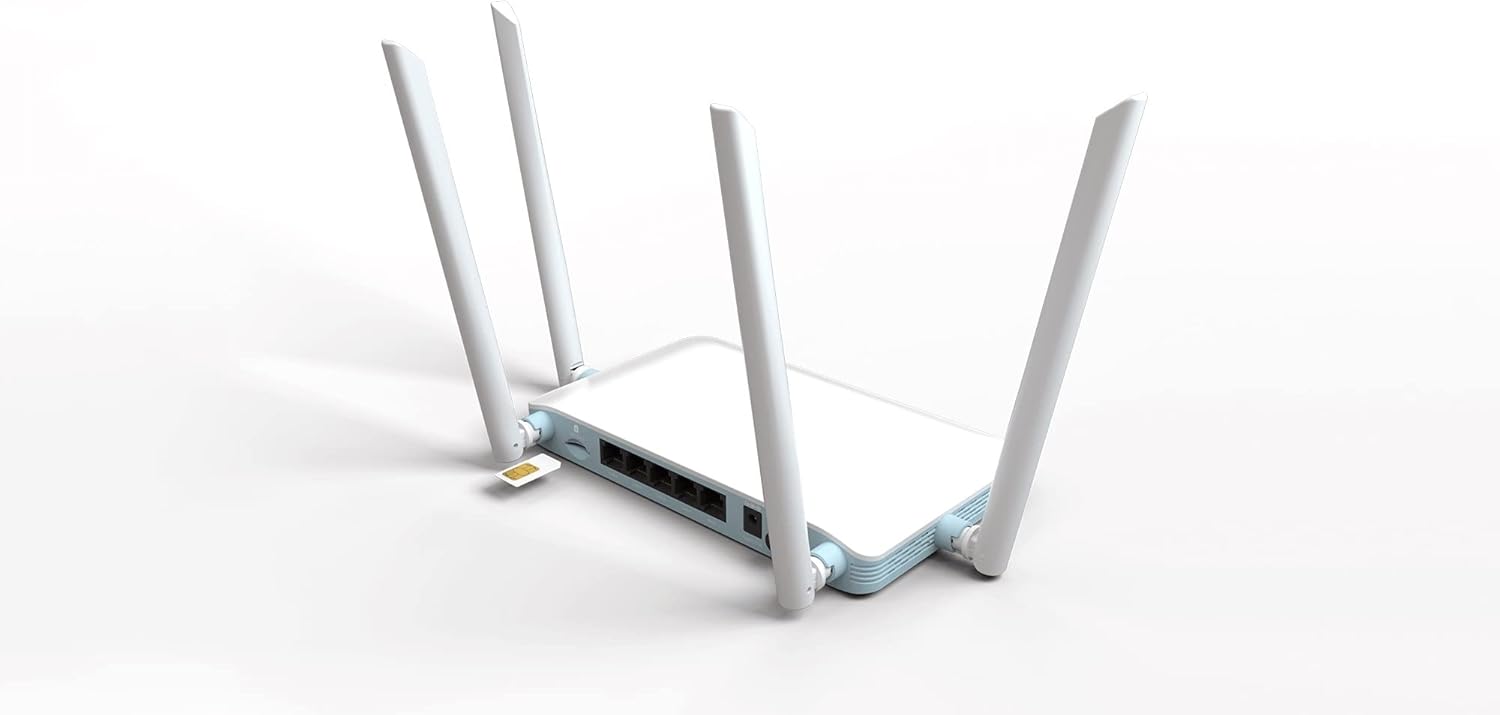
Figura 3.3: detallada view of the SIM card slot on the D-Link G403/E router, showing how a SIM card is inserted.
4. Configuración e instalación
4.1 Instalación da tarxeta SIM
- Asegúrese de que o enrutador estea apagado.
- Localiza a ranura para a tarxeta SIM no panel traseiro.
- Insert your standard-sized 4G LTE SIM card into the slot with the gold contacts facing down and the notched corner oriented correctly. Push until it clicks into place. If using a Nano or Micro SIM, ensure it is placed in a suitable adapter before insertion.
- To remove the SIM card, gently push it in until it clicks, then release, and it will eject.
4.2 Acendido do enrutador
- Connect the provided power adapter to the Power Input port on the rear of the router.
- Plug the other end of the power adapter into a wall outlet or power strip.
- Press the Power On/Off button. The Power LED on the front panel should illuminate.
4.3 Configuración inicial (Web Interface)
After powering on, you can access the router's web-based management interface for detailed configuration.
- Conectar ao enrutador:
- Conexión por cable: Connect an Ethernet cable from one of the LAN ports (LAN1-LAN4) on the router to your computer's Ethernet port.
- Conexión sen fíos: On your computer or mobile device, connect to the default Wi-Fi network name (SSID) printed on the label on the bottom of the router. The default Wi-Fi password (WPA/WPA2 Key) is also on this label.
- Accede a Web Interface: Abrir a web navegador (por exemplo, Chrome, Firefox, Edge) e escribe o enderezo IP predeterminado do enrutador na barra de enderezos. Isto adoita ser
192.168.0.1or192.168.1.1. Refer to the label on the bottom of your router for the exact IP address and default login credentials. - Iniciar sesión: Enter the default username and password. The default username is usually
admin, and the password might beadmin,password, or blank. It is highly recommended to change the default password immediately after your first login for security purposes. - Siga o asistente de configuración: The first time you log in, a setup wizard may guide you through basic configurations such as changing the administrator password, setting up the time zone, and configuring your internet connection (4G LTE or WAN).
- Configure 4G LTE Connection: If using a SIM card, the router should automatically detect your mobile network and configure the APN settings. If not, you may need to manually enter the APN, username, and password provided by your mobile network operator.
- Configurar a configuración Wi-Fi: Change the default Wi-Fi network name (SSID) and password to something unique and secure.
5. Funcionamento do enrutador
5.1 Conectividade a Internet
Once configured, the router will establish an internet connection via the inserted 4G LTE SIM card or the WAN port. The Internet LED on the front panel will indicate the connection status.
- Green/Solid: Conectado a internet.
- Vermello/Intermitente: No internet connection or connection error.
5.2 Rede sen fíos (Wi-Fi)
The router broadcasts a Wi-Fi signal for wireless devices. You can connect smartphones, tablets, laptops, and other Wi-Fi enabled devices to this network using the configured SSID and password.
- The router supports Wi-Fi N 300 Mbps, compatible with 802.11n, 802.11b, and 802.11g standards.
- For optimal performance, ensure your devices are within the router's Wi-Fi range.
5.3 Wired Network (LAN)
Use the four Fast Ethernet LAN ports to connect wired devices such as desktop computers, smart TVs, gaming consoles, or network printers for stable and high-speed local network access.
5.4 Modo de punto de acceso
The D-Link G403/E router supports Access Point (AP) mode. In AP mode, the device extends an existing wired network wirelessly. This is useful if you already have a router and want to add Wi-Fi capabilities or extend your current Wi-Fi coverage.
To configure AP mode, access the web interface and navigate to the operating mode settings. Connect the router's WAN port to a LAN port on your existing router.
6. Mantemento
6.1 Actualizacións de firmware
Regularly check for and install firmware updates from the official D-Link websitio. As actualizacións do firmware poden mellorar o rendemento, engadir novas funcións e solucionar vulnerabilidades de seguridade.
- Visit the D-Link support websitio para a súa rexión.
- Busca your model (G403/E) and download the latest firmware.
- Acceder ao enrutador web interface and navigate to the firmware upgrade section (usually under System or Administration).
- Cargue o firmware descargado file and follow the on-screen instructions. Do not power off the router during the update process.
6.2 Colocación do router
For optimal Wi-Fi coverage and signal strength, place the router in a central location, away from obstructions, metal objects, and devices that emit radio frequency interference (e.g., microwaves, cordless phones).
6.3 Limpeza
Manteña o enrutador limpo e libre de po. Use un pano suave e seco para limpar o exterior. Non empregue produtos de limpeza líquidos nin aerosois.
6.4 Restablecemento dos valores predeterminados de fábrica
If you encounter persistent issues or forget your login password, you can reset the router to its factory default settings. This will erase all custom configurations.
- With the router powered on, locate the small pinhole Reset button on the rear panel.
- Use a paperclip or a similar pointed object to press and hold the Reset button for approximately 10 seconds.
- Release the button when the Power LED blinks or the router reboots.
- The router will restart with factory default settings. You will need to reconfigure it.
7 Solución de problemas
7.1 Sen conexión a Internet
- Comproba a tarxeta SIM: Asegúrate de que a tarxeta SIM estea inserida correctamente e activa co teu provedor de rede móbil.
- Potencia do sinal: Check the Signal Strength LEDs on the front panel. If the signal is weak, try repositioning the router.
- Configuración de APN: Verify that the APN settings in the router's web interface coincida coas proporcionadas polo seu operador de rede móbil.
- Conexión WAN: If using the WAN port, ensure the Ethernet cable is securely connected to your modem and the modem is working correctly.
- Reiniciar: Apague e reinicie o enrutador (apágueo, agarde 10 segundos e acendao).
7.2 Problemas de conexión Wi-Fi
- Check Wi-Fi LED: Ensure the Wi-Fi LED on the front panel is illuminated.
- Contrasinal correcto: Verifica que estás a introducir o contrasinal wifi correcto.
- Rango de sinal: Move closer to the router to check if it's a range issue.
- Interferencia: Reducir a interferencia doutros dispositivos electrónicos.
- Reinicio do router: Reinicie o router.
7.3 Non se pode acceder Web Interface
- Enderezo IP: Asegúrate de que estás a usar o enderezo IP correcto (por exemplo,
192.168.0.1). - Conexión: Verifica que o teu dispositivo estea conectado ao enrutador mediante Wi-Fi ou Ethernet.
- Caché do navegador: Limpar o seu web a caché e as cookies do navegador ou proba cun navegador diferente.
- Cortafuegos/Antivirus: Desactiva temporalmente calquera cortafuegos ou software antivirus do teu ordenador que poida estar a bloquear o acceso.
- Restablecer o enrutador: Se todo o demais falla, realice un restablecemento de fábrica (consulte a Sección 6.4).
8. Especificacións
| Característica | Descrición |
|---|---|
| Nome do modelo | Router intelixente EAGLE PRO AI N300 4G |
| Número de modelo | G403/E |
| Marca | D-Link |
| Categoría 4G LTE | Cat 4 (Up to 150 Mbps Download) |
| Wi-Fi estándar | 802.11n/b/g (Wi-Fi N 300 Mbps) |
| Clase de banda de frecuencia | Dobre banda |
| Portos Ethernet | 4 x LAN Fast Ethernet, 1 x WAN Fast Ethernet |
| Características especiais | Modo Punto de Acceso |
| Dimensións (L x W x H) | 26 x 25 x 6 cm (aprox.) |
| Peso | 290 g (aprox.) |
| Entrada de enerxía | 12V 1A |
9. Garantía e soporte
For warranty information and technical support, please refer to the warranty card included with your product or visit the official D-Link support website for your region. The D-Link website provides up-to-date drivers, firmware, and troubleshooting resources.
Oficial de D-Link Websitio: www.dlink.com
Please have your product model number (G403/E) and serial number ready when contacting support.