
Introdución
This manual provides essential instructions for the safe and effective use, assembly, operation, maintenance, and troubleshooting of your Mintcraft SX-8B 2 Gallon Polyethylene Compression Sprayer. Please read this manual thoroughly before operating the sprayer and retain it for future reference.
The Mintcraft SX-8B is a general-purpose pressure sprayer designed for applying water, fertilizers, herbicides, and pesticides. It features a non-corrosive polyethylene construction, a heavy-duty hose, and a sprayer wand with an adjustable nozzle and on/off trigger lock.
Información importante de seguridade
ADVERTENCIA: O incumprimento destas instrucións de seguridade pode provocar lesións graves ou danos materiais.
- Always wear appropriate personal protective equipment (PPE) such as gloves, eye protection, and a mask when handling chemicals.
- Never use flammable liquids, hot liquids, or caustic chemicals in this sprayer.
- Do not over-pressurize the sprayer. Follow the recommended pressure levels.
- Keep the sprayer out of reach of children and pets.
- Libere a presión do pulverizador despois de cada uso e antes do almacenamento ou mantemento.
- Ensure all connections are tight before pressurizing.
- Do not leave the sprayer unattended while pressurized.
- Dispose of chemical residues according to local regulations.
Lista de pezas
Familiarize yourself with the components of your sprayer:
- Sprayer Tank (2 Gallon Polyethylene)
- Pump Assembly (with handle)
- Válvula de liberación de presión
- Mangueira
- Varita pulverizadora
- Boquilla axustable
- Bloqueo do gatillo
- Shoulder Strap (if included)
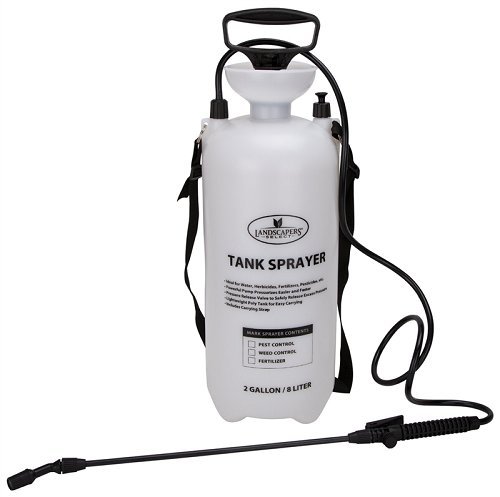
Image: The Mintcraft SX-8B 2 Gallon Polyethylene Compression Sprayer, showing the main tank, pump handle, hose, and wand assembly.
Configuración e montaxe
- Desempaquetar compoñentes: Retire con coidado todas as pezas da embalaxe. Inspeccione se hai algún dano.
- Conecte a mangueira: Securely connect the hose to the sprayer tank outlet and the sprayer wand inlet. Ensure connections are hand-tight to prevent leaks.
- Fixar a correa do ombreiro (opcional): If a shoulder strap is provided, attach it to the designated loops on the sprayer tank for easier carrying.
- Preparar a solución: Before filling, ensure your desired liquid solution is properly mixed according to its manufacturer's instructions.
- Encher o depósito: Unscrew the pump assembly from the tank. Carefully pour the prepared solution into the tank, ensuring not to exceed the maximum fill line. Do not fill above the shoulder of the tank.
- Montaxe segura da bomba: Reinsert the pump assembly into the tank opening and screw it down tightly to create a secure seal.
Instrucións de funcionamento
- Presurizar o pulverizador: With the pump assembly securely tightened, pump the handle up and down approximately 10-20 times until resistance is felt. This builds pressure inside the tank. Do not over-pump.
- Axuste a boquilla: Twist the adjustable nozzle at the end of the wand to achieve the desired spray pattern (from a fine mist to a solid stream).
- Comezar a pulverización: Point the wand towards the target area. Squeeze the trigger on the wand to begin spraying.
- Use Trigger Lock: For continuous spraying, push the trigger lock forward while the trigger is depressed. To stop, release the trigger lock and then the trigger.
- Manter a presión: If the spray weakens, pump the handle a few more times to restore pressure.
- Liberar a presión despois do uso: Once spraying is complete, sempre release the pressure from the tank. To do this, pull the pressure release valve (usually a small knob or lever on the pump assembly) until all air has escaped. You will hear a hissing sound.
Mantemento
- Limpeza despois de cada uso:
- Baleirar calquera resto de solución do tanque.
- Enxágüe o tanque ben con auga limpa.
- Fill the tank with clean water, pressurize, and spray through the wand until the tank is empty to flush the hose and nozzle.
- Release all pressure and allow all components to air dry before storage.
- Limpeza de boquillas: If the nozzle becomes clogged, unscrew it from the wand and clean it with a small brush or by rinsing under strong water pressure. Do not use metal objects that could damage the nozzle.
- Lubricación dos selos: Periodically inspect the O-rings and seals on the pump assembly and wand. If they appear dry or cracked, apply a small amount of silicone grease to maintain a good seal and prevent leaks.
- Almacenamento: Garde o pulverizador nun lugar fresco e seco, lonxe da luz solar directa e de temperaturas de conxelación. Asegúrese de que se libere toda a presión antes de gardalo.
Resolución de problemas
| Problema | Causa posible | Solución |
|---|---|---|
| Sprayer does not build pressure. | Loose pump assembly; Worn O-rings/seals; Clogged check valve. | Tighten pump assembly; Inspect and lubricate/replace O-rings; Clean check valve. |
| Liquid leaks from connections. | Conexións soltas; xuntas tóricas/xuntas danadas. | Tighten all connections; Inspect and replace damaged O-rings/seals. |
| Sen pulverización ou pulverización débil. | Insufficient pressure; Clogged nozzle or wand; Empty tank. | Pump more to build pressure; Clean nozzle/wand; Refill tank. |
| Pressure releases too quickly. | Loose pump assembly; Faulty pressure release valve; Damaged tank. | Tighten pump assembly; Inspect pressure release valve for debris; Check tank for cracks. |
Especificacións
- Modelo: SX-8B
- Capacidade: 2 litros
- Material: Polyethylene (non-corrosive)
- Dimensións do produto: 14.96 x 22.65 x 22.24 polgadas
- Peso do artigo: 3.19 libras
- Fabricante: ORGILL WWS-L&G (Brand: Mintcraft)
- Características: Adjustable nozzle, on/off trigger lock, heavy-duty hose.
Garantía e Soporte
For warranty information or technical support, please refer to the documentation provided with your purchase or contact Mintcraft customer service. Keep your purchase receipt as proof of purchase.
Note: Specific warranty terms may vary. Please consult the official Mintcraft website or your retailer for the most current information.