
1. Introdución
Grazas pola compraasing the BLACK+DECKER CS3652LC 3.6V Compact Cordless Screwdriver. This tool is designed for light-duty fastening tasks, such as furniture assembly and general household repairs. Its compact size and USB charging capability make it convenient for various DIY projects.
Please read this manual carefully before using the tool to ensure safe and efficient operation. Keep this manual for future reference.

Image 1.1: The BLACK+DECKER CS3652LC Compact Cordless Screwdriver.
2. Instrucións de seguridade
Siga sempre as precaucións de seguridade básicas ao usar ferramentas eléctricas para reducir o risco de incendio, descarga eléctrica e lesións persoais.
- Use o equipo de protección individual axeitado, como lentes de seguridade.
- Manter a zona de traballo limpa e ben iluminada.
- Non utilice ferramentas eléctricas en atmosferas explosivas, como en presenza de líquidos, gases ou po inflamables.
- Manteña os nenos e os espectadores afastados mentres manexa unha ferramenta eléctrica.
- Evite o arranque accidental. Asegúrese de que o interruptor estea na posición de apagado antes de conectar a unha batería, coller ou transportar a ferramenta.
- Non excedas. Manteña un equilibrio e unha posición adecuada en todo momento.
- Emprega a ferramenta correcta para a túa aplicación. Non forces a ferramenta.
- Desconecte a batería da ferramenta eléctrica antes de facer calquera axuste, cambiar accesorios ou almacenar ferramentas eléctricas.
3. Configuración
3.1 Carga da batería
The tool is equipped with a 3.6V, 1.5Ah Lithium-Ion battery. Before first use, fully charge the battery. A full charge takes approximately 3 hours.
- Locate the USB charging port on the tool.
- Connect the provided USB charging cable to the tool and to a compatible USB power adapter (not included) or a computer USB port.
- The charging indicator light will illuminate during charging. It will change or turn off once charging is complete.
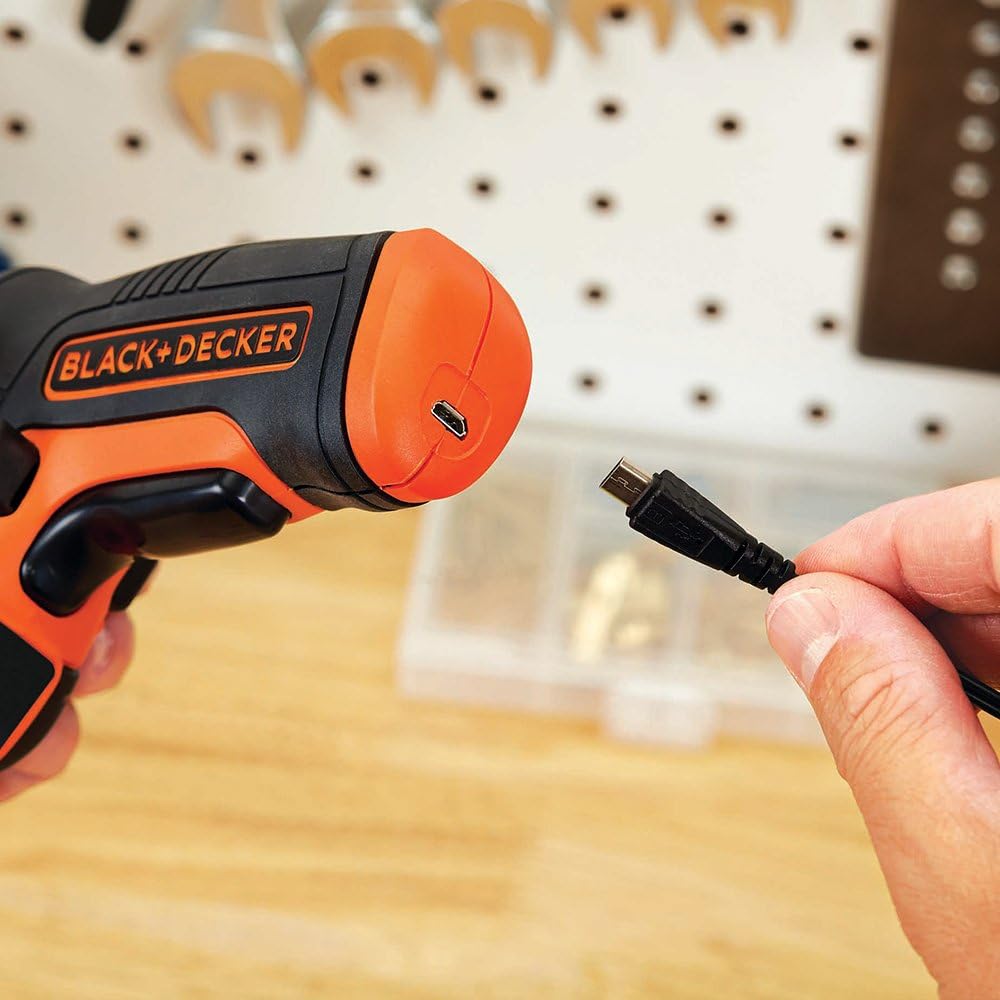
Image 3.1: Connecting the USB charging cable to the screwdriver.
3.2 Instalación e extracción de bits
The screwdriver comes with a variety of bits for different screw types and sizes. Ensure the tool is off before changing bits.
- Para instalar un bit: Insert the desired bit firmly into the chuck until it clicks into place.
- Para eliminar un bit: Pull the bit straight out from the chuck.

Image 3.2: Inserting a screwdriver bit.
4. Instrucións de funcionamento
4.1 Funcionamento básico
- Interruptor de avance/retroceso: Locate the forward/reverse switch near the trigger. Push it to the left for forward (tightening) and to the right for reverse (loosening). The center position locks the tool.
- Interruptor de disparo: Squeeze the trigger to start the tool. Release it to stop.
- Luz de traballo LED: The integrated LED light illuminates the work area when the trigger is pressed, improving visibility in dimly lit spaces.

Image 4.1: The LED work light illuminates the work area.
4.2 Aplicacións
This compact screwdriver is ideal for various tasks:
- Montaxe de mobles en paquetes planos.
- Installing light fixtures or wall plates.
- Tightening loose screws around the house.
- Light DIY projects requiring screw fastening up to 38mm in length.

Image 4.2: Using the screwdriver for furniture assembly.

Image 4.3: Fastening a wall plate with the screwdriver.
5. Mantemento
Un mantemento regular garante a lonxevidade e o rendemento óptimo da súa ferramenta.
- Limpeza: Keep the ventilation slots of the tool clean to prevent overheating. Use a soft, damp pano para limpar o exterior. Non empregue produtos químicos agresivos nin produtos de limpeza abrasivos.
- Almacenamento: Store the tool in a dry, secure place out of reach of children. Ensure the battery is partially charged before long-term storage.
- Coidado da batería: Do not store the battery in temperatures above 40°C (104°F) or below 0°C (32°F). Do not dispose of batteries in fire.
6 Solución de problemas
If you encounter issues with your screwdriver, refer to the following common troubleshooting steps:
- A ferramenta non arranca: Ensure the battery is fully charged. Check that the forward/reverse switch is not in the center (locked) position.
- Reduced power or short run time: The battery may need recharging. Battery performance can decrease over time; consider contacting support if issues persist after charging.
- Deslizamento pouco: Ensure the bit is correctly inserted and fully seated in the chuck. Use the appropriate bit size and type for the screw.
Para obter máis axuda, póñase en contacto co servizo de atención ao cliente de BLACK+DECKER.
7. Especificacións
| Característica | Especificación |
|---|---|
| Número de modelo | CS3652LC |
| Fonte de enerxía | Recargable (CC 3.6 V) |
| Par máximo | 5.5 N·m |
| Velocidade sen carga | 180 RPM |
| Capacidade da batería | 1.5 Ah (ións de litio) |
| Tempo de carga | Approx. 3 hours (via USB) |
| Lonxitude máxima do parafuso | 38 mm |
| Max Work Volume | Approx. 240 screws (φ3.5mm x 20mm) |
| Tamaño de Chuck | 6.35 mm |
| Dimensións (L x W x H) | 15.5 x 5.5 x 14 cm |
| Peso | 0.33 kg |
| País de Orixe | China |
| Accesorios incluídos | #1 Phillips, #2 Phillips, #2 PoziDrive, #8 Slotted, 3mm Hex, 4mm Hex, 5mm Hex, 6mm Hex (50mm length each); #2 Phillips, #2 PoziDrive (100mm length each); 2.5mm Drill Bit; Charger |
8. Garantía e soporte
BLACK+DECKER products are manufactured to high-quality standards. For information regarding warranty coverage, service, or technical support, please refer to the warranty card included with your purchase or visit the official BLACK+DECKER websitio.
You can also contact BLACK+DECKER customer service directly for assistance with product operation, parts, or repairs.
Websitio: www.blackanddecker.com


