
Introdución
This manual provides detailed instructions for the setup, operation, and maintenance of your Homtime C12PRO Docking Station Speaker. The C12PRO integrates a Bluetooth speaker, FM radio, alarm clock, and dual USB charging capabilities, designed for convenient everyday use.
Contido do paquete
Verifique que todos os elementos que se indican a continuación estean incluídos no seu paquete:
- 1 x Homtime C12PRO Speaker Unit
- 1 x adaptador de alimentación
- 1 x Manual de usuario
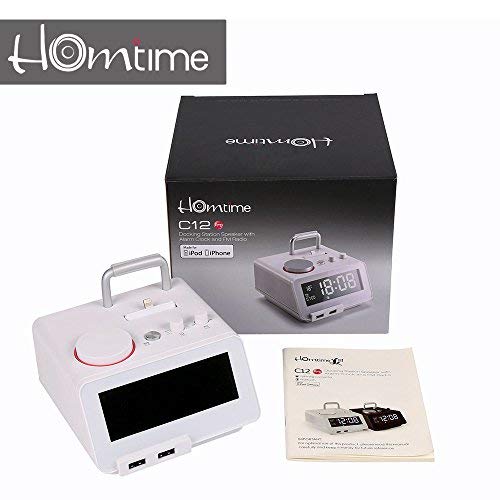
Imaxe: Contents of the Homtime C12PRO package, showing the main speaker unit, power adapter, and the user manual.
Produto rematadoview
Familiarize yourself with the various components and controls of your C12PRO unit.

Imaxe: Fronte view of the Homtime C12PRO with an iPhone docked. The large digital display shows time and temperature, and the front features dual USB charging ports.

Imaxe: Fronte view of the Homtime C12PRO without a phone docked. This image clearly shows the digital display, the docking connector, and the control buttons on the top surface.
Panel frontal e pantalla
- Large 4.2-inch LCD Display: Shows time, alarm status, and room temperature (Celsius or Fahrenheit). Brightness is adjustable.
- Portos de carga USB duales: Located at the front base for convenient charging of external devices.
Controis do panel superior
- Conector de acoplamento: Apple Certified Lightning connector for iPod/iPhone.
- Botóns/mandos de control: For setting time, alarm, volume, mode selection, and FM radio tuning.
Conexións do panel traseiro
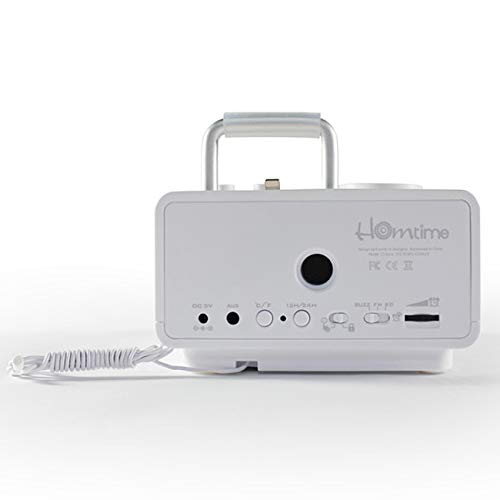
Imaxe: Traseira view of the Homtime C12PRO. This image displays the DC 9V power input, AUX-in port, 12H/24H time format button, and other rear controls.
- Entrada de alimentación DC 9 V: Conecte aquí o adaptador de corrente fornecido.
- Porto de entrada auxiliar: Conector de 3.5 mm para conectar fontes de son externas.
- 12H/24H Button: Toggles between 12-hour and 24-hour time display formats.
- Outros controis: May include snooze/dimmer, alarm on/off, and FM antenna connection.
Configuración
- Desempaquetar a unidade: Carefully remove the C12PRO speaker and all accessories from the packaging.
- Conectar enerxía: Insert the DC plug of the power adapter into the DC 9V input port on the rear of the unit. Plug the power adapter into a standard wall outlet. The display will illuminate.
- Configuración da hora inicial:
- Manteña premido o HORARIO button (location may vary, typically on top or rear).
- Usa o +/- buttons or rotary knob to adjust the hour. Press HORARIO de novo para confirmar.
- Adjust the minute using the +/- buttons or rotary knob. Press HORARIO para confirmar e saír do modo de axuste da hora.
- Para cambiar entre o formato de 12 horas e o de 24 horas, prema o botón 12H/24H botón no panel traseiro.
- Axustar o brillo da pantalla: Preme o SNOOZE / DIMMER button (often combined) repeatedly to cycle through brightness levels.
- Unidade de temperatura establecida: Se é o caso, prema o botón ° C / ° F button to switch between Celsius and Fahrenheit display for room temperature.
Instrucións de funcionamento
Encendido/apagado
Preme o POTENCIA button to turn the unit on or off. When off, the clock display remains active.
Configuración da alarma
- Manteña premido o CONXUNTO DE ALARMA button. The alarm hour will flash.
- Usa o +/- buttons or rotary knob to adjust the alarm hour. Press CONXUNTO DE ALARMA para confirmar.
- Adjust the alarm minute. Press CONXUNTO DE ALARMA para confirmar.
- Select the alarm source (Buzzer, FM Radio, or Docked Device). Use +/- or rotary knob and press CONXUNTO DE ALARMA para confirmar.
- Para activar/desactivar a alarma, prema o botón ALARMA ON / OFF botón. Aparecerá unha icona de alarma na pantalla cando estea activa.
- Cando soe a alarma, prema o botón AMORTAR button to temporarily silence it for a few minutes. Press POTENCIA para desactivar a alarma durante o día.
Funcionamento da radio FM
- Preme o MODO botón ata que apareza "FM" na pantalla.
- For automatic station scanning, press and hold the REPRODUCIR/PAUSA button (or a dedicated ESCANEAR button). The radio will scan and save available stations.
- Para sintonizar manualmente, use o ANTERIOR / SEGUINTE buttons or rotary knob to adjust the frequency.
- To select a saved station, press the PRESET botón e despois use ANTERIOR / SEGUINTE para navegar.
- Axuste o volume usando o VOLUME knob or buttons.
Emparejamento Bluetooth
- Preme o MODO button until "BT" or "Bluetooth" appears on the display. The Bluetooth indicator will flash, indicating pairing mode.
- No teu dispositivo móbil, activa o Bluetooth e busca novos dispositivos.
- Select "Homtime C12PRO" from the list of available devices.
- Once paired, the Bluetooth indicator on the C12PRO will stop flashing and remain solid. You can now play audio wirelessly from your device.
- Adjust volume on both the C12PRO and your connected device.
Usando a estación de acoplamento
The C12PRO features an Apple Certified Lightning connector for compatible iPod/iPhone devices.
- Carefully align your iPhone/iPod with the Lightning connector on the top of the unit.
- Gently push down until the device is securely seated.
- The C12PRO will automatically charge your device and can play audio from it.
- Preme o MODO button to select the docking station as the audio source.
Carga USB
The unit includes dual USB ports for charging other devices.
- Connect your USB charging cable to one of the USB ports on the front of the C12PRO.
- Connect the other end of the cable to your device (e.g., Android phone, tablet).
- The C12PRO will provide power to charge your device.
AUX-in Connection
Connect external audio players via the 3.5mm AUX-in port.
- Connect a 3.5mm audio cable (not included) from your external audio device's headphone jack to the AUX-in port on the rear of the C12PRO.
- Preme o MODO botón ata que apareza "AUX" na pantalla.
- Play audio from your external device. Adjust volume on both the C12PRO and the external device.
Mantemento
- Limpeza: Disconnect the power adapter before cleaning. Use a soft, dry cloth to wipe the exterior surfaces. Do not use abrasive cleaners, waxes, or solvents.
- Almacenamento: Se garda a unidade durante un período prolongado, desconéctea da corrente e gárdea nun lugar fresco e seco, lonxe da luz solar directa e de temperaturas extremas.
- Batería: The unit contains a CR2 battery (included) for clock memory backup. This battery is not user-replaceable for general operation and should only be replaced by qualified service personnel if necessary.
Resolución de problemas
| Problema | Causa posible | Solución |
|---|---|---|
| Sen alimentación/Pantalla apagada | O adaptador de corrente non está conectado ou a toma de corrente está defectuosa. | Asegúrate de que o adaptador de corrente estea conectado correctamente á unidade e a unha toma de corrente que funcione. |
| Non hai son do altofalante | Volume too low; incorrect source selected; device not connected properly. | Increase volume. Press MODO to select the correct audio source (BT, FM, Dock, AUX). Reconnect Bluetooth device or docked phone. |
| O emparejamento por Bluetooth falla | C12PRO not in pairing mode; device too far; interference. | Ensure C12PRO is in BT mode and flashing. Move device closer. Turn off other Bluetooth devices. |
| Radio FM estática/mala recepción | Sinal débil; antena non estendida. | Extend the FM antenna fully. Reposition the unit for better reception. Perform auto-scan again. |
| A alarma non soa | Alarm not activated; alarm volume too low. | Ensure the alarm icon is visible on the display. Check alarm volume settings. |
| Device not charging via USB/Dock | Cable issue; device not compatible; unit not powered. | Try a different USB cable. Ensure the C12PRO is powered on. Verify device compatibility with the Lightning dock. |
Especificacións

Imaxe: A table detailing the specifications of the Homtime C12PRO, including driver units, S/N ratio, Bluetooth version, range, radio frequency, power, and dimensions.
| Modelo | C12 Pro |
| Unidades conductoras | 2 x 40 mm |
| Relación S/N | > 70 dB |
| Versión Bluetooth | 2.1 + EDR |
| Alcance Bluetooth | 10 M |
| Rango de frecuencia de radio | 87.5 MHz - 108 MHz |
| Dispositivos compatibles | iPad, iPhone, Android, Windows Phone, Computer |
| Adaptador de alimentación | AC100-240V, 50/60Hz, DC 5V 3A |
| Potencia de saída | 3W + 3W (6 Watts total) |
| Dimensións (LxWxH) | 12.8 x 12.9 x 10.7 cm |
| Peso do elemento | 800 g |
| Fontes de audio | Apple Lightning, USB, Bluetooth, Aux-in |
| Tipo de visualización | Digital LCD (4.2 inches) |
| Baterías | 1 CR2 battery required (included for clock memory) |
Garantía e Soporte
Información da garantía
The Homtime C12PRO comes with a Garantía limitada de 1 anos from the date of purchase. This warranty covers manufacturing defects in materials and workmanship under normal use. It does not cover damage caused by misuse, accidents, unauthorized modifications, or external causes.
Conserve o comprobante de compra para reclamacións de garantía.
Atención ao cliente
For technical assistance, troubleshooting not covered in this manual, or warranty inquiries, please contact Homtime customer support. Refer to the contact information provided with your product packaging or visit the official Homtime websitio para obter os detalles de soporte máis actualizados.