1. Introdución
This manual provides detailed instructions for the installation, operation, and maintenance of your ASUS B150M-A Micro ATX Motherboard. The B150M-A supports 6th Generation Intel Processors and DDR4 memory, featuring advanced hardware safeguards with 5X Protection II, an intuitive UEFI BIOS, and Fan Xpert 2+ for optimized cooling. This motherboard is designed for reliable performance in various computing environments.
Características principais:
- 5X Protection II: Advanced hardware safeguards for comprehensive system protection.
- DDR4 Memory Compatibility: Supports high-speed DDR4 memory modules.
- UEFI BIOS with EZ Flash 3: User-friendly graphical BIOS interface with easy update functionality.
- Fan Xpert 2+: Advanced fan controls for optimal cooling and quiet operation.
- Gaming-Grade Audio: Enhanced audio experience with LED-illuminated shielding.
2. Información de seguridade
Observe sempre as seguintes precaucións de seguridade ao manipular e instalar a placa base:
- Electricidade estática: Wear an anti-static wrist strap or frequently touch a grounded object to discharge static electricity before handling components.
- Apagado: Asegúrese de que a fonte de alimentación estea desconectada da toma de corrente antes de instalar ou retirar calquera compoñente.
- Manexo de compoñentes: Suxeita os compoñentes polos bordos, evitando o contacto con pines, circuítos ou conectores.
- Ventilación: Asegúrate de que haxa unha ventilación axeitada dentro da carcasa do ordenador para evitar o sobrequecemento.
- Instalación profesional: Se non ten dúbida sobre algún paso de instalación, consulte cun técnico cualificado.
3. Contido do paquete
Verify that all items are present in your motherboard package. If any item is damaged or missing, contact your retailer.

Imaxe: Contents of the ASUS B150M-A motherboard retail box. This includes the motherboard, a rear I/O panel shield, a user guide, a support DVD, and two SATA data cables.
- ASUS B150M-A Motherboard
- Protector do panel de E/S traseiro
- Guía de usuario
- DVD de soporte (que contén controladores e utilidades)
- SATA 6Gb/s Data Cables (x2)
4. Configuración e instalación
4.1 Deseño da placa base
Familiarícese cos distintos compoñentes e conectores da placa base antes da instalación.

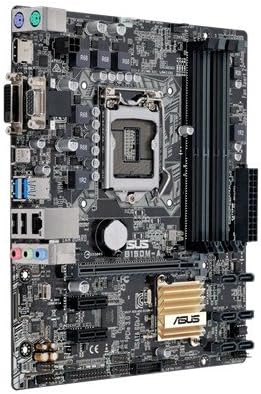
Imaxe: Acabadoview of the ASUS B150M-A motherboard. Key areas include the LGA1151 CPU socket, four DDR4 DIMM slots, PCIe x16 and x1 slots, SATA ports, and various headers.

Imaxe: Angled perspective of the ASUS B150M-A motherboard, providing a clearer view of the heatsink over the B150 chipset and the layout of the expansion slots.
4.2 Instalación da CPU (LGA1151)
- Localiza o socket LGA1151 na placa base.
- Push the load lever down and away from the socket to open the retention frame.
- Carefully align the CPU with the socket, ensuring the gold triangle on the CPU matches the triangle on the socket. Do not force the CPU into the socket.
- Lower the CPU gently into the socket.
- Peche o marco de retención e empurre a palanca de carga de volta ao seu lugar ata que faga clic.
- Instala o refrigerador da CPU segundo as instrucións do fabricante.
4.3 Instalación de memoria (DDR4)
The B150M-A motherboard has four DDR4 DIMM slots. For optimal performance, install memory modules in pairs.
- Abra os clips nos dous extremos da ranura DIMM.
- Aliña o módulo de memoria coa ranura, asegurándote de que a muesca do módulo coincida coa chave da ranura.
- Prema firmemente os dous extremos do módulo de memoria ata que os clips encaixen no seu lugar.
- Verify that both clips are securely closed.
4.4 Instalación da tarxeta de expansión
The motherboard features PCIe x16 and PCIe x1 slots for graphics cards and other expansion cards.
- Locate an available expansion slot.
- Remove the corresponding metal slot cover from your computer case.
- Aliñe a tarxeta de expansión coa ranura e prema firmemente cara abaixo ata que estea completamente asentada.
- Secure the card with a screw or the case's retention mechanism.
4.5 Storage Device Installation (SATA)
Connect your SATA hard drives or SSDs to the SATA 6Gb/s ports on the motherboard.
- Conecta un extremo dun cable de datos SATA a un porto SATA da placa base.
- Conecta o outro extremo do cable de datos SATA ao teu dispositivo de almacenamento.
- Connect a SATA power cable from your power supply to the storage device.
4.6 Front Panel Connectors
Connect the cables from your computer case's front panel (power button, reset button, USB ports, audio jacks, etc.) to the corresponding headers on the motherboard. Refer to the motherboard layout diagram for header locations.
4.7 Conexións de enerxía
Ensure all necessary power cables from your power supply are connected to the motherboard and components.
- Conector de alimentación ATX de 24 pines: Connect the main 24-pin power cable from the PSU to the motherboard.
- 8-pin (or 4-pin) ATX 12V Power Connector: Connect the CPU power cable to the corresponding header near the CPU socket.
5. Instrucións de funcionamento
5.1 Primeiro arranque e configuración da BIOS
Despois de montar o sistema, conecta un monitor, un teclado e un rato. Acende o sistema.
- Preme o DEL key during startup to enter the UEFI BIOS Utility.
- The UEFI BIOS provides a graphical interface for configuring system settings, boot order, and hardware monitoring.
- Use the EZ Mode for basic settings or switch to Advanced Mode for more detailed configurations.
5.2 Instalación do controlador
After installing your operating system, install the necessary drivers for the motherboard components. These can be found on the included Support DVD or downloaded from the official ASUS websitio.
- Install chipset drivers.
- Install LAN drivers for network connectivity.
- Install audio drivers for sound functionality.
- Install any other relevant utility drivers.
5.3 Fan Control with Fan Xpert 2+
The Fan Xpert 2+ utility allows for advanced control over system fans, optimizing cooling performance and reducing noise levels. This utility can be accessed through the ASUS AI Suite software or directly within the UEFI BIOS.
6. Mantemento
6.1 Limpeza
Limpa o interior do teu ordenador con regularidade para evitar a acumulación de po, que pode provocar sobrequecemento e avaría dos compoñentes. Usa aire comprimido para eliminar o po dos ventiladores, disipadores de calor e outros compoñentes. Asegúrate de que o sistema estea apagado e desconectado antes de limpalo.
6.2 Actualizacións da BIOS
Consulta periodicamente o soporte técnico de ASUS website for updated BIOS versions. BIOS updates can improve system stability, add support for new hardware, or fix bugs. Use the EZ Flash 3 utility within the BIOS to safely update the firmware, typically via a USB flash drive.
7 Solución de problemas
Se tes problemas coa túa placa base, considera os seguintes pasos comúns para a súa resolución:
- Sen alimentación/Sen POST:
- Verifique que todos os cables de alimentación (ATX de 24 pines, CPU de 8 pines) estean conectados correctamente.
- Asegúrate de que a CPU e a RAM estean correctamente instaladas.
- Try booting with only one RAM stick installed, testing each slot and module.
- Clear the CMOS (Complementary Metal-Oxide-Semiconductor) by removing the CMOS battery for a few minutes or using the clear CMOS jumper.
- Problemas de visualización:
- Ensure the monitor cable is connected to the correct port (integrated graphics or discrete graphics card).
- Reseat the graphics card if applicable.
- Proba cun monitor ou cable diferente.
- O sistema operativo non arranca:
- Check boot order in BIOS.
- Verify storage device connections.
- Run a diagnostic tool on your storage drive.
- Problemas periféricos (USB, audio, LAN):
- Asegúrate de que os controladores estean instalados correctamente.
- Comproba as conexións físicas.
- Test with different peripherals.
For more advanced troubleshooting or persistent issues, refer to the comprehensive user manual on the ASUS support websitio web ou póñase en contacto co soporte técnico de ASUS.
8. Especificacións
| Característica | Detalle |
|---|---|
| Nome do modelo | B150M-A |
| Socket CPU | LGA 1151 |
| Procesadores compatibles | Intel Core i5-6600K, Intel Core i7-6700K, Intel Core i5-7600K, Intel Core i7-7700K (and other 6th/7th Gen Intel Core processors with BIOS update) |
| Chipset | Intel B150 |
| Tecnoloxía de memoria RAM | DDR4 |
| Slots de memoria | 4 x DIMM |
| Tamaño máximo de memoria | 64 GB |
| Velocidade do reloxo da memoria | 2133 MHz |
| Interfaz da tarxeta gráfica | Integrated (requires CPU with integrated graphics) |
| Total PCIe Ports | 1 x PCIe 3.0/2.0 x16, 2 x PCIe 3.0/2.0 x1 |
| Portos SATA totais | 6 SATA de 6 Gb/s |
| Portos USB | Total 5 (USB 3.0, USB 2.0) + Internal Headers |
| Saída de vídeo | HDMI, DVI-D, VGA (D-Sub) |
| Audio | Códec de audio de alta definición de 8 canles Realtek ALC887 |
| LAN | Controlador Realtek RTL8111H Gigabit LAN |
| Factor de forma | Micro ATX (9.2 inch x 7.3 inch) |
| Peso do elemento | 1.9 libras |
Imaxe: The rear input/output panel of the ASUS B150M-A motherboard, featuring legacy PS/2 ports, VGA, DVI-D, HDMI for video output, USB 3.0 and USB 2.0 ports, a Gigabit Ethernet port, and 3.5mm audio jacks.
9. Información da garantía
ASUS products are manufactured to the highest quality standards. This motherboard is covered by a limited warranty provided by ASUS. The specific terms and duration of the warranty may vary by region and retailer. Please retain your proof of purchase for warranty claims.
For detailed warranty information, please visit the official ASUS support website or consult the warranty card included with your product.
10. Soporte técnico
If you require further assistance or encounter issues not covered in this manual, please contact ASUS technical support. You can find support resources, FAQs, driver downloads, and contact information on the official ASUS websitio:
Visita o soporte técnico de ASUS Websitio
When contacting support, please have your motherboard model (B150M-A) and serial number ready.