
Introdución
Grazas pola compraasing the Andoer AD-980II i-TTL GN58 Flash Speedlite. This powerful and versatile flash unit is designed to provide enhanced lighting for your photography, compatible with Nikon cameras. It features a high guide number of 58 (ISO 100, 180mm), multiple operating modes including i-TTL, Manual, Multi, Master, and Slave, as well as High-Speed Sync (HSS) up to 1/8000s. Please read this manual thoroughly to understand the product's functions and ensure safe and optimal operation.
Precaucións de seguridade
- Non desmonte nin modifique a unidade de flash. Alto volumetagOs compoñentes e están presentes no interior.
- Manteña o flash seco. Non o expoña á choiva, á humidade ou a unha humidade elevada.
- Avoid direct eye exposure to the flash light, especially at close range, as it can impair vision.
- Manter fóra do alcance dos nenos.
- Use only recommended batteries. Do not mix old and new batteries or different types of batteries.
- If the flash unit overheats, allow it to cool down before further use.
Produto rematadoview
Compoñentes

Figura 1: Fronte view of the Andoer AD-980II Flash Speedlite, showing the flash head and infrared sensor.

Figura 2: Traseira view of the flash, highlighting the LCD display and control buttons (Mode, Fn, Clear, Zoom, On/Off, Directional Pad, Lock).
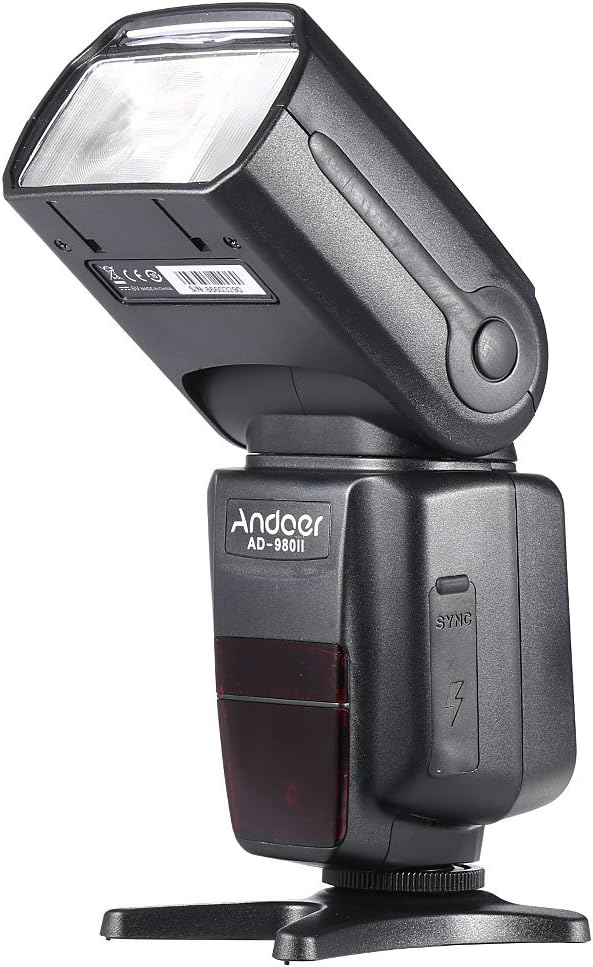
Figura 3: Lateral view of the flash, illustrating the PC sync port and external power interface cover.

Figura 4: Explotado view showing key components: built-in diffuser and reflector, PC port & external power interface, battery compartment, and fast transmission contacts on the hot shoe.
Panel de control e pantalla
The rear of the flash unit features an LCD display and several control buttons for adjusting settings and selecting modes.
- Botón MODE: Cycles through i-TTL, Manual (M), Multi, and Slave modes.
- Fn Button: Accesses function settings.
- Botón BORRAR: Used to clear settings or confirm selections.
- Botón ZOOM: Adjusts the flash head's zoom position (Auto/Manual).
- Botón ON/OFF: Acende ou apaga a unidade.
- Pad direccional: Navega polos menús e axusta os valores.
- Interruptor LOCK: Fixa o flash á zapata de enganche da cámara.
Configuración
1. Instalación da batería
- Open the battery compartment cover located on the side of the flash unit (refer to Figure 4).
- Insira catro (4) pilas de tamaño AA, asegurándose de manter a polaridade correcta (+/-) como se indica no interior do compartimento.
- Pecha a tapa do compartimento da batería de forma segura.
Nota: For optimal performance and recycle times, use high-quality alkaline or Ni-MH rechargeable batteries.
2. Montaxe do flash na cámara
- Desliza a zapata de flash da unidade de flash no soporte da zapata de flash da túa cámara.
- Rotate the LOCK switch clockwise until it is firmly secured. Do not overtighten.
- To remove the flash, rotate the LOCK switch counter-clockwise and slide the flash off the hot shoe.
Modos de funcionamento
Preme o MODO para percorrer os modos de flash dispoñibles.
1. i-TTL Mode (Automatic Flash)
In i-TTL mode, the flash automatically determines the optimal flash output based on the camera's metering system. This mode is ideal for quick and convenient shooting.
- Attach the flash to your Nikon camera's hot shoe.
- Turn on the flash and the camera.
- Select i-TTL mode using the MODE button.
- The flash will communicate with the camera to set the appropriate exposure.
2. Modo manual (M)
Manual mode allows you to set the flash output power manually, from 1/1 (full power) to 1/128 power, in 1/3 stop increments. This provides precise control over lighting.
- Select M mode using the MODE button.
- Use the directional pad to adjust the flash output power.
- Take a test shot and adjust power as needed.
3. Multi (Stroboscopic) Mode
Multi mode fires the flash repeatedly during a single exposure, creating a stroboscopic effect. You can set the flash frequency (Hz), number of flashes, and flash output.
- Select Multi mode using the MODE button.
- Use the directional pad and Fn button to set the frequency, number of flashes, and power.
4. Master/Slave Modes (Wireless Flash)
The AD-980II can function as a master unit to control other slave flashes or as a slave unit triggered by a master flash or camera's built-in flash. It supports 4 channels in 3 groups.
- Modo mestre: Set the flash to Master mode (often indicated by a specific icon or 'M' with wireless symbol). Use the Fn button to set channels and groups.
- Slave Mode (C/N, S1, S2):
- C/N Slave Mode: Optical slave mode compatible with Nikon's wireless flash system.
- Modo S1: Optical slave mode that triggers the flash upon detecting the first flash from a master unit. Suitable for manual flash.
- Modo S2: Optical slave mode that ignores the pre-flash from a master unit and triggers on the main flash. Suitable for i-TTL flash.
To use slave modes, ensure the flash's optical sensor is facing the master flash or camera's built-in flash.
Funcións avanzadas
1. Sincronización de alta velocidade (HSS)
The AD-980II supports High-Speed Sync (HSS) up to 1/8000s, allowing you to use flash at shutter speeds faster than your camera's maximum flash sync speed. This is useful for freezing fast motion or using wide apertures in bright conditions.
- Ensure your camera supports HSS.
- Activate HSS on the flash unit (usually via the Fn button or a dedicated HSS icon on the display).
- Set your camera's shutter speed above its normal sync speed.
2. Rear-Curtain Sync
Rear-curtain sync fires the flash just before the second curtain closes, creating a natural-looking trail of light behind moving subjects when using slow shutter speeds.
- Activate Rear-curtain sync through the flash's custom functions or camera settings.
3. Auto/Manual Zoom
The flash head's zoom position can be adjusted automatically to match the lens focal length or manually set from 18mm to 180mm.
- Preme o ZOOM button to cycle between Auto and Manual zoom settings.
- In Manual zoom, use the directional pad to adjust the focal length.
4. Sound Prompt
The flash unit includes a sound prompt feature to indicate when the flash is fully recycled and ready to fire. This can be enabled or disabled via the function settings.
5. Over-Heat Protection
To prevent damage from continuous high-power firing, the flash unit has an over-heat protection system. If the unit becomes too hot, it will temporarily disable firing until it cools down.
Mantemento
- Limpeza: Use un pano suave e seco para limpar a unidade de flash. Para a sucidade persistente, use un pano lixeiramente seco.amp cloth and then dry thoroughly. Do not use organic solvents or strong cleaning agents.
- Almacenamento: When not in use for extended periods, remove the batteries to prevent leakage. Store the flash in a cool, dry place away from direct sunlight and extreme temperatures.
- Coidado da batería: Replace all batteries at the same time. Do not mix battery types.
Resolución de problemas
| Problema | Causa posible | Solución |
|---|---|---|
| O flash non se acende. | As pilas están gastadas ou inseridas incorrectamente. | Substitúa as pilas ou comprobe a polaridade. |
| O flash non se dispara. | Flash not securely mounted; camera settings incorrect; flash in sleep mode; flash overheated. | Ensure flash is locked onto hot shoe; check camera flash settings; press shutter button halfway to wake flash; allow flash to cool down. |
| A saída do flash é demasiado débil/forte. | Compensación da exposición do flash (FEC) ou axuste manual da potencia incorrecto. | Adjust FEC on camera or flash; adjust manual power setting in M mode. |
| Wireless slave mode not working. | Optical sensor blocked; incorrect channel/group settings; master flash not firing. | Ensure clear line of sight to optical sensor; verify channel/group settings match master; check master flash operation. |
Especificacións
| Número de modelo | AD-980II |
| Número de guía | GN58 (ISO 100, 180 mm) |
| Cobertura Flash | 18-180 mm (zoom automático/manual) |
| Modos de flash | i-TTL, M, Multi, Master, Slave (C/N, S1, S2) |
| Sincronización de alta velocidade (HSS) | Ata 1/8000s |
| Tempo de reciclaxe | Aprox. 2.9 s (potencia máxima) |
| Ángulo de rotación vertical | -7 a 90 graos |
| Ángulo de rotación horizontal | 0 a 360 graos |
| Comunicación sen fíos | Optical Pulse (4 channels, 3 groups) |
| Fonte de enerxía | 4 pilas tamaño AA |
| Dimensións | 19.56 x 5.08 x 7.62 cm |
| Peso | 616.89 g |
| UPC | 743022313320 |
Garantía e Soporte
Para obter información sobre a garantía e asistencia técnica, consulte a documentación incluída coa súa compra ou póñase en contacto co seu vendedor. Garde o comprobante de compra para calquera reclamación de garantía.
You can also visit the official Andoer websitio para obter máis axuda e actualizacións do produto.