
Introdución
This manual provides detailed instructions for the installation, operation, and maintenance of your Venstar T1900 Residential Slimline Platinum Thermostat. Please read this manual thoroughly before attempting to install or operate the thermostat to ensure proper function and to avoid potential damage.
Información importante de seguridade
- Always turn off power to the heating/cooling system at the main circuit breaker or fuse box before installing or servicing the thermostat.
- Este termostato funciona con 24 voltios de CA. Non o conecte á tensión de liña.tage (120V ou 240V).
- A instalación debe ser realizada por un técnico cualificado se non está familiarizado coa cableaxe eléctrica.
- Do not short circuit the terminals on the gas valve or at the system control to test the thermostat. This will damage the thermostat and void the warranty.
- Ensure all wiring connections are secure and insulated to prevent short circuits.
Contido do paquete
Verifique que o seu paquete conteña os seguintes elementos:
- Unidade de termostato Venstar T1900
- Ferraxes de montaxe (parafusos e ancoraxes de parede)
- Manual de usuario (este documento)
Produto rematadoview
The Venstar T1900 is a 7-day programmable digital thermostat designed for residential use. It offers precise temperature control and energy-saving scheduling capabilities. This thermostat is compatible with heat/cool, heat pump, and dual-fuel systems, controlling up to three heat stages e dous guaystages.
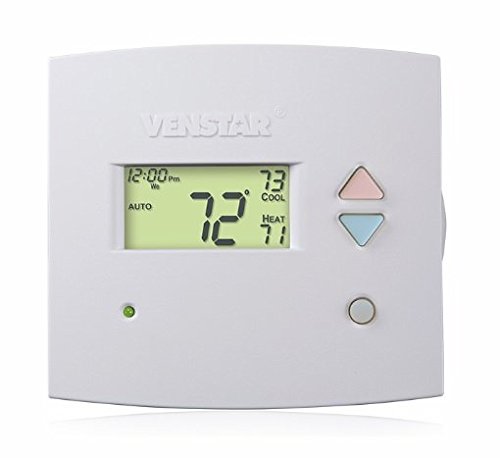
Figura 1: Fronte view of the Venstar T1900 Thermostat. This image displays the thermostat's LCD screen and control buttons, indicating its slimline design.
Características principais:
- 7-Day Programmability: Allows for customized heating and cooling schedules for each day of the week.
- Compatibilidade do sistema: Works with heat/cool, dual-fuel, and heat pump systems.
- Multi-Stage Control: Manages up to three heat stages e dous guaystages.
- Capacidade de control remoto: Controllable by phone using an optional add-on (sold separately).
- Automatic or Manual Operation: Provides flexibility for scheduled or on-demand temperature adjustments.
Guía de instalación
Ferramentas necesarias:
- Desaparafusador (Phillips e/ou de punta plana)
- Drill with appropriate drill bit (if installing new wall anchors)
- Descascados de fíos
- Lapis
- Nivel (opcional)
1. Apague a alimentación
Locate the circuit breaker or fuse box that controls your heating and cooling system. Turn off the power completely before proceeding with any wiring.
2. Retirar o termostato antigo (se corresponde)
- Retire con coidado a tapa do termostato antigo.
- Fai unha foto das conexións de cableado existentes como referencia.
- Label each wire with the terminal designation it was connected to (e.g., R, G, Y, W).
- Disconnect the wires and remove the old thermostat's mounting plate from the wall.
3. Mount the New Thermostat Base
- Separate the front cover of the T1900 thermostat from its base plate.
- Position the base plate on the wall where you want to install the thermostat. Ensure it is level.
- Marque os orificios de montaxe cun lapis.
- Se é necesario, faga buratos guía e insira ancoraxes de parede.
- Secure the thermostat base plate to the wall using the provided screws.
4. Cableado
Connect the wires from your HVAC system to the corresponding terminals on the T1900 thermostat base. Refer to the wiring diagram provided with your specific HVAC system for precise connections. Ensure wires are stripped approximately 3/8 inch and securely fastened under the terminal screws.
Common Terminal Designations:
- R/Rc/Rh: 24V Power (Heating/Cooling)
- C: Common (24V return)
- G: Ventilador
- A/A1: Compresor Stage 1 (Refrixeración)
- Y2: Compresor Stage 2 (Refrixeración)
- W/W1: Calor Stage 1 (Calefacción)
- W2: Calor Stage 2 (Calefacción)
- O / B: Reversing Valve (Heat Pumps)
Note: The T1900 supports various system types. Consult the detailed wiring diagrams in the full installation manual for specific configurations (e.g., heat pump with auxiliary heat, conventional multi-stagsistemas electrónicos).
5. Fixar o termostato á base
Once wiring is complete and verified, carefully align the thermostat front cover with the mounted base plate and snap it into place.
6. Restaurar enerxía
Return to your circuit breaker or fuse box and restore power to your heating and cooling system.
Configuración inicial
Upon initial power-up, the thermostat may prompt you to configure basic settings. Follow the on-screen instructions to set the current date, time, and system type (e.g., Conventional, Heat Pump).
System Type Configuration:
It is crucial to correctly configure the thermostat for your specific HVAC system. Incorrect settings can lead to improper operation or damage. Access the installer settings menu (refer to the full installation guide for specific button sequences) to select:
- Tipo de sistema: Heat/Cool, Heat Pump, Dual Fuel
- Número de calor Stages
- Número de Cool Stages
- Reversing Valve Operation: O (Cooling) or B (Heating)
Instrucións de funcionamento
Comprensión da pantalla:
The LCD screen displays the current temperature, set temperature, system mode, fan mode, time, and programming status. Refer to the icons and indicators on the screen for current operational status.
Setting System Mode:
Preme o MODO botón para percorrer os modos de sistema dispoñibles:
- CALENTACIÓN: The system will operate to maintain the heating setpoint.
- FRÍO: The system will operate to maintain the cooling setpoint.
- AUTOMÁTICO: The thermostat automatically switches between heating and cooling as needed to maintain the set temperature range.
- OFF: O sistema de calefacción e refrixeración está apagado.
Setting Fan Mode:
Preme o FAN botón para cambiar polos modos de ventilador:
- AUTOMÁTICO: O ventilador só funciona cando o sistema de calefacción ou refrixeración está en funcionamento.
- ACTIVADO: O ventilador funciona continuamente, independentemente das solicitudes de calefacción ou refrixeración.
Axuste da temperatura:
Usa o UP e ABAIXO arrow buttons to adjust the desired temperature setpoint. In programmable modes, this will temporarily override the schedule until the next scheduled change.
Horarios de programación (7 días):
The T1900 allows for 7-day programming, enabling different schedules for each day of the week. This feature helps save energy by adjusting temperatures when you are away or asleep.
- Preme o PROGRAMA botón para entrar en modo de programación.
- Usa o DÍA button to select the day or group of days you wish to program (e.g., Mon-Fri, Sat-Sun, or individual days).
- Usa o TEMPO button to cycle through the four available periods: Wake, Leave, Return, Sleep.
- Usa o UP e ABAIXO arrow buttons to set the desired temperature for each period.
- Usa o ATENCIÓN button to exit programming mode or save changes.
Refer to the detailed programming section in the full user guide for advanced options and specific button sequences.
Remote Control (Optional Add-on):
The Venstar T1900 thermostat can be controlled remotely via a phone using an optional add-on module (sold separately). This module connects to the thermostat and allows for remote access and control through a dedicated application. Installation and setup instructions for the remote control module are provided with the module itself.
Mantemento
Limpeza do termostato:
Para manter a aparencia e a funcionalidade do termostato, limpe periodicamente o exterior cun pano suave eamp pano. Non empregue produtos de limpeza abrasivos, solventes nin aerosoles químicos, xa que poden danar os compoñentes de plástico e electrónicos.
Substitución da batería:
The Venstar T1900 thermostat does not require batteries for operation as it is powered by the 24V AC system.
Resolución de problemas
If you experience issues with your Venstar T1900 thermostat, consult the following common problems and solutions:
| Problema | Causa posible | Solución |
|---|---|---|
| A pantalla do termostato está en branco | Sen corrente ao termostato. | Comproba o disxuntor do teu sistema de climatización. Asegúrate de que todas as conexións de cableado estean ben fixadas. |
| Heating/Cooling system does not respond | Modo de sistema incorrecto seleccionado; problema de cableado; bloqueo do sistema. | Verify the system mode (HEAT/COOL/AUTO). Check wiring connections. Wait 5 minutes for system lockout to reset. |
| A lectura da temperatura semella inexacta | Localización do termostato; obstrución do sensor. | Ensure the thermostat is not exposed to direct sunlight, drafts, or heat sources. Clean any dust from the thermostat vents. |
| Programming schedule is not working | Program not saved; temporary override active; incorrect time/day setting. | Ensure programs are saved. Check if a temporary override is active and cancel it. Verify current time and day settings. |
| O ventilador funciona continuamente en modo AUTO | Fan mode set to ON; wiring issue. | Press the FAN button to ensure it is set to AUTO. Check fan wiring. |
If these solutions do not resolve the issue, please contact customer support or a qualified HVAC technician.
Especificacións
| Característica | Especificación |
|---|---|
| Marca | Venstar |
| Nome do modelo | Venstar T1900 |
| Tipo de controlador | Pulsador |
| Característica especial | Programable |
| Cor | Branco |
| Usos específicos do produto | Heat Pump, Heater |
| Tipo de control de temperatura | Programmable, Smart/Remote (with add-on) |
| Voltage | 24 voltios AC |
| Tipo de visualización | LCD ou LED |
| Método de control | Remote (with add-on) |
| Retroiluminación | Si |
| Dimensións do produto | 5.3 x 2 x 2 polgadas |
| Peso do elemento | 0.01 onzas |
| Requírense baterías? | Non |
Información da garantía
Venstar products are manufactured to high-quality standards. This product is covered by a limited warranty against defects in materials and workmanship. The specific terms and duration of the warranty may vary. Please refer to the warranty card included with your product or visit the official Venstar websitio web para obter información detallada sobre a garantía e os procedementos de rexistro.
Atención ao cliente
For technical assistance, troubleshooting, or warranty inquiries, please contact Venstar customer support. You can typically find contact information, including phone numbers and email addresses, on the official Venstar websitio (www.venstar.com) or on the product packaging.
When contacting support, please have your thermostat model number (T1900) and any relevant purchase information ready.