1. Introdución
Thank you for choosing the Lenco PDR-030 DAB+/FM Portable Digital Radio. This manual provides essential information for setting up, operating, and maintaining your device. The PDR-030 offers high-quality digital radio reception (DAB+) and traditional FM radio, along with features such as an integrated rechargeable battery for portability, an RDS display, station memory, and an alarm clock function.
Compoñentes incluídos:
- Lenco PDR-030 Digital Radio
- AC Power Adapter (220 Volt)
- Manual de usuario
2. Información importante de seguridade
- Non expoña o dispositivo á choiva nin á humidade para evitar incendios ou descargas eléctricas.
- Asegúrate de que o adaptador de corrente volvatage coincide coa súa fonte de alimentación local.
- Non abras a c.asing. Encomende todo o mantemento a persoal cualificado.
- Evite colocar a unidade preto de fontes de calor ou baixo a luz solar directa.
- Handle the integrated battery with care. Do not attempt to replace it yourself.
- Manteña o dispositivo lonxe de campos magnéticos fortes.
3. Produto rematadoview
Familiarize yourself with the main components and controls of your Lenco PDR-030 radio.
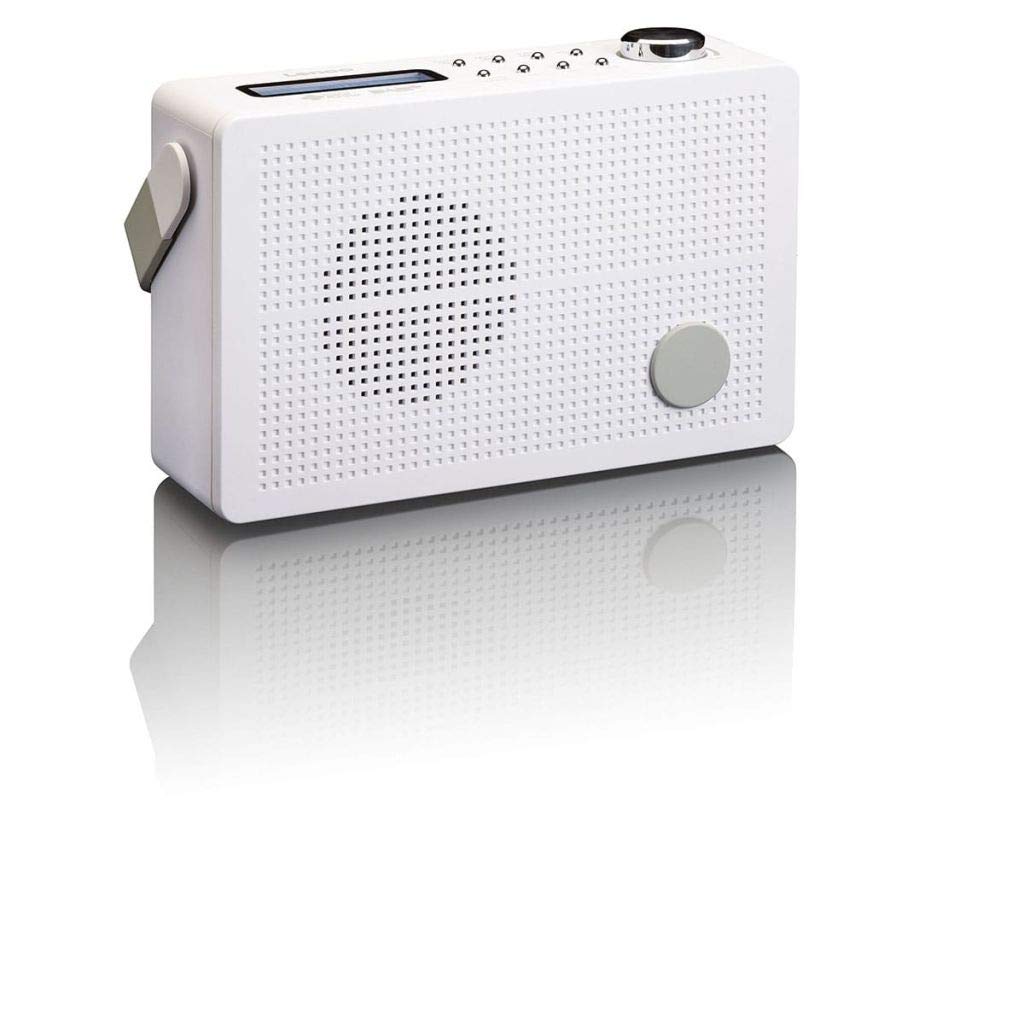
Figura 3.1: Front Panel of Lenco PDR-030 Radio. Features include a blue backlit LCD display, power/source button, alarm, sleep, info/menu, preset buttons, select/snooze, scan, previous, next buttons, and a rotary volume knob.
Key Controls and Features:
- Visualización: Two-line illuminated LCD for time, date, station name, and information.
- Botón de acendido/fonte: Turns the radio on/off and switches between DAB+ and FM modes.
- Botón de volume: Axusta o nivel de saída de audio.
- Antena telescópica: For optimal radio signal reception.
- Conector para auriculares (3.5 mm): Para escoita privada.
- Alarm/Sleep/Info/Menu/Preset Buttons: For various functions including setting alarms, sleep timer, accessing information, menu navigation, and managing station presets.
- Select/Snooze/Scan/Prev/Next Buttons: For station tuning, menu selection, and snooze function.
4. Configuración
4.1 Alimentando a radio
The PDR-030 can be powered by the included AC adapter or its integrated rechargeable battery.
- Potencia CA: Connect the supplied 220V AC power adapter to the DC input jack on the radio and then to a wall outlet. The radio will automatically begin charging the internal battery.
- Potencia da batería: The integrated Lithium-ion battery allows for portable use. Ensure the battery is sufficiently charged before use without the AC adapter.
4.2 Configuración da antena
Extend the telescopic antenna fully for optimal reception of both DAB+ and FM signals. Adjust its position for the best signal quality.
4.3 Initial Power On and Station Scan
- Preme o Fonte de enerxía botón para acender a radio.
- Upon first use, the radio will automatically enter DAB+ mode and perform a full scan for available digital radio stations. This may take a few minutes.
- Unha vez finalizada a busca, a radio sintonizará a primeira emisora dispoñible.
5. Instrucións de funcionamento
5.1 Encendido/apagado
Preme o Fonte de enerxía botón para acender ou apagar a radio.
5.2 Mode Selection (DAB+/FM)
Preme o Fonte button repeatedly to switch between DAB+ and FM radio modes.
5.3 Estacións de sintonización
- DAB+ Mode:
- After the initial scan, use the Prev e A continuación botóns para navegar pola lista de emisoras DAB+ dispoñibles.
- To perform a new full scan, press the Menú button, navigate to "Full Scan" using Anterior / Seguinte, e prema Seleccione.
- Modo FM:
- Preme o Escanear button to automatically scan for the next available FM station.
- Para a sintonización manual, manteña premido o botón Prev or A continuación botóns para axustar con precisión a frecuencia.
5.4 Saving and Recalling Preset Stations
The radio allows you to store up to 10 DAB+ and 10 FM preset stations.
- Para gardar unha predefinición:
- Sintonice a emisora desexada.
- Manteña premido o Predefinido botón ata que apareza "Preset Store" na pantalla.
- Usa o Anterior / Seguinte botóns para seleccionar un número predefinido (1-10).
- Preme Seleccione para confirmar e gardar a emisora.
- Para recuperar un preselección:
- Preme o Predefinido botón brevemente.
- Usa o Anterior / Seguinte botóns para seleccionar o número predefinido desexado.
- Preme Seleccione to tune to the preset station.
5.5 Control de volume
Xire o Botón de volume en sentido horario para aumentar o volume e en sentido antihorario para diminuílo.
5.6 RDS Functionality (FM Mode)
In FM mode, the RDS (Radio Data System) function displays information such as station name, program type, and other broadcast data on the two-line LCD display.
5.7 Función de alarma
The PDR-030 can be used as an alarm clock with two separate alarm times.
- Configurar unha alarma:
- Preme o Alarma botón.
- Use Anterior / Seguinte para seleccionar Alarma 1 ou Alarma 2 e, a seguir, prema Seleccione.
- Follow the on-screen prompts to set the alarm time, duration, source (Buzzer or Radio), frequency (Daily, Once, Weekdays, Weekends), and volume.
- Ensure the alarm is set to "On" and press Seleccione para gardar.
- Función de Snooze: Cando soe a alarma, prema o botón Adiar botón para silencialo temporalmente durante un período determinado.
- Temporizador de sono: Preme o Durmir repetidamente para axustar un temporizador de sono (por exemplo, 15, 30, 45, 60 minutos) despois do cal a radio apagarase automaticamente.
5.8 Conexión dos auriculares
Connect 3.5mm stereo headphones to the headphone jack for private listening. The internal speaker will be muted automatically.
6. Mantemento
6.1 Limpeza
Wipe the radio's exterior with a soft, dry cloth. Do not use abrasive cleaners, waxes, or solvents as they may damage the finish. Ensure no liquids enter the device.
6.2 Coidado coa batería
The integrated Lithium-ion battery is designed for long life. To maximize battery lifespan:
- Evite descargar completamente a batería con frecuencia.
- Se garda a radio durante un período prolongado, cargue a batería aproximadamente ao 50 % e gárdea nun lugar fresco e seco.
- Do not attempt to replace the battery yourself. Contact qualified service personnel if battery issues arise.
7 Solución de problemas
| Problema | Causa posible | Solución |
|---|---|---|
| Sen poder | AC adapter not connected or faulty; battery discharged. | Check AC adapter connection. Charge the battery. |
| Mala recepción DAB+/FM | Antena non estendida; zona de sinal débil; interferencias. | Fully extend and adjust the telescopic antenna. Move the radio to a location with better signal. Avoid placing near other electronic devices. |
| Sen son | Volume demasiado baixo; auriculares conectados; silencio activado. | Increase volume. Disconnect headphones. Check if mute is active (if applicable). |
| A alarma non soa | Alarma non activada; volume da alarma demasiado baixo; axuste de hora incorrecto. | Ensure alarm is set to "On". Check alarm volume. Verify current time and alarm time settings. |
8. Especificacións
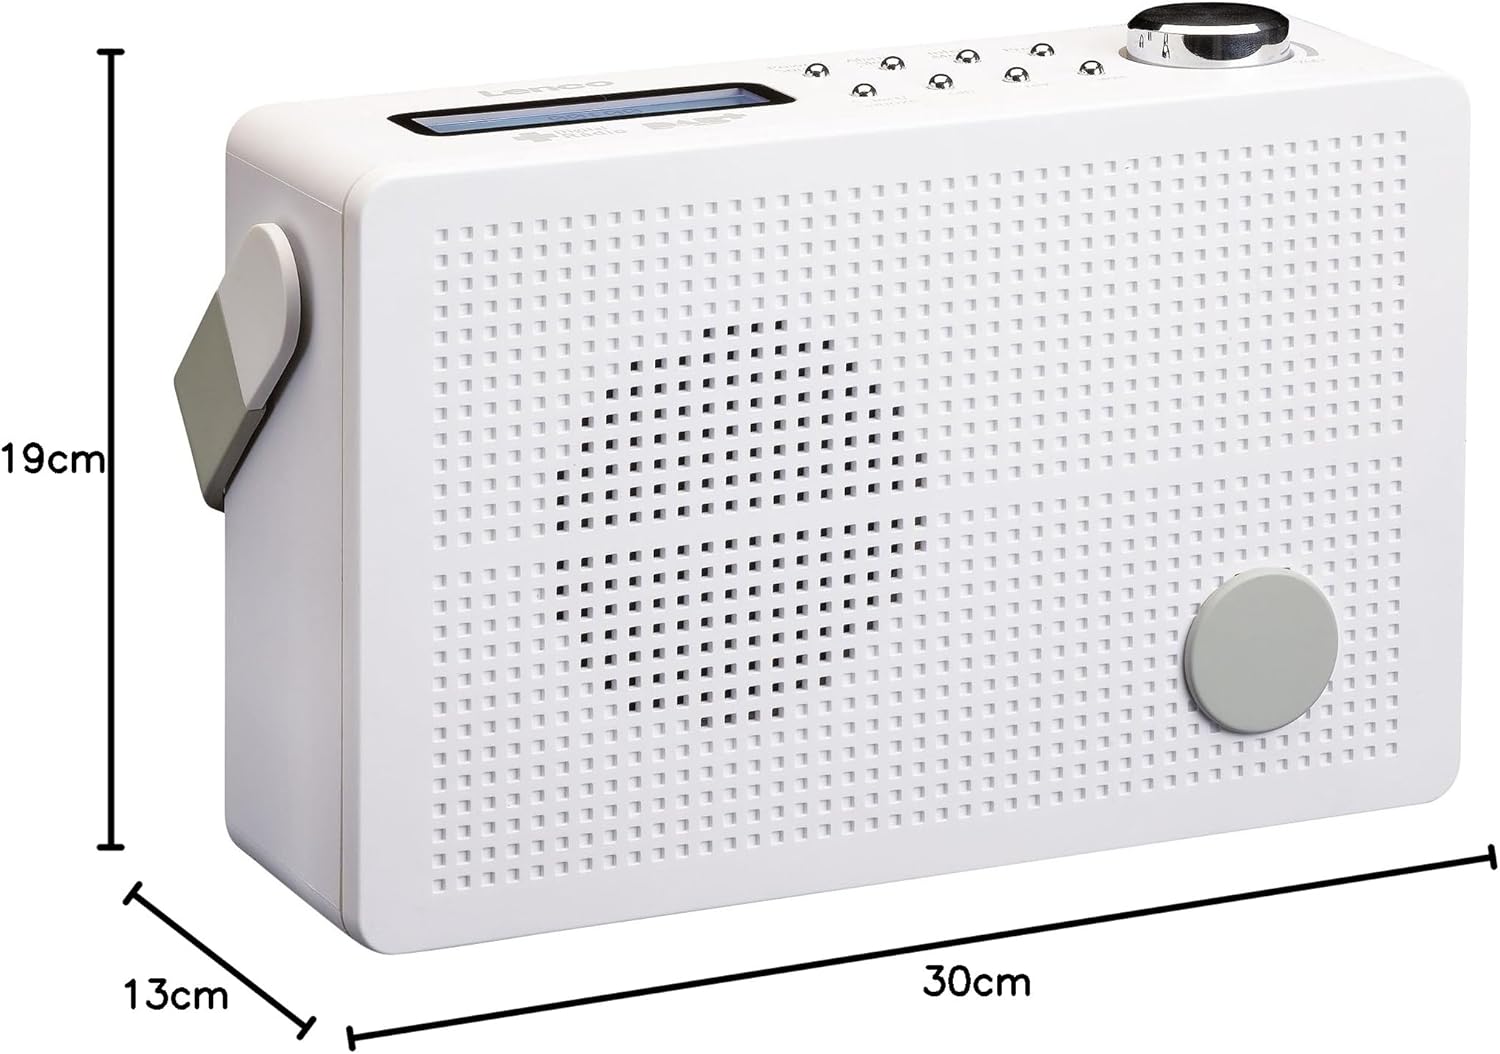
Figura 8.1: Lenco PDR-030 Dimensions.
| Característica | Detalle |
|---|---|
| Número de modelo | PDR-030 |
| Tecnoloxía de sintonizador | DAB+, FM (Ukw) |
| Fonte de enerxía | Battery-Powered (Integrated Lithium-ion), AC Adapter |
| Vol. ACtage | 220 voltios |
| Dimensións do produto (ancho x fondo x alto) | 21.4 x 6.5 x 13.8 cm (approx. 22.5 x 8.5 x 15 cm as per another spec) |
| Peso do elemento | 9 g (Note: This seems incorrect, likely 670g from description) |
| Tipo de material | Plástico |
| Interface de hardware | 3.5 mm Audio (Headphone Jack) |
| Características especiais | Portable, RDS Display, Alarm Clock, Station Memory (10 DAB+, 10 FM) |
Note: Some dimensions and weight specifications provided by the manufacturer may vary slightly. The description states 670 grams for weight, while specifications list 9g. Please refer to the product packaging for the most accurate information.
9. Garantía e soporte
Lenco products are designed for reliability and performance. This product typically comes with a 24-month manufacturer's warranty from the date of purchase, covering defects in materials and workmanship. Please retain your proof of purchase for warranty claims.
For technical support, service, or warranty inquiries, please refer to the contact information provided on the Lenco official website or your local retailer. Do not attempt to repair the device yourself.
Para obter máis información, pode visitar o Lenco Store on Amazon.