1. Introdución
Thank you for choosing the Outsunny 6' x 4' Polycarbonate Greenhouse. This manual provides essential information for the safe assembly, operation, and maintenance of your greenhouse. Please read these instructions thoroughly before beginning assembly and retain them for future reference.

Figure 1.1: The Outsunny 6' x 4' Polycarbonate Greenhouse, featuring a sliding door and a hinged roof vent.
This greenhouse is designed to provide a protected environment for your plants, shielding them from adverse weather conditions and pests, allowing for extended growing seasons.
2. Información de seguridade
Cumprir estas pautas de seguridade é fundamental para evitar lesións e danos no produto.
- Montaxe: Always assemble the greenhouse with at least two adults. Wear appropriate safety gear, including gloves, to prevent cuts from sharp edges.
- Localización: Select a level, stable surface for installation. We recommend placing the greenhouse against a wall or in a sheltered area, away from strong winds, to enhance stability.
- Ancoraxe: Ensure the greenhouse is securely anchored to the ground using the provided ground bolts or other suitable anchoring methods to prevent it from being lifted by wind.
- Condicións meteorolóxicas: In extreme weather conditions (e.g., heavy snow, strong winds), take additional precautions such as reinforcing the structure or temporarily removing panels if necessary.
- Ventilación: Ensure proper ventilation, especially during hot weather, to prevent overheating inside the greenhouse.
- Nenos e animais: Keep children and pets away from the assembly area. Do not allow them to play inside the greenhouse unsupervised.
3. Compoñentes do paquete
Before beginning assembly, verify that all components listed in your product's packing list are present and undamaged. Contact customer support immediately if any parts are missing or defective.
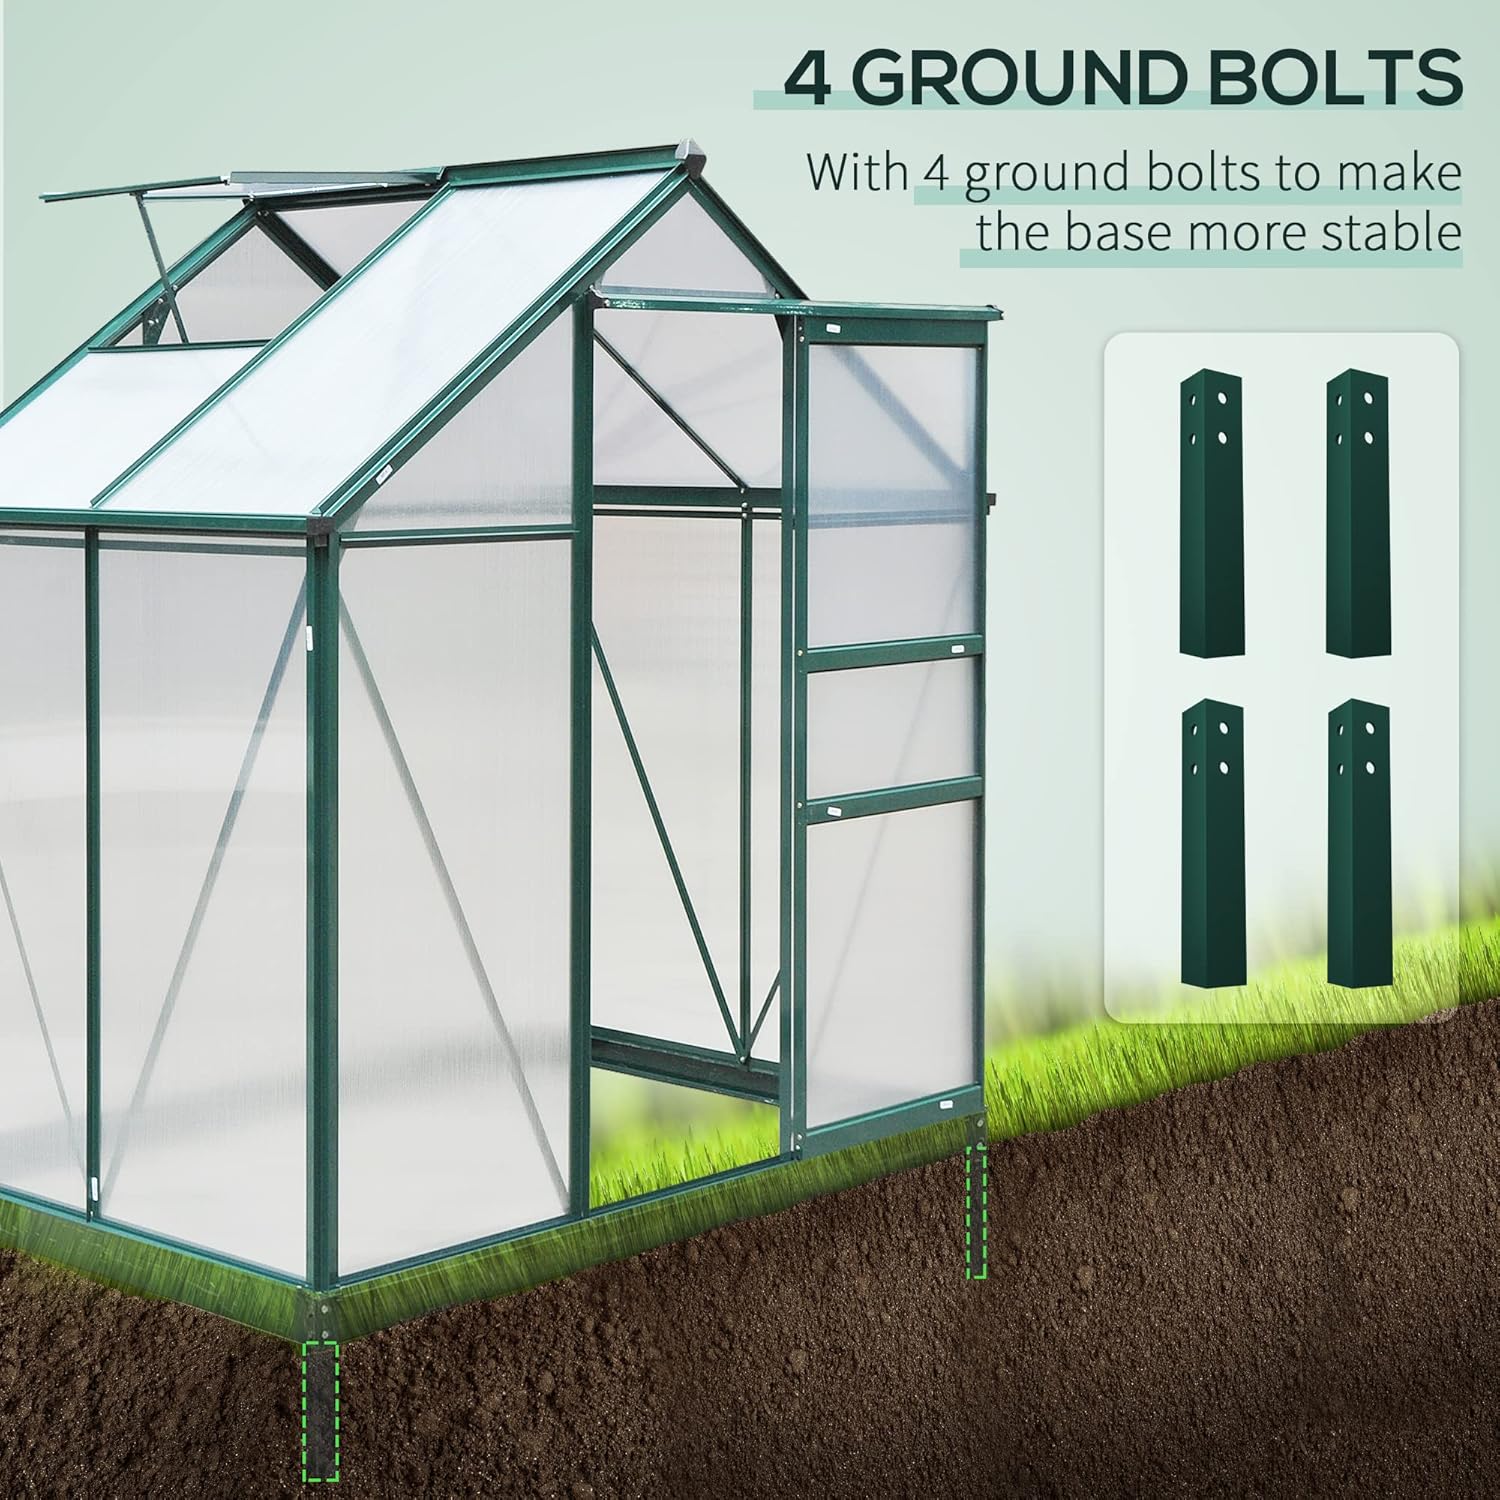
Figure 3.1: Illustration of the transparent polycarbonate panels and the aluminum alloy frame, highlighting key material features like high light transmission, rust protection, and UV protection.
Os compoñentes típicos inclúen:
- Seccións de marco de aliaxe de aluminio
- Polycarbonate Panels (Roof and Wall)
- Montaxe de portas corredías
- Rooftop Vent Assembly
- Base de aceiro galvanizado
- Ground Bolts (4 units)
- Fasteners and Hardware Kit
- Rain Gutter System Components
4. Configuración e montaxe
Follow these general steps for assembling your greenhouse. Refer to the detailed diagrams in your specific assembly guide for precise instructions.
4.1 Preparación do lugar
Choose a flat, level, and well-drained area. Clear any debris, rocks, or vegetation. Ensure adequate space around the greenhouse for access and maintenance.
4.2 Base Assembly and Anchoring
Assemble the galvanized steel base according to the instructions. Securely anchor the base to the ground using the four provided ground bolts. Proper anchoring is critical for stability.
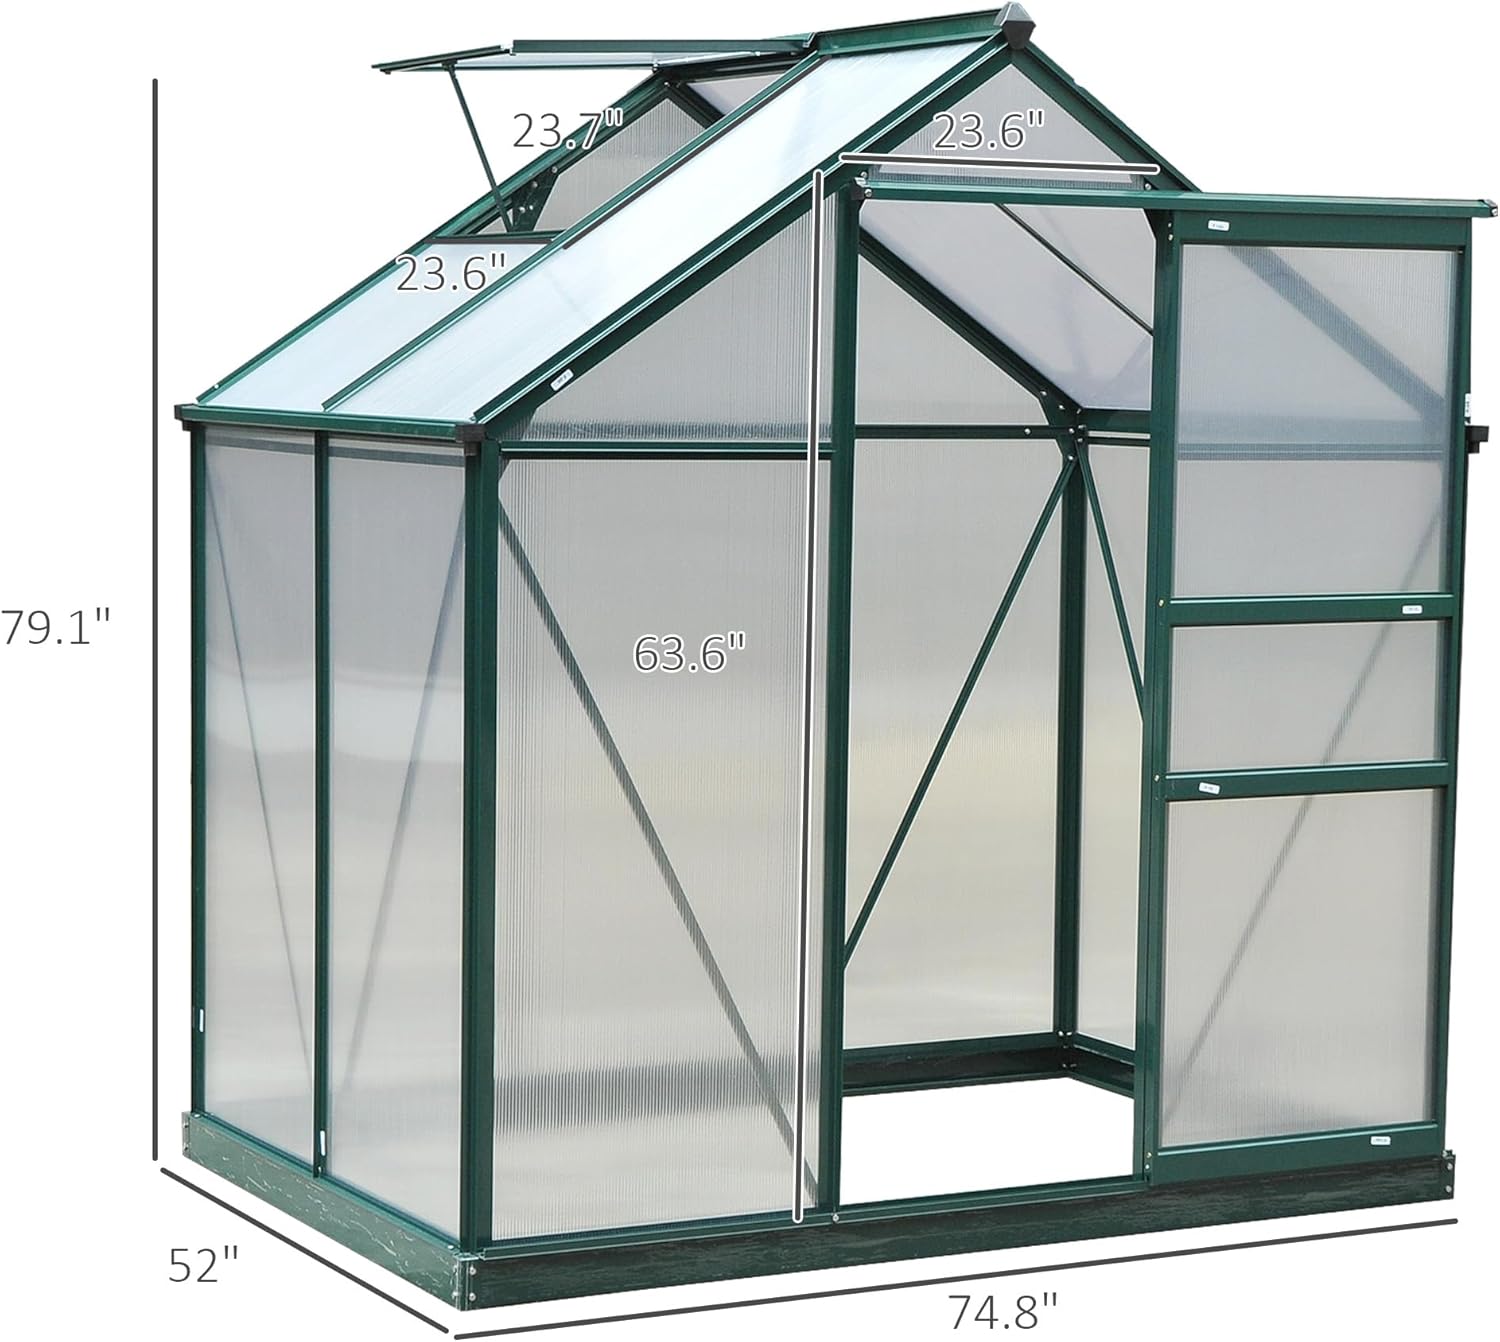
Figure 4.1: Diagram illustrating the installation of the four ground bolts to enhance the stability of the greenhouse base.
4.3 Montaxe do cadro
Construct the aluminum frame by connecting the various sections. Ensure all connections are tight and secure. The powder-coated aluminum provides a water-safe build.
4.4 Instalación do panel
Carefully slide the polycarbonate panels into the designated channels of the aluminum frame. Ensure the panels are correctly oriented (UV-protected side facing outwards, if applicable).
4.5 Door and Vent Installation
Install the sliding door and the rooftop vent. Test their operation to ensure smooth movement and proper sealing.
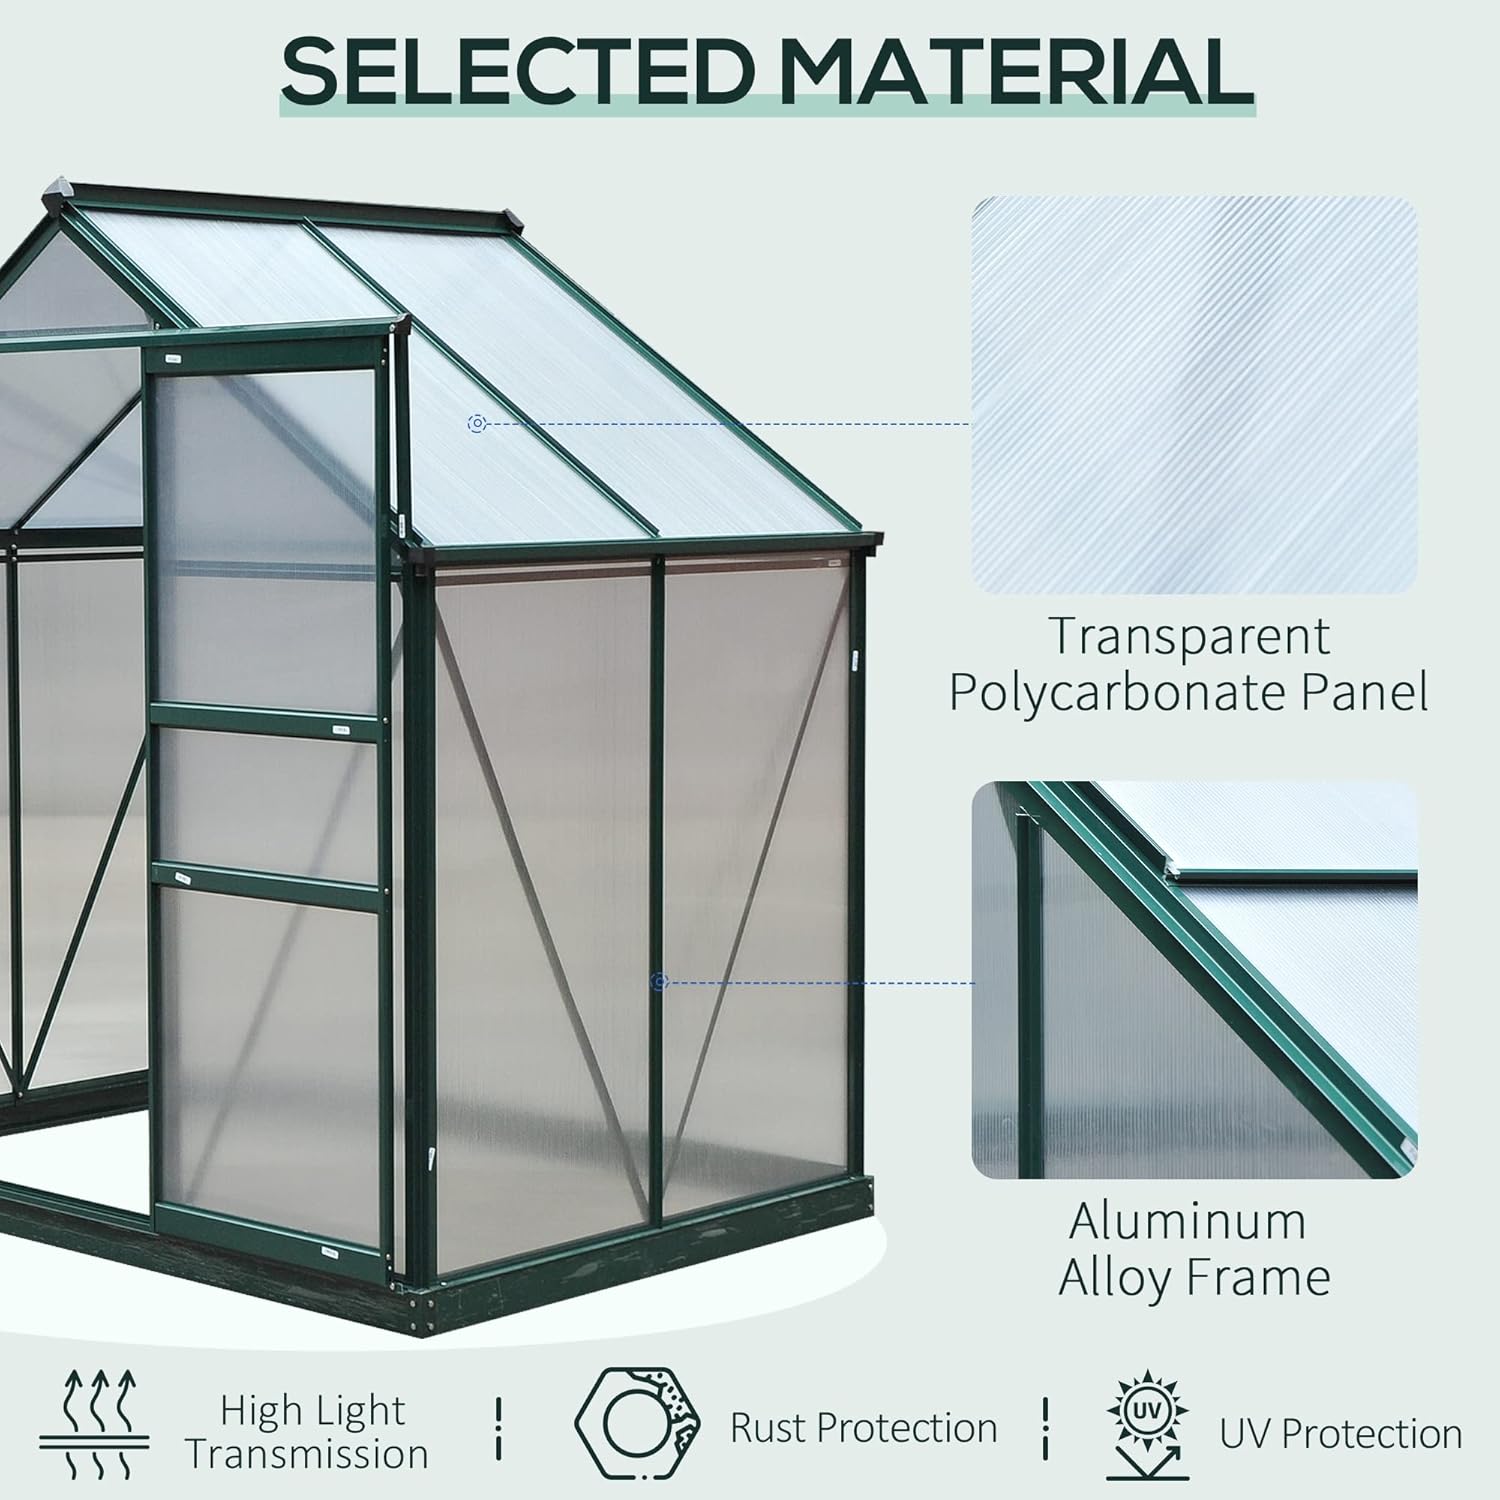
Figure 4.2: Key design features including the flexible sliding door for easy access, the rooftop vent for airflow, and the four corners with slant support bars for structural integrity.
5. Funcionamento
Understanding the features of your greenhouse will help you optimize growing conditions for your plants.
5.1 Porta corrediza
The flexible sliding door provides easy access for moving plants, tools, and equipment. It can be opened for ventilation or closed to maintain internal temperature and humidity.
5.2 Rooftop Vent
The hinged rooftop vent allows for controlled air circulation. Open the vent to release excess heat and humidity, preventing condensation and ensuring optimal growing conditions. Close it to retain warmth.
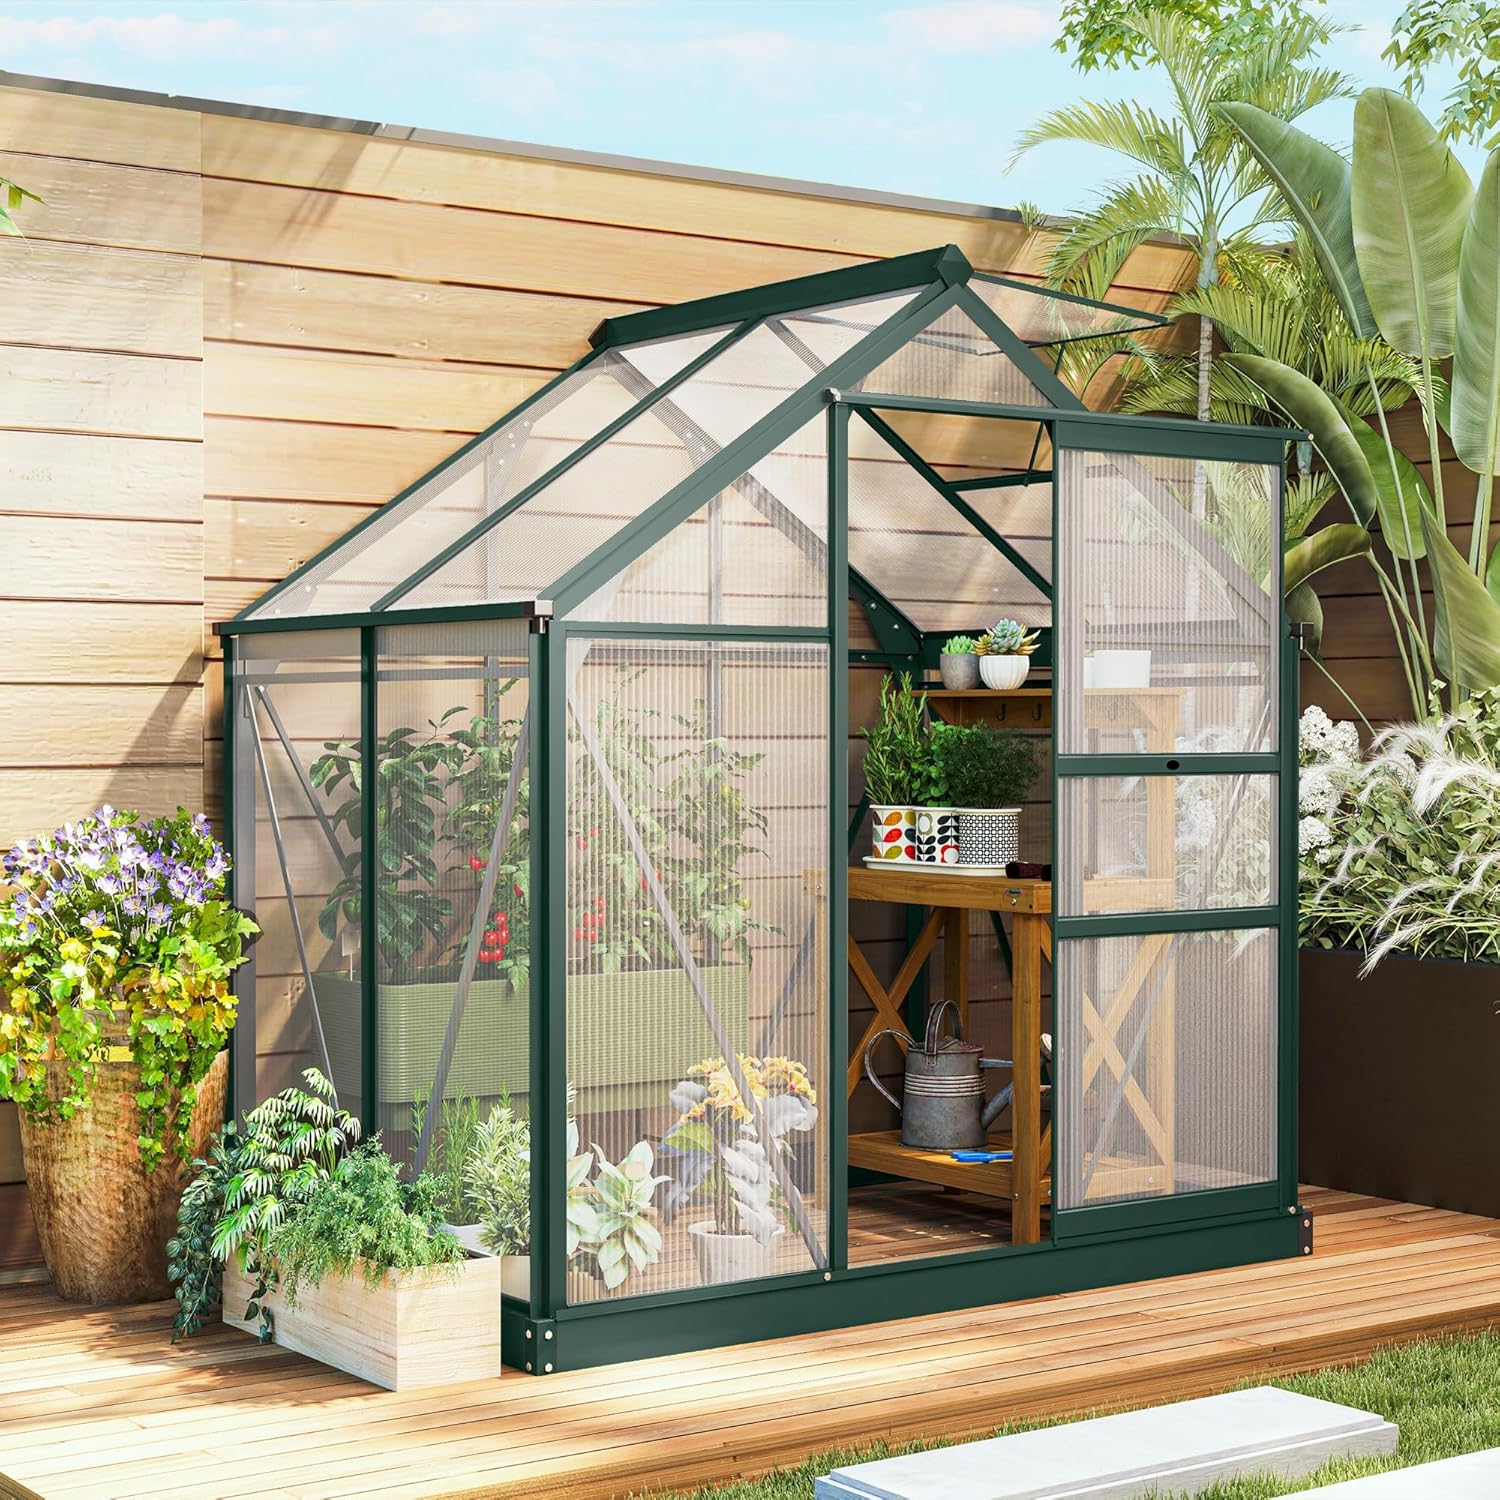
Figure 5.1: The interior of the greenhouse, demonstrating space for shelving and various plants, with the rooftop vent visible.
5.3 Rain Gutter System
The integrated rain gutters are designed to collect natural rainwater from the roof. This water can be harvested for irrigation, providing a sustainable water source for your plants.

Figure 5.2: Detail of the integrated rain gutters, designed for effective water drainage and collection.
6. Mantemento
Un mantemento regular prolongará a vida útil do teu invernadoiro e garantirá un rendemento óptimo.
- Limpeza: Periodically clean the polycarbonate panels with mild soap and water to remove dirt, algae, and debris. Avoid abrasive cleaners or tools that could scratch the panels.
- Inspección do cadro: Annually inspect the aluminum frame for any signs of corrosion or damage. Tighten any loose bolts or fasteners.
- Inspección do panel: Check panels for cracks or damage. Replace any severely damaged panels to maintain insulation and protection.
- Vent and Door: Lubricate hinges and sliding mechanisms as needed to ensure smooth operation. Keep tracks clear of debris.
- Canlóns de choiva: Regularly clear leaves and debris from the rain gutters to ensure efficient water collection and drainage.
- Invernada (se procede): In areas with heavy snowfall, consider brushing snow off the roof to prevent excessive weight accumulation.
7 Solución de problemas
Esta sección aborda problemas comúns que podes atopar co teu invernadoiro.
| Problema | Causa posible | Solución |
|---|---|---|
| Greenhouse feels unstable or wobbly. | Ancoraxe insuficiente; conexións soltas da estrutura. | Ensure ground bolts are fully secured. Tighten all frame fasteners. Consider additional anchoring if in a windy area. |
| Condensación excesiva no interior. | Poor ventilation; high humidity. | Open the rooftop vent and/or sliding door to increase airflow. Ensure plants are not overwatered. |
| A porta corrediza atascase ou é difícil de abrir. | Debris in track; misaligned rollers; lack of lubrication. | Clean the door track. Check for proper alignment of rollers. Apply a silicone-based lubricant to the track and rollers. |
| Water leakage from roof or seams. | Panels not properly seated; damaged seals; missing sealant. | Inspect panel seating and seals. Apply weather-resistant silicone sealant to any gaps or compromised areas. |
8. Especificacións
Key technical details for the Outsunny 6' x 4' Polycarbonate Greenhouse:
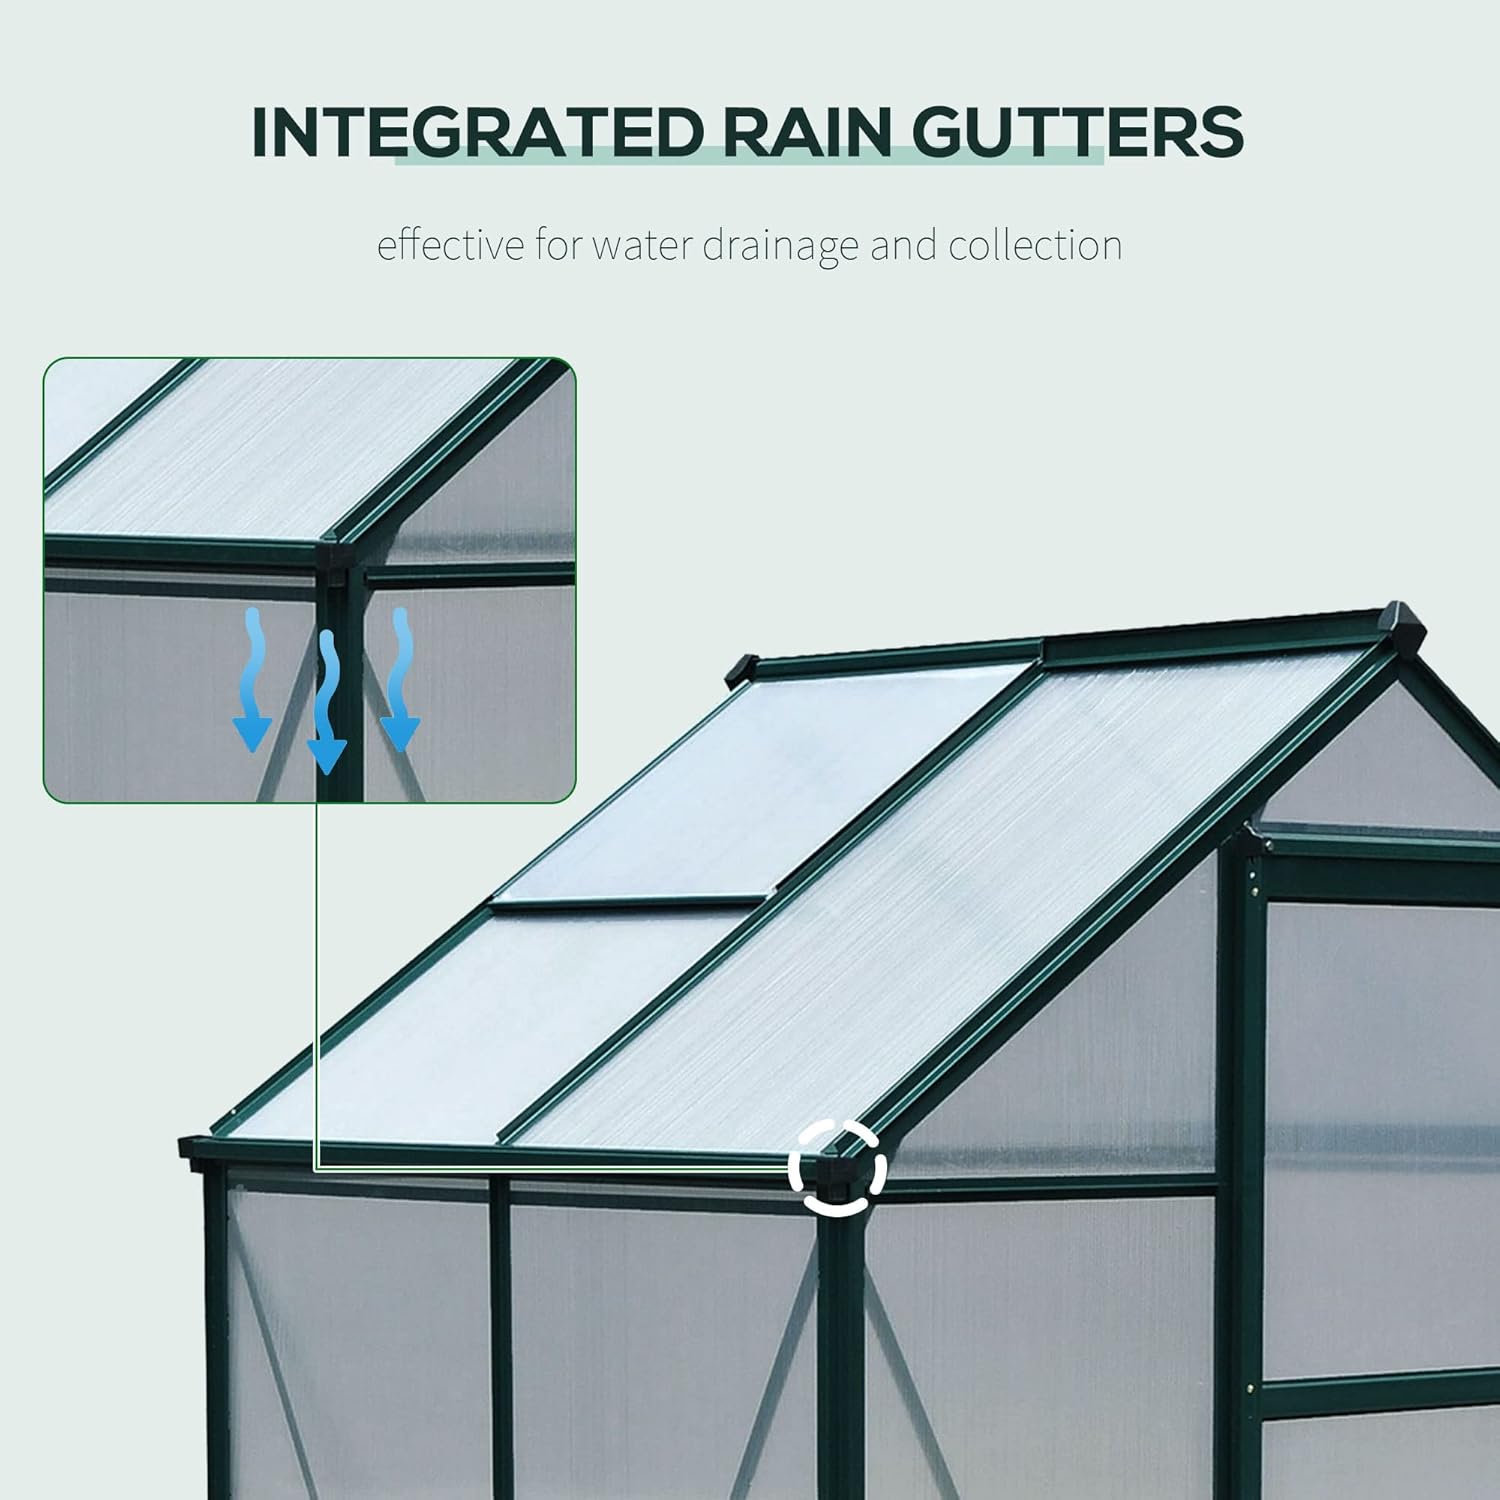
Figure 8.1: Detailed dimensions of the greenhouse, including length, width, height, and roof vent measurements.
- Marca: soleado
- Modelo: 6' x 4' x 6.5' (Approximate)
- Dimensións do produto (L x W x H): 74.75" x 52" x 79.25" (190 cm x 132 cm x 201 cm)
- Peso do artigo: 54 libras (24.5 kg)
- Material de cuberta: Policarbonato (PC)
- Material do cadro: Powder-Coated Aluminum Alloy
- Material base: Aceiro Galvanizado
- Cor: Verde escuro
- Características: Sliding Door, Rooftop Vent, Rain Gutter System, 4 Ground Bolts
9. Garantía e soporte
For warranty information, product support, or to order replacement parts, please contact Outsunny customer service. Refer to your purchase documentation for specific warranty terms and contact details.
You can typically find support contact information on the official Outsunny websitio web ou a través do vendedor onde adquiriu o produto.