
1. Introdución
Grazas pola compraasing the Candy X-Range CMXG20DS Microwave with Grill. This manual provides essential information for the safe and efficient operation of your appliance. Please read these instructions carefully before using the microwave oven and retain them for future reference.
Instrucións de seguridade importantes
- Non intente usar este forno coa porta aberta, xa que isto pode resultar nunha exposición prexudicial á enerxía das microondas.
- Non coloque ningún obxecto entre a cara frontal do forno e a porta nin permita que se acumule terra ou residuos de limpeza nas superficies de selado.
- Non accione o forno se está danado. É particularmente importante que a porta do forno se peche correctamente e que non se danen as seguintes: (1) porta (dobrada), (2) bisagras e pestillos (rotos ou soltos), (3) selos e superficies de selado.
- O forno non debe ser axustado nin reparado por ninguén, excepto por persoal de servizo debidamente cualificado.
- Asegúrese de que o aparello estea correctamente conectado a terra.
- Non quentes líquidos ou outros alimentos en recipientes selados, xa que poden explotar.
- Use só utensilios axeitados para o seu uso en fornos microondas.
- Ao quentar alimentos en recipientes de plástico ou de papel, vixiar o forno debido á posibilidade de ignición.
2. Produto rematadoview
The Candy X-Range CMXG20DS is a 20-liter microwave oven with an integrated grill function, designed for versatile cooking. It features a digital display, multiple power levels, and automatic programs.
Compoñentes
- Unidade de forno microondas
- Prato xiratorio de vidro (25.5 cm de diámetro)
- Anel de tocadiscos
- Parrilla Grill
- Manual de instrucións
Diagrama do aparello
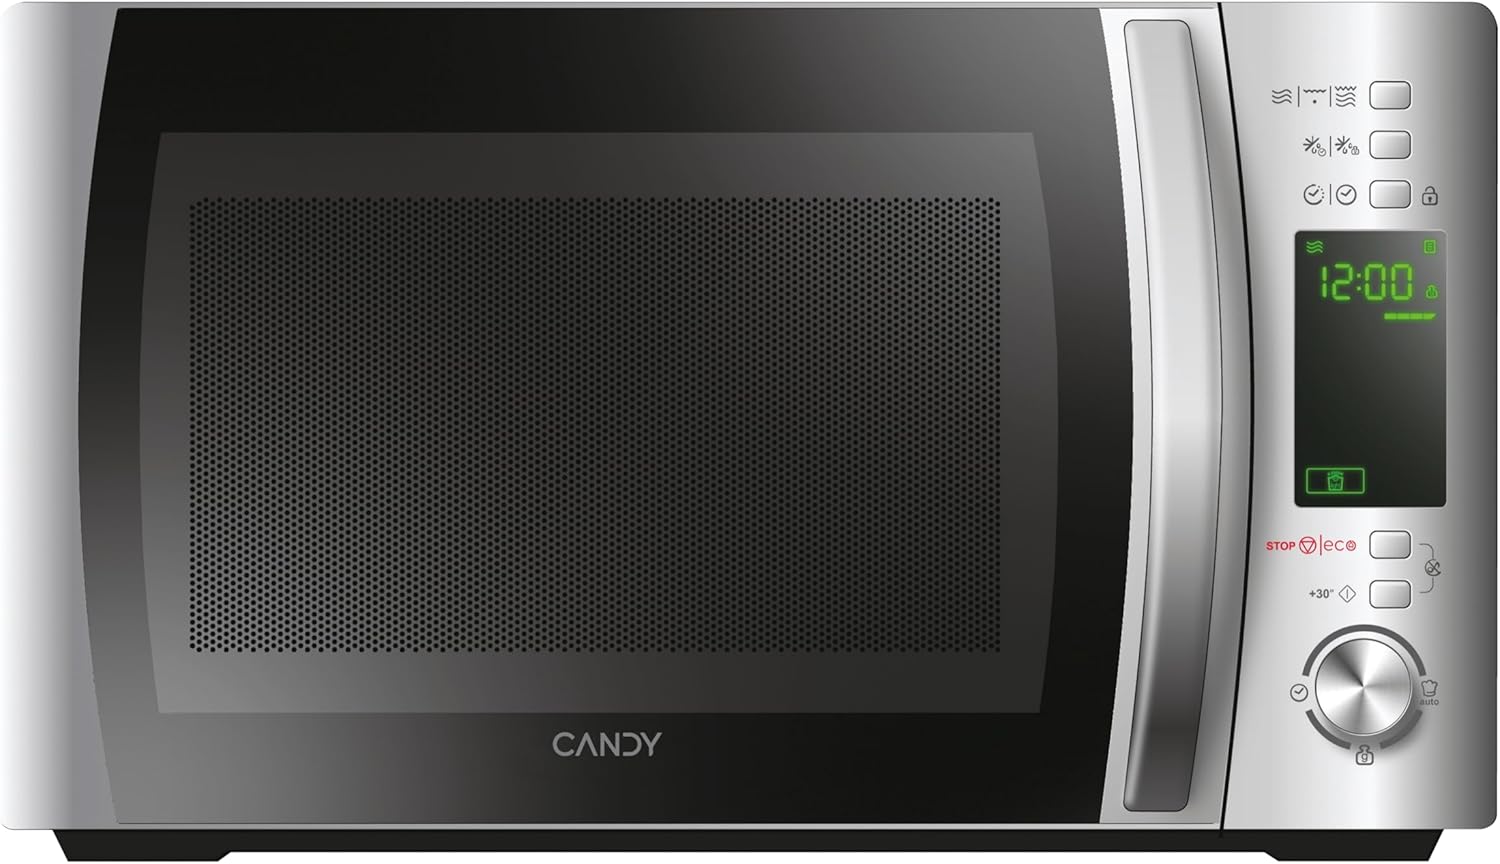

Panel de control
The control panel features a digital display and various buttons and a dial for setting cooking functions, time, and power levels. Specific functions include:
- Pantalla dixital: Mostra o tempo, o nivel de potencia e os indicadores do programa.
- Botóns de nivel de potencia: Adjust microwave power.
- Grill Function Button: Activates the grill.
- Botón de desconxelación: For defrosting by weight or time.
- Automatic Programs Button: Accesses pre-set cooking programs.
- Botón de bloqueo de seguridade: Engages/disengages child lock.
- Botón STOP/ECO: Detén a cocción ou activa o modo Eco.
- Botón +30 segundos: Quick start or adds 30 seconds to cooking time.
- Dial rotativo: Adjusts time, weight, or program selection.
- Botón de inicio: Initiates cooking.
3. Configuración
Desembalaxe e colocación
- Retire todos os materiais de embalaxe da cavidade do forno e dos accesorios.
- Inspect the oven for any damage such as dents or a misaligned door. Do not operate if damaged.
- Place the microwave oven on a stable, level surface strong enough to hold the oven and the food being cooked.
- Ensure adequate ventilation. Maintain a minimum clearance of 20 cm above the oven, 10 cm at the rear, and 5 cm on both sides. Do not block any ventilation openings.
- Non coloque o forno preto de fontes de calor nin en lugares publicitarios.amp ambiente.

Conexión eléctrica
- Plug the power cord into a properly installed and earthed wall socket.
- Asegurar o voltage coincide coa etiqueta de clasificación do electrodoméstico.
Configuración inicial: Axuste do reloxo
- Cando se conecta o microondas por primeira vez, a pantalla mostrará "0:00".
- Press the "Clock" button (if available, otherwise consult specific model instructions for clock setting, often combined with a time setting button).
- Rotate the dial to set the hour. Press the "Clock" button again.
- Rotate the dial to set the minutes. Press the "Clock" button to confirm.
4. Instrucións de funcionamento
4.1. Cociña básica no microondas
- Coloque os alimentos nun recipiente apto para microondas no prato xiratorio de vidro. Peche a porta.
- Press the "Microwave" button (or equivalent power level button) repeatedly to select the desired power level (e.g., 700W, 500W, etc.). The display will show the selected power.
- Rotate the dial to set the cooking time.
- Prema o botón "Inicio" para comezar a cociñar.
4.2. Función de grella
- Coloque a comida na grella e, a seguir, coloque a grella no prato xiratorio.
- Press the "Grill" button. The display will show "G".
- Rotate the dial to set the grilling time.
- Prema o botón "Inicio".
4.3. Cocción combinada (microondas + grella)
- Coloque os alimentos nun recipiente axeitado no prato xiratorio ou na grella.
- Press the "Combi" button (or press Microwave/Grill buttons in sequence to select a combination mode, e.g., C-1, C-2).
- Rotate the dial to set the cooking time.
- Prema o botón "Inicio".
4.4. Función de desconxelación
The CMXG20DS offers defrosting by weight or by time.
Desconxelación por peso:
- Coloque os alimentos conxelados no prato xiratorio.
- Press the "Defrost" button once. The display will show "dEF1" (or similar for weight defrost).
- Rotate the dial to set the weight of the food.
- Prema o botón "Inicio".
Desconxelación por hora:
- Coloque os alimentos conxelados no prato xiratorio.
- Press the "Defrost" button twice. The display will show "dEF2" (or similar for time defrost).
- Rotate the dial to set the defrosting time.
- Prema o botón "Inicio".

4.5. Express Cooking (+30 Seconds)
For quick heating at full power, simply press the "+30 Seconds" button. Each press adds 30 seconds to the cooking time. This function can also be used to extend cooking time during operation.
4.6. Automatic Programs (40 Programs)
The microwave features 40 pre-set automatic cooking programs for various food types. These programs are designed to simplify cooking by automatically setting the optimal time and power.
- Press the "Auto Program" button. The display will show "A-1" (or similar).
- Rotate the dial to select the desired program (e.g., A-1 for pizza, B-1 for vegetables). A list of programs and their corresponding codes is typically found on the inside of the microwave door or in a separate section of this manual.
- Prema o botón "Inicio".

4.7. Función de temporizador
The microwave can be used as a kitchen timer without cooking.
- Ensure the oven is not in cooking mode.
- Press the "Timer" button (or a dedicated clock/timer button).
- Rotate the dial to set the desired countdown time.
- Press the "Start" button. The timer will count down without activating the microwave function.
4.8. Safety Lock (Child Lock)
Para evitar o funcionamento non intencionado, especialmente por parte de nenos:
- Para activar: Press and hold the "Safety Lock" button (often indicated by a lock icon) for 3 seconds. A lock indicator will appear on the display.
- Para desactivar: Press and hold the "Safety Lock" button again for 3 seconds. The lock indicator will disappear.
4.9. Modo Eco
The Eco mode turns off the display to save energy when the microwave is not in use.
- Para activar: Press the "STOP/ECO" button once when the microwave is idle. The display will turn off.
- Para desactivar: Press any button or open the door. The display will reactivate.
4.10. simply-Fi App Integration
The simply-Fi app provides additional functionality, including access to recipes, cooking tips, and product information. Refer to the app's instructions for pairing and usage.

5. Mantemento e Limpeza
Unha limpeza e un mantemento regulares garantirán a lonxevidade e o rendemento óptimo do seu forno microondas.
Limpeza xeral
- Desconecte sempre o aparello da toma de enerxía antes de limpar.
- Limpar a cavidade do forno despois de cada uso cun anuncioamp pano. Para manchas difíciles, pódese usar un deterxente suave.
- As superficies exteriores deben ser limpas con adamp cloth. Prevent water from seeping into the ventilation openings.
- The door and door seals should be cleaned regularly to ensure proper closing and operation.
Accesorios de limpeza
- O prato xiratorio e o anel do prato xiratorio de vidro pódense lavar con auga morna e xabón ou no lavalouza.
- The grill rack should be cleaned with warm soapy water and a non-abrasive sponge.
- Ensure all parts are completely dry before reassembling and using the microwave.
6 Solución de problemas
Se tes problemas co teu forno microondas, consulta a seguinte táboa para ver os problemas e as solucións máis habituais.
| Problema | Causa posible | Solución |
|---|---|---|
| O forno non comezará | Cable de alimentación non conectado correctamente. Porta non pechada correctamente. Fusible fundido ou disyuntor saltado. | Ensure power cord is plugged in. Close door securely. Check household fuse or reset circuit breaker. |
| A comida non se quenta | Incorrect cooking time or power level set. Microwave-safe dish not used. | Adjust cooking time and power level. Use appropriate microwave-safe cookware. |
| Chispas dentro do forno | Metal ou papel de aluminio no forno. Residuos de comida nas paredes da cavidade. | Remove any metal objects. Clean the oven cavity thoroughly. |
| A placa xiratoria non xira | Turntable not properly placed on the ring. Obstruction under the turntable. | Ensure turntable and ring are correctly positioned. Remove any obstructions. |
| A pantalla mostra o código de erro | Avaría interna. | Unplug the oven for a few minutes, then plug it back in. If the error persists, contact customer support. |
Se o problema persiste despois de intentar estas solucións, póñase en contacto co servizo de atención ao cliente.
7. Especificacións técnicas
- Marca:
- Doce
- Número de modelo:
- CMXG20DS
- Cor:
- Prata
- Dimensións do produto (P x A x A):
- 44 x 29.5 x 26 cm
- Capacidade:
- 20 litros
- Potencia de saída de microondas:
- 700 vatios
- Voltage:
- 230 voltios
- Material:
- Aceiro inoxidable
- Nivel de ruído:
- 44 dB
- Características especiais:
- Control panel lock, Defrost, Eco mode, Turntable, Programmable, Quick access keys, Timer
- Diámetro da mesa giratoria:
- 25.5 cm
- Peso:
- 12.2 kg
8. Garantía e soporte
Información da garantía
This Candy appliance is covered by a standard manufacturer's warranty. Please refer to the warranty card included with your purchase for specific terms and conditions, including the duration of coverage and what is covered.
Atención ao cliente
For technical assistance, spare parts, or service requests, please contact Candy customer support. Contact details can typically be found on the manufacturer's official websitio web ou na documentación da garantía.
When contacting support, please have your model number (CMXG20DS) and serial number ready.