
1. Introdución
This manual provides detailed instructions for the installation, operation, and maintenance of your ASRock AB350M-HDV MicroATX Motherboard. The ASRock AB350M-HDV is designed to support AMD Socket AM4 A-Series APUs (Bristol Ridge) and Ryzen Series CPUs (Summit Ridge), featuring a Digi Power design and 7 Power Phase design for stable performance. It supports DDR4 memory and offers various connectivity options including SATA3, USB 3.0, and an Ultra M.2 slot.
2. Produto rematadoview
The ASRock AB350M-HDV motherboard is a MicroATX form factor board, ideal for compact PC builds. It features essential components for a modern computing system.

Figura 2.1: En ángulo view of the ASRock AB350M-HDV Motherboard, showcasing its compact MicroATX design and various components.
Características principais:
- Supports AMD Socket AM4 A-Series APUs (Bristol Ridge) and Ryzen Series CPUs (Summit Ridge).
- DDR4 memory support up to 3200+ (OC) for Ryzen CPUs and 2400 for A-series APUs.
- 1 PCIe 3.0 x16 slot and 1 PCIe 2.0 x1 slot for expansion cards.
- 4 SATA3 ports and 1 Ultra M.2 (PCIe Gen3 x4 & SATA3) slot for storage.
- 6 USB 3.0 ports (2 front, 4 rear) and 2 USB 2.0 ports for peripheral connectivity.
- Integrated Gigabit Ethernet for network connectivity.
- Video outputs: VGA, DVI, HDMI.

Figura 2.2: De arriba abaixo view of the ASRock AB350M-HDV Motherboard, highlighting the CPU socket, RAM slots, M.2 slot, and PCIe slots.
3. Configuración e instalación
Follow these steps carefully to install your ASRock AB350M-HDV motherboard and its components.
3.1 Instalación da CPU
- Localiza o socket da CPU AM4 na placa base.
- Levante a palanca de carga que está no lateral da toma de corrente.
- Aliña a marca triangular da CPU coa marca correspondente no socket. Coloca a CPU no socket con coidado sen forzala.
- Baixa a palanca de carga para fixar a CPU no seu lugar.
- Instala o refrigerador da CPU segundo as instrucións do fabricante.
3.2 Instalación da RAM (memoria)
- Locate the DDR4 DIMM slots. This motherboard has 4 slots.
- Abra os clips nos dous extremos da ranura DIMM.
- Aliñe a muesca do módulo RAM coa chave da ranura DIMM.
- Insira o módulo RAM firmemente na ranura ata que os clips encaixen no seu lugar. Asegúrese de que ambos os clips estean pechados.
3.3 Instalación de dispositivos de almacenamento (SATA e M.2)
Unidades SATA:
- Connect one end of a SATA data cable to a SATA3 port on the motherboard.
- Conecta o outro extremo do cable de datos SATA ao teu disco duro ou SSD.
- Conecta un cable de alimentación SATA da fonte de alimentación (PSU) ao dispositivo de almacenamento.
SSD M.2:
- Localiza a ranura Ultra M.2 na placa base.
- Remove the M.2 screw and standoff from the slot.
- Insira o SSD M.2 na ranura nun ángulo de 30 graos.
- Push the M.2 SSD down and secure it with the screw and standoff.
3.4 Conexións de enerxía
- Conecta o conector de alimentación ATX de 24 pines da túa fonte de alimentación á toma de alimentación de 24 pines da placa base.
- Connect the 8-pin (or 4-pin) ATX 12V power connector from your PSU to the corresponding socket near the CPU.
3.5 Conexións do panel frontal
Connect the cables from your PC case (Power Button, Reset Button, HDD LED, Power LED, USB, Audio) to the corresponding headers on the motherboard. Refer to the motherboard layout diagram in your physical manual for exact header locations.
3.6 Instalación da tarxeta gráfica
- Locate the PCIe 3.0 x16 slot.
- Retire a tapa da ranura de expansión correspondente da caixa do seu PC.
- Align the graphics card with the PCIe slot and press it down firmly until it clicks into place.
- Fixa a tarxeta gráfica á carcasa cun parafuso.
- Connect any required PCIe power cables from your PSU to the graphics card.
4. Instrucións de funcionamento
4.1 Primeiro arranque e configuración da BIOS/UEFI
- Despois de montar todos os compoñentes, conecte o monitor, o teclado e o rato.
- Acende o teu sistema.
- Durante o arranque, prema repetidamente o botón DEL or F2 tecla para entrar na utilidade de configuración da BIOS/UEFI.
- In the BIOS, you can configure boot order, system time, and other advanced settings. Save changes and exit to boot into your operating system installation media.
4.2 Instalación do controlador
After installing your operating system, install the necessary drivers for the motherboard components. These typically include chipset drivers, audio drivers, LAN drivers, and any specific utility drivers. Drivers can be found on the ASRock official websitio para o modelo específico da túa placa base.
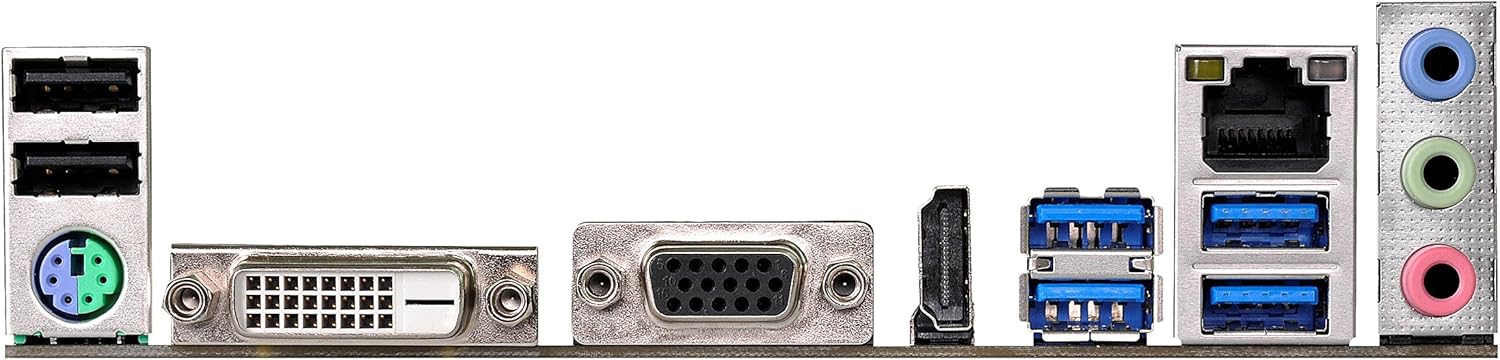
Figure 4.1: Rear I/O panel of the ASRock AB350M-HDV Motherboard, showing USB ports, video outputs (VGA, DVI, HDMI), LAN port, and audio jacks.
5. Mantemento
Un mantemento axeitado garante a lonxevidade e o rendemento óptimo da túa placa base.
5.1 Limpeza
- Limpe regularmente o po da placa base e dos seus compoñentes con aire comprimido.
- Asegúrese de que o sistema estea apagado e desconectado antes de limpalo.
- Evite usar produtos de limpeza líquidos directamente sobre os compoñentes.
5.2 Actualizacións da BIOS/UEFI
Comprobe periodicamente o ASRock website for BIOS/UEFI updates. Updates can improve compatibility, stability, and performance. Follow the instructions provided by ASRock carefully when performing a BIOS update to avoid system damage.
6 Solución de problemas
Esta sección ofrece solucións a problemas comúns cos que podes atoparte.
6.1 Sen alimentación / Sen POST (autoproba de acendido)
- Comproba as conexións de alimentación: Ensure the 24-pin and 8-pin (or 4-pin) CPU power connectors are securely seated.
- Verify PSU: Test your power supply unit (PSU) to ensure it is functional and providing adequate power.
- Reasentar compoñentes: Remove and re-install the CPU, RAM, and graphics card to ensure they are properly seated.
- Borrar CMOS: Refer to your physical manual for instructions on how to clear the CMOS (Complementary Metal-Oxide-Semiconductor) settings, which can resolve boot issues.
6.2 Sen saída de pantalla
- Conexión de monitor: Ensure your monitor is correctly connected to the graphics card or motherboard (if using an APU with integrated graphics).
- Tarxeta gráfica: If using a dedicated graphics card, ensure it is properly installed and has sufficient power. Test with another graphics card if possible.
- APU Compatibility: If using an AMD A-Series APU, ensure your monitor is connected to the motherboard's video outputs (VGA, DVI, HDMI). Ryzen CPUs without integrated graphics require a dedicated graphics card.
6.3 Operating System Not Booting
- Orde de arranque: Check the BIOS/UEFI settings to ensure the correct boot device (e.g., SSD/HDD with OS) is prioritized.
- Dispositivo de almacenamento: Verify that your storage device is detected in the BIOS.
- Instalación do sistema operativo: If the OS is newly installed, ensure the installation process completed successfully.
7. Especificacións
| Marca | ASRock |
| Nome do modelo | AB350M-HDV |
| Socket CPU | Enchufe AM4 |
| Tipo de chipset | AMD Promontory B350 |
| Procesadores compatibles | AMD A-Series APUs (Bristol Ridge), Ryzen Series CPUs (Summit Ridge) |
| Tecnoloxía de memoria RAM | DDR4 |
| Velocidade do reloxo da memoria | 2133 MHz (Base), up to 3200+ (OC) for Ryzen CPU |
| Slots de memoria dispoñibles | 4 |
| Interfaz da tarxeta gráfica | PCI Express (1x PCIe 3.0 x16, 1x PCIe 2.0 x1) |
| Portos SATA totais | 4 (SATA3) |
| M.2 Ranura | 1 (Ultra M.2, PCIe Gen3 x4 & SATA3) |
| Total de portos USB | 8 (6 USB 3.0, 2 USB 2.0) |
| Saídas de vídeo | VGA, DVI, HDMI |
| Tipo de conector de alimentación principal | 24-Pin ATX |
| Factor de forma | MicroATX |
| Peso do elemento | 1.3 libras |
8. Información da garantía
The ASRock AB350M-HDV Motherboard comes with a 1 ano de garantía. For specific terms and conditions, please refer to the warranty card included with your product or visit the official ASRock websitio.
9. Apoio
For further assistance, technical support, or driver downloads, please visit the official ASRock websitio:
You can also find contact information for customer service and support resources on their websitio.