
1. Produto rematadoview
The GeoVision GV-EFD4700-0F is an indoor, fixed, mini-sized network camera designed for day and night surveillance. It features an automatic IR-cut filter and integrated IR LEDs to ensure clear imaging in various lighting conditions. This model offers an entry-level surveillance solution with essential features and high image quality.
As características principais inclúen:
- 1/3" progressive scan super low lux CMOS sensor for minimal illumination at 0.02 lux.
- Dual streams supporting H.265, H.264, and MJPEG codecs.
- Video resolutions up to 20 fps at 2592 x 1520, 25 fps at 2560 x 1440, and 30 fps at 2048 x 1520.
- Intelligent IR with a distance of up to 15 meters (50 ft).
- Wide Dynamic Range Pro (WDR Pro) for clear images in high-contrast scenes.
- 3D noise reduction for improved image clarity.
- Built-in microphone for audio monitoring.
- 2-axis mechanism (pan / tilt) for flexible positioning.
- Power options: DC 12V or Power over Ethernet (PoE IEEE 802.3af).
2. Contido do paquete
Ao abrir o paquete, comprobe que todos os artigos estean presentes e en bo estado:
- GeoVision GV-EFD4700-0F Mini Fixed IP Dome Camera
- Kit de parafuso de montaxe
- Modelo de instalación
- Quick Start Guide / Instruction Manual (this document)
3. Información de seguridade
Read these instructions carefully before installation and operation. Keep this manual for future reference.
- Fonte de enerxía: Use only the specified power adapter (DC 12V) or a compliant PoE (IEEE 802.3af) switch. Incorrect voltage pode danar o dispositivo.
- Instalación: Ensure the camera is securely mounted to prevent it from falling. Installation should be performed by qualified personnel if necessary.
- Ambiente: This camera is designed for indoor use. Do not expose it to water, moisture, or extreme temperatures.
- Limpeza: Desconecte a alimentación antes de limpar. Use un pano suave e seco. Non empregue produtos de limpeza líquidos nin en aerosol.
- Servizo: Non intente atender este produto vostede mesmo. Remita todo o servizo a persoal de servizo cualificado.
4. Configuración e instalación
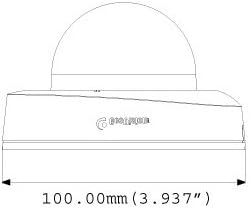
4.1 Dimensións físicas
Understand the camera's dimensions for proper placement and mounting.

4.2 Opcións de montaxe
The GV-EFD4700-0F supports both ceiling and wall-surface mounting.


4.3 Pasos da instalación
- Seleccionar localización: Choose a suitable indoor location for optimal surveillance coverage.
- Preparar superficie: Use the provided installation template to mark drilling points on the ceiling or wall.
- Perforación: Drill pilot holes according to the template. Insert wall anchors if necessary.
- Cámara segura: Attach the camera base to the mounting surface using the supplied screws.
- Cables de conexión: Connect the Ethernet cable for network and PoE, or a DC 12V power adapter and a separate Ethernet cable.
- Axustar ángulo: Loosen the adjustment screws to pan and tilt the camera lens to the desired viewángulo de inclinación. Aperte os parafusos unha vez axustados.
4.4 Configuración inicial
After physical installation and power connection, access the camera's web interface for initial setup:
- Conexión de rede: Ensure the camera is connected to your network. It will typically obtain an IP address via DHCP.
- Descubrir a cámara: Use GeoVision's IP Device Utility software or a network scanner to find the camera's IP address.
- Acceso Web Interface: Abrir a web browser and enter the camera's IP address.
- Iniciar sesión: Enter the default username and password (refer to the Quick Start Guide or GeoVision documentation for default credentials). Change these immediately for security.
- Configuración básica: Configure network settings, date/time, video resolution, and recording preferences.
5. Funcionamento da cámara
5.1 En directo View e Gravación
Once configured, you can access the live video feed through the web interface or compatible NVR/VMS software. The camera supports continuous recording, scheduled recording, and event-triggered recording (e.g., motion detection).
- Compresión H.265: Utilizes H.265 video codec for efficient storage and reduced network bandwidth while maintaining high image quality.
- WDR Pro: Wide Dynamic Range Pro enhances image visibility in scenes with both very bright and very dark areas.
- Funcionalidade IR: The built-in IR LEDs automatically activate in low-light conditions, providing clear black and white images up to 15 meters.
5.2 Detección de movemento e alertas
Configure motion detection zones and sensitivity within the camera's web interface. The camera can be set to trigger recordings, send email alerts, or notify your VMS upon detecting motion.
5.3 Monitorización de audio
The integrated microphone allows for audio monitoring of the surveillance area. Audio settings can be adjusted via the web interface.
6. Mantemento
6.1 Limpeza
Regularly clean the camera lens and housing to ensure optimal image quality. Use a soft, lint-free cloth. For stubborn dirt, a slightly damp Pódese usar un pano con deterxente suave e despois un pano seco. Evite produtos de limpeza ou solventes abrasivos.
6.2 Actualizacións de firmware
Periodically check the GeoVision website for firmware updates. Firmware updates can provide new features, performance improvements, and security enhancements. Follow the instructions provided with the firmware update package carefully to avoid damaging the device.
7 Solución de problemas
If you encounter issues with your GV-EFD4700-0F camera, refer to the following common problems and solutions:
- Sen enerxía:
- Check if the power adapter is securely connected and providing 12V DC.
- If using PoE, ensure the Ethernet cable is connected to a PoE-enabled switch or injector and that the switch port is active.
- Sen fonte de vídeo:
- Verify network connectivity. Ping the camera's IP address.
- Ensure the camera's IP address, subnet mask, and gateway settings are correct.
- Check if the video stream settings (e.g., resolution, frame rate) are compatible with your viewing software or NVR.
- Restart the camera by disconnecting and reconnecting power.
- Mala calidade da imaxe:
- Limpar a lente da cámara.
- Comprobe se hai obstrucións no campo de visión da cámara view.
- Adjust WDR Pro settings in the web interface for high-contrast scenes.
- Ensure sufficient lighting for optimal color images; IR will provide black and white in low light.
- Non se pode acceder Web Interface:
- Confirm the camera's IP address is correct.
- Ensure your computer is on the same network segment as the camera.
- Proba con outro web navegador.
- Desactiva temporalmente calquera software de cortafuegos no teu ordenador.
If problems persist, contact GeoVision technical support.
8. Especificacións
| Característica | Detalle |
|---|---|
| Nome do modelo | GV-EFD4700-0F |
| Sensor de imaxe | 1/3" progressive scan super low lux CMOS |
| Resolución efectiva de fotografías | 4 MP |
| Iluminación mínima | 0.02 lux |
| Compresión de vídeo | H.265, H.264, MJPEG |
| Máx. Velocidade de fotogramas | 30 fps at 2048 x 1520 |
| Distancia IR | Ata 15 m (50 pés) |
| Lente | 2.8 mm (fixo) |
| Rango dinámico | WDR Pro |
| Redución de ruído | Redución de ruído 3D |
| Audio | Micrófono incorporado |
| Pan/Tilt Mechanism | 2 eixes |
| Entrada de enerxía | DC 12 V / PoE (IEEE 802.3af) |
| Tecnoloxía de conectividade | Wired (Ethernet), Wi-Fi (for certain functions/protocols) |
| Uso interior/exterior | Interior |
| Dimensións (elemento) | 3.9 x 3.9 x 2.4 polgadas (100 x 100 x 60.8 mm) |
| Peso (artigo) | 5.28 onzas |
| Cor | Branco |
| Fabricante | USA Vision Systems |
9. Información da garantía
GeoVision products typically come with a limited manufacturer's warranty. Specific warranty terms, conditions, and duration may vary by region and retailer. Please refer to the warranty card included with your purchase or visit the official GeoVision websitio web para obter información detallada sobre a garantía e os procedementos de rexistro. Garde o comprobante de compra para reclamacións de garantía.
10. Apoio
For technical assistance, product inquiries, or further support, please utilize the following resources:
- GeoVision Official Websitio: Visita www.geovision.com.tw for product documentation, FAQs, software downloads, and support contact information.
- Soporte técnico: Contact GeoVision's technical support team through their website or the contact details provided in your product's packaging.
- Recursos en liña: Explore online forums and communities for user-generated tips and solutions.


