1. Introdución
Thank you for choosing the Electriq 6 Place Freestanding or Integrated Table Top Dishwasher. This manual provides essential information for the safe and efficient operation, installation, and maintenance of your appliance. Please read it thoroughly before first use and keep it for future reference.
This compact dishwasher is designed for small kitchens or households, offering convenience and efficiency for up to 6 place settings.
2. Información de seguridade
Observe sempre as seguintes precaucións de seguridade para reducir o risco de incendio, descarga eléctrica, lesións ás persoas ou danos no aparello.
- Ensure the dishwasher is properly earthed.
- Non faga funcionar a lavalouza se o cable de alimentación ou o enchufe están danados.
- Manteña os nenos lonxe do lavalouzas, especialmente cando estea en funcionamento ou coa porta aberta.
- Use só deterxentes e abrillantadores deseñados especificamente para lavalouzas.
- Non abra a porta durante o funcionamento, xa que pode saír auga quente en chorros.
- Os obxectos afiados deben cargarse coas puntas cara abaixo para evitar lesións.
- Desconecte o aparello da fonte de alimentación antes da limpeza ou mantemento.
3. Produto rematadoview
The Electriq 6 Place Table Top Dishwasher is a compact and efficient appliance designed to fit conveniently on your countertop or integrate into your kitchen space.

Figura 3.1: Fronte view of the Electriq 6 Place Table Top Dishwasher.

Figure 3.2: The compact dishwasher integrated into a kitchen countertop, next to a microwave.
Características principais:
- Capacidade para 6 cubertos: Ideal for small households, accommodating up to 66 pieces of crockery and cutlery.
- Deseño compacto: Freestanding or integrated, perfect for countertops or limited spaces.
- 6 Wash Programmes: Including Normal, Intensive, Eco, Glass, 90 Min, and Rapid cycles.
- Temporizador de demora: Allows you to set the wash to start 2, 4, 6, or 8 hours later.
- Eficiencia enerxética: Rated F for energy efficiency.
- Anti-flood and Anti-leak Protection: Enhanced safety features for your kitchen.
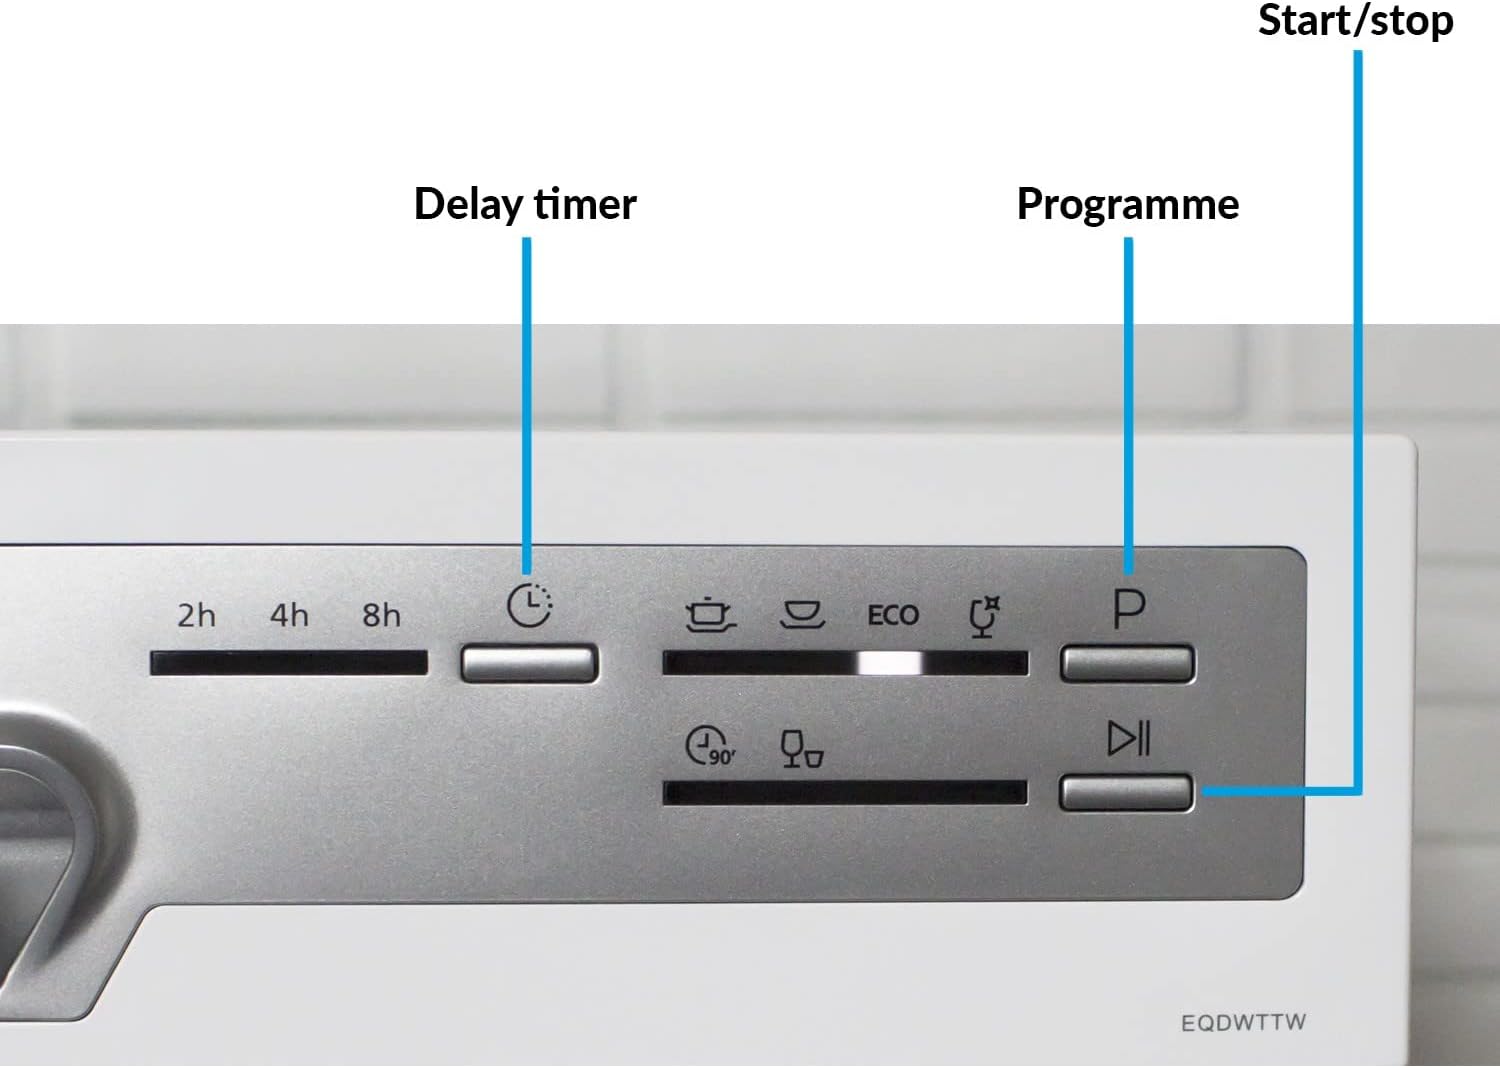
Figura 3.3: detallada view of the control panel, showing buttons for Delay Timer, Programme selection, and Start/Stop.
4. Instalación e configuración
4.1 Desembalaxe
Carefully remove all packaging materials. Inspect the dishwasher for any damage. Report any damage to your retailer immediately.
4.2 Posicionamento
The dishwasher can be placed freestanding on a stable, level surface or integrated into a suitable cabinet. Ensure there is adequate space for ventilation and door opening.

Figure 4.1: Dimensions of the dishwasher: Height 43.8cm, Width 55cm, Depth 50cm.
4.3 Conexión de auga
Connect the water inlet hose to a cold water supply tap. Ensure all connections are tight to prevent leaks. The dishwasher features a cold water fill system.
4.4 Conexión de drenaxe
Connect the drain hose to a suitable drain pipe or sink. Ensure the hose is not kinked or blocked.
4.5 Conexión eléctrica
Plug the dishwasher into a grounded electrical outlet. Ensure the voltage and frequency match the appliance's requirements (230 Volts).
4.6 Initial Setup (Salt and Rinse Aid)
Before first use, fill the salt dispenser with dishwasher salt and the rinse aid dispenser with rinse aid. Refer to the specific sections in this manual for detailed instructions on filling these compartments. The dishwasher has salt and rinse aid warning indicators.
5. Instrucións de funcionamento
5.1 Carga do lavalouzas
Load dishes carefully to ensure proper water circulation and cleaning. The dishwasher includes a cutlery basket for organized washing.

Figura 5.1: Interior view demonstrating the capacity for larger items like pots and pans.

Figure 5.2: The dishwasher can accommodate plates up to 10.15 inches (25.8cm) in diameter.

Figure 5.3: The glass stand provides stable support for delicate glassware during the wash cycle.
5.2 Engadir deterxente
Engade a cantidade axeitada de deterxente para lavalouzas ao dosificador. Consulta as instrucións do fabricante do deterxente para coñecer a dosificación.
5.3 Selección dun programa
Press the 'Programme' button to cycle through the available wash programmes. Indicator lights will show the selected programme.
- Normal: Lavado diario estándar para pratos normalmente sucios.
- Intensivo: For heavily soiled dishes with tough, baked-on food.
- Eco: Energy-saving programme for normally soiled dishes.
- Vidro: Lavado suave para cristalería delicada.
- 90 min: Para pratos lixeiramente sucios que requiren un lavado máis rápido.
- Rápido: A quick 30-minute wash for lightly soiled items without drying.

Figure 5.4: The Quick Wash feature provides fast and efficient cleaning.
5.4 Setting the Delay Timer
Press the 'Delay Timer' button to set a delayed start time of 2, 4, 6, or 8 hours. This allows you to run the dishwasher at a time that suits you, such as during off-peak energy hours.
5.5 Inicio dun ciclo
Close the dishwasher door firmly. Press the 'Start/Stop' button to begin the selected wash cycle. The indicator light will illuminate.
6. Mantemento e coidados
6.1 Limpeza do sistema de filtro
Regularly clean the filter system to ensure optimal washing performance. The dishwasher features an easy-clean filter system. Remove the filter, rinse it under running water, and remove any food debris. Reassemble correctly.
6.2 Reposición de sal e abrillantador
Monitor the salt and rinse aid warning indicators. Refill these compartments as needed to ensure effective cleaning and drying results.
6.3 Limpeza exterior e interior
Limpe o exterior do lavalouza con anuncioamp cloth. Clean the interior periodically with a dishwasher cleaner or a mixture of vinegar and water to prevent odors and build-up.
7 Solución de problemas
If your dishwasher is not functioning correctly, please consult the following table before contacting customer service.
| Problema | Causa posible | Solución |
|---|---|---|
| O lavalouza non arranca | Cable de alimentación non conectado; Porta non pechada correctamente; Fusible fundido. | Comprobe a conexión eléctrica; asegúrese de que a porta estea pechada; comprobe o fusible/disxuntor da casa. |
| Pratos non limpos | Improper loading; Insufficient detergent; Clogged spray arms/filter; Incorrect program. | Reload dishes correctly; Add more detergent; Clean spray arms and filter; Select appropriate program. |
| A auga non drena | Manguera de drenaxe dobrada ou bloqueada; filtro atascado. | Comprobe e limpe a mangueira de drenaxe; Limpe o sistema de filtros. |
| Ruído excesivo | Traqueteo da louza; Obxecto estraño na bomba; Aparello non nivelado. | Reorganizar a louza; comprobar se hai obxectos estraños; nivelar o electrodoméstico. |
| Manchas brancas nos pratos | Falta de abrillantador; Auga dura. | Refill rinse aid dispenser; Adjust water softener setting if applicable. |
8. Especificacións
| Característica | Especificación |
|---|---|
| Nome do modelo | EQDWTTW |
| Capacidade | 6 Configuración de lugar |
| Dimensións (H x W x D) | 43.8 x 55 x 50 cm |
| Peso | 21 kg |
| Programas | Normal, Intensive, Eco, Glass, 90 Min, Rapid |
| Temperaturas | 40, 45, 60, 65, 70°C |
| Temporizador de atraso | 2, 4, 6 ou 8 horas |
| Valoración enerxética | F |
| Consumo de auga (por ciclo) | 6.5 litros |
| Nivel de ruído | 49 dB |
| Tipo de instalación | Autónomo |
| Voltage | 230 voltios |
| Compoñentes incluídos | Cesta de Cubertos |
9. Garantía e soporte
This Electriq dishwasher comes with a 1 ano de garantía desde a data de compra. Conserve o comprobante de compra para reclamacións de garantía.
For technical support, spare parts, or warranty inquiries, please contact Electriq customer service. Contact details can typically be found on the manufacturer's websitio web ou a documentación da súa compra.
Please have your model number (EQDWTTW) and serial number ready when contacting support.