
1. Produto rematadoview
This manual provides instructions for the NB POWER 48V-72V 60A Brushless DC Sine Wave Ebike Controller and the accompanying VM960 Color Display. This system is designed for electric bicycles, scooters, and similar electric vehicles, supporting motors up to 3000W.
Características principais:
- High-efficiency 48V-72V 60A Brushless DC Sine Wave Controller.
- Compatible with 3000W brushless motors and electric bike kits.
- Advanced VM960 Color Display for comprehensive ride data.
- Suitable for various electric vehicle applications.
2. Especificacións técnicas
Parámetros do controlador:
| Parámetro | Valor |
|---|---|
| Corrente máxima | 60 ± 1A |
| Voltage | DC 48V-72V |
| Corrente nominal | 30A |
| Potencia nominal | 3000 W |
| Set de velocidade | 1-4.2 V |
| Entrada de freo | LOW-LEVEL |
| Baixo Voltage Protección | DC40 ± 0.5 V |
| Condicións de funcionamento | -40~80 °C |
| Certificación | CE |
VM960 Display Features:
- Funcións de visualización: Speed, Motor Power Ratio, Battery Level, Error Indication, Total Mileage, Single Mileage, Cruise Control, Single Running Time, Light Signal.
- Control e configuración: Power Switch, Front Light Control, 6km/h Inching Control, Wheel Diameter Setting, Top Speed Setting, Idleness Time Setting for Auto-Hibernation, Backlight Brightness Setting, Voltage Level Setting.
- Protocolo de comunicación: UART.
Dimensións físicas:
The controller measures approximately 18.5 cm in length, 11 cm in width, and 5.2 cm in height.
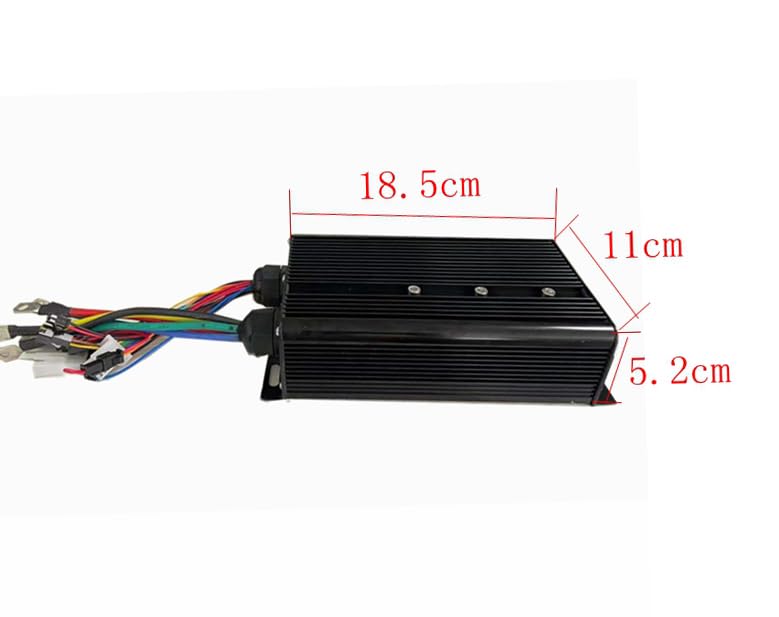
Image: Dimensions of the NB POWER 60A Brushless DC Sine Wave Ebike Controller.
The VM960 display measures approximately 87mm in width, 111mm in height, and 15mm in depth. The control buttons are approximately 39.35mm by 44mm.

Image: Dimensions of the VM960 Color Display and its control unit.
3. Guía de instalación
Careful installation is crucial for optimal performance and safety. Refer to the wiring diagram below for correct connections.
Diagrama de cableado:
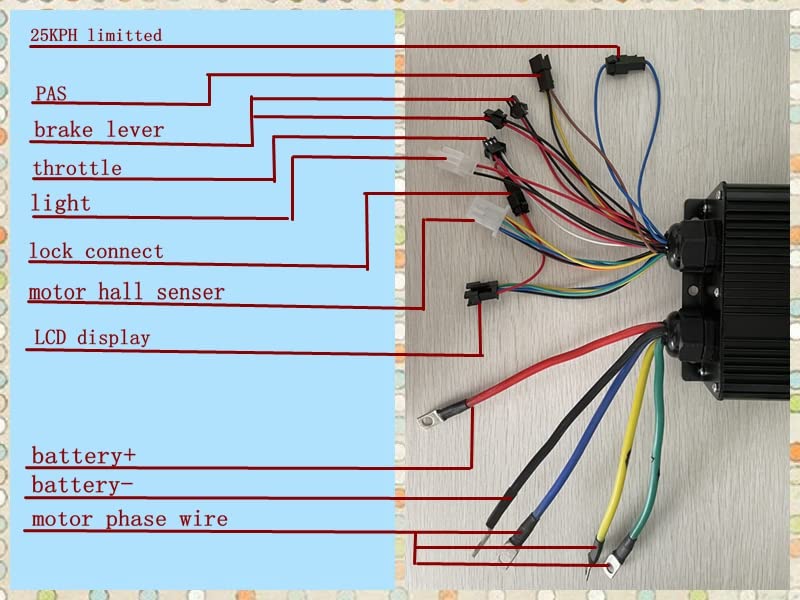
Image: Detailed wiring diagram for the NB POWER Ebike Controller.
Puntos de conexión:
- 25KPH Limited: Connect this wire if speed limiting to 25 km/h is required.
- PAS (Sistema de asistencia ao pedaleo): Connect to your ebike's PAS sensor for pedal assistance.
- Palanca de freo: Connect to the ebike's brake levers. This typically cuts motor power when brakes are applied.
- Acelerador: Connect to the ebike's throttle for speed control.
- Luz: Output for connecting an ebike light.
- Lock Connect: Connect to the ignition lock or power switch.
- Motor Hall Sensor: Connect to the motor's Hall sensors for proper motor commutation.
- Pantalla LCD: Connect to the VM960 Color Display.
- Battery+: Terminal positivo para a conexión da batería.
- Battery-: Terminal negativo para a conexión da batería.
- Motor Phase Wire: Connect the three thick wires to the corresponding motor phase wires (usually Green, Blue, Yellow).
Bloque de terminales:
A terminal block is provided for secure and organized connection of the motor phase wires and battery connections. Ensure all connections are tight and insulated.

Imaxe: Example of a terminal block for robust electrical connections.
4. Instrucións de funcionamento
The VM960 Color Display provides essential information and control over your ebike system.
VM960 Display Interface:

Image: Labeled interface of the VM960 Color Display.
Display Functions Explained:
- Indicador de faro: Mostra se a luz dianteira da bicicleta eléctrica está acesa.
- Speed Data: Displays current real-time speed (RT SPEED) in km/h.
- Indicador de batería: Shows the current battery charge level and voltage (por exemplo, 48.5 V).
- Indicación de fallo: Alerts to system errors or malfunctions.
- Pantalla de potencia: Shows current motor power output in Watts (e.g., 368W).
- Datos da viaxe: Displays total mileage (TRIP/KM) and other trip-specific information.
- USB: Indicates USB connection status or availability.
- Brake Display: Shows when brakes are engaged.
- Nivel de asistencia: Indicates the current level of pedal assist (e.g., Level 2).
- Visualización do reloxo: Mostra a hora actual.
- Logo and Error Code: Displays brand logo and specific error codes if a fault occurs.
Control e configuración:
- Interruptor de alimentación: Press and hold to turn the display and system on/off.
- Control da luz dianteira: Short press the light button to toggle the front light.
- 6km/h Inching Control: Activates a low-speed assist mode for walking alongside the bike.
- Axuste do diámetro da roda: Adjust for accurate speed and distance readings.
- Top Speed Setting: Configure the maximum assisted speed.
- Idleness Time Setting for Auto-Hibernation: Sets the time before the display automatically turns off due to inactivity.
- Backlight Brightness Setting: Axusta a intensidade da retroiluminación da pantalla.
- Voltage Level Setting: Configure the battery voltagparámetros.
Refer to the display's specific sub-menu navigation for detailed adjustments of these settings.
5. Mantemento
Regular maintenance ensures the longevity and reliable operation of your controller and display system.
- Limpeza: Keep the controller and display clean and free from dust and debris. Use a soft, dry cloth. Avoid using harsh chemicals or excessive moisture.
- Inspección: Periodically check all wiring connections for tightness and signs of wear or damage. Ensure no wires are pinched or exposed.
- Protección ambiental: While the controller is designed for outdoor use, avoid prolonged exposure to extreme weather conditions (heavy rain, direct sunlight, extreme temperatures) when possible.
- Coidado da batería: Follow your battery manufacturer's guidelines for charging and storage to ensure optimal system performance.
6 Solución de problemas
Esta sección aborda problemas comúns cos que podes atoparte. Para problemas que non aparecen na lista, ponte en contacto co servizo de atención ao cliente.
| Problema | Causa posible | Solución |
|---|---|---|
| O sistema non se acende | Loose battery connection, faulty power switch, low battery voltage. | Check battery connections. Ensure battery is charged. Verify power switch functionality. |
| Motor not responding to throttle | Loose throttle connection, faulty throttle, motor hall sensor issue, controller fault. | Check throttle wiring. Inspect motor hall sensor connections. Consult wiring diagram. |
| A pantalla mostra un código de erro | Specific system malfunction (e.g., motor, controller, sensor). | Note the error code and refer to the display's specific error code list (if available) or contact support with the code. |
| Inaccurate speed/distance readings | Incorrect wheel diameter setting on the display. | Adjust the wheel diameter setting in the VM960 display menu. |
7. Garantía e soporte
This product is covered by a standard manufacturer's warranty against defects in materials and workmanship. The warranty period typically begins from the date of purchase. Please retain your proof of purchase for warranty claims.
For technical assistance, warranty claims, or further inquiries, please contact your retailer or the manufacturer directly. Provide your product model number and a detailed description of the issue to facilitate support.