
Introdución
Welcome to the world of sewing with your new Janome IT 1028 Glamour mechanical sewing machine. This manual provides essential information for the safe and efficient operation, setup, maintenance, and troubleshooting of your machine. Please read it thoroughly before using the machine to ensure optimal performance and longevity.
The Janome IT 1028 Glamour is designed for ease of use, featuring 12 stitch types, a free arm for circular sewing, an oscillating hook, automatic buttonholes, and adjustable stitch length and width. It also includes a double presser foot lift, feed dog lowering, a thread cutter, a needle threader, and a soft cover for protection.
Instrucións de seguridade
Para reducir o risco de descargas eléctricas, queimaduras, incendios ou lesións ás persoas:
- Desconecte sempre a máquina da toma de corrente inmediatamente despois de usala e antes de limpala, retirar as cubertas ou facer calquera axuste de mantemento por parte do usuario.
- Do not allow the machine to be used as a toy. Close attention is necessary when the machine is used by or near children.
- Empregue esta máquina só para o uso previsto, tal e como se describe neste manual. Empregue só os accesorios recomendados polo fabricante.
- Nunca utilice esta máquina se ten o cable ou a ficha danados, se non funciona correctamente, se se deixou caer ou se danou, ou se caeu á auga.
- Nunca deixe caer nin introduza ningún obxecto en ningunha abertura.
- Non use ao aire libre.
- Non opere onde se utilicen produtos en aerosol (spray) ou onde se administre osíxeno.
- Manter os dedos afastados de todas as partes en movemento. Requírese un coidado especial arredor da agulla da máquina de coser.
- Use sempre a placa de agulla adecuada. A placa incorrecta pode facer que a agulla se rompa.
- Non use agullas dobradas.
- Non tires nin empurres do tecido mentres coses. Isto pode desviar a agulla e facela romper.
- Apague a máquina de coser ao facer axustes na zona da agulla, como enfiar a agulla, cambiala, enfiar a bobina ou cambiar o pé prensatelas.
- Always unplug the machine when removing the light bulb.
- Non desconecte tirando do cable. Para desenchufar, agarre o enchufe, non o cable.
Produto rematadoview
Características clave
- 12 Stitch Types: Versatile options for various sewing projects.
- Brazo libre: Facilitates sewing cuffs, sleeves, and other small, circular items.
- Oscillating Hook: Ensures smooth and consistent stitch formation.
- Lonxitude e ancho da puntada axustables: Provides control over stitch appearance.
- Automatic Four-Step Buttonhole: Simplifies the creation of professional-looking buttonholes.
- Double Presser Foot Lift: Allows for sewing thicker fabrics.
- Feed Dog Lowering: Useful for darning and free-motion quilting.
- Cortador de fíos: Conveniently trims threads.
- Enfiador de agullas: Assists in quickly threading the needle.
- Tapa blanda: Protects the machine from dust and damage.
Compoñentes da máquina
Familiarize yourself with the main parts of your Janome IT 1028 Glamour sewing machine.

Figura 1: Fronte view of the Janome IT 1028 Glamour sewing machine with the soft cover in place. This image shows the overall design and the stitch selection and length dials.

Imaxe 2: Primeiro plano view of the stitch selector dial (left) and stitch length dial (right) on the Janome IT 1028 Glamour. The decorative illustration on the machine body is also visible.
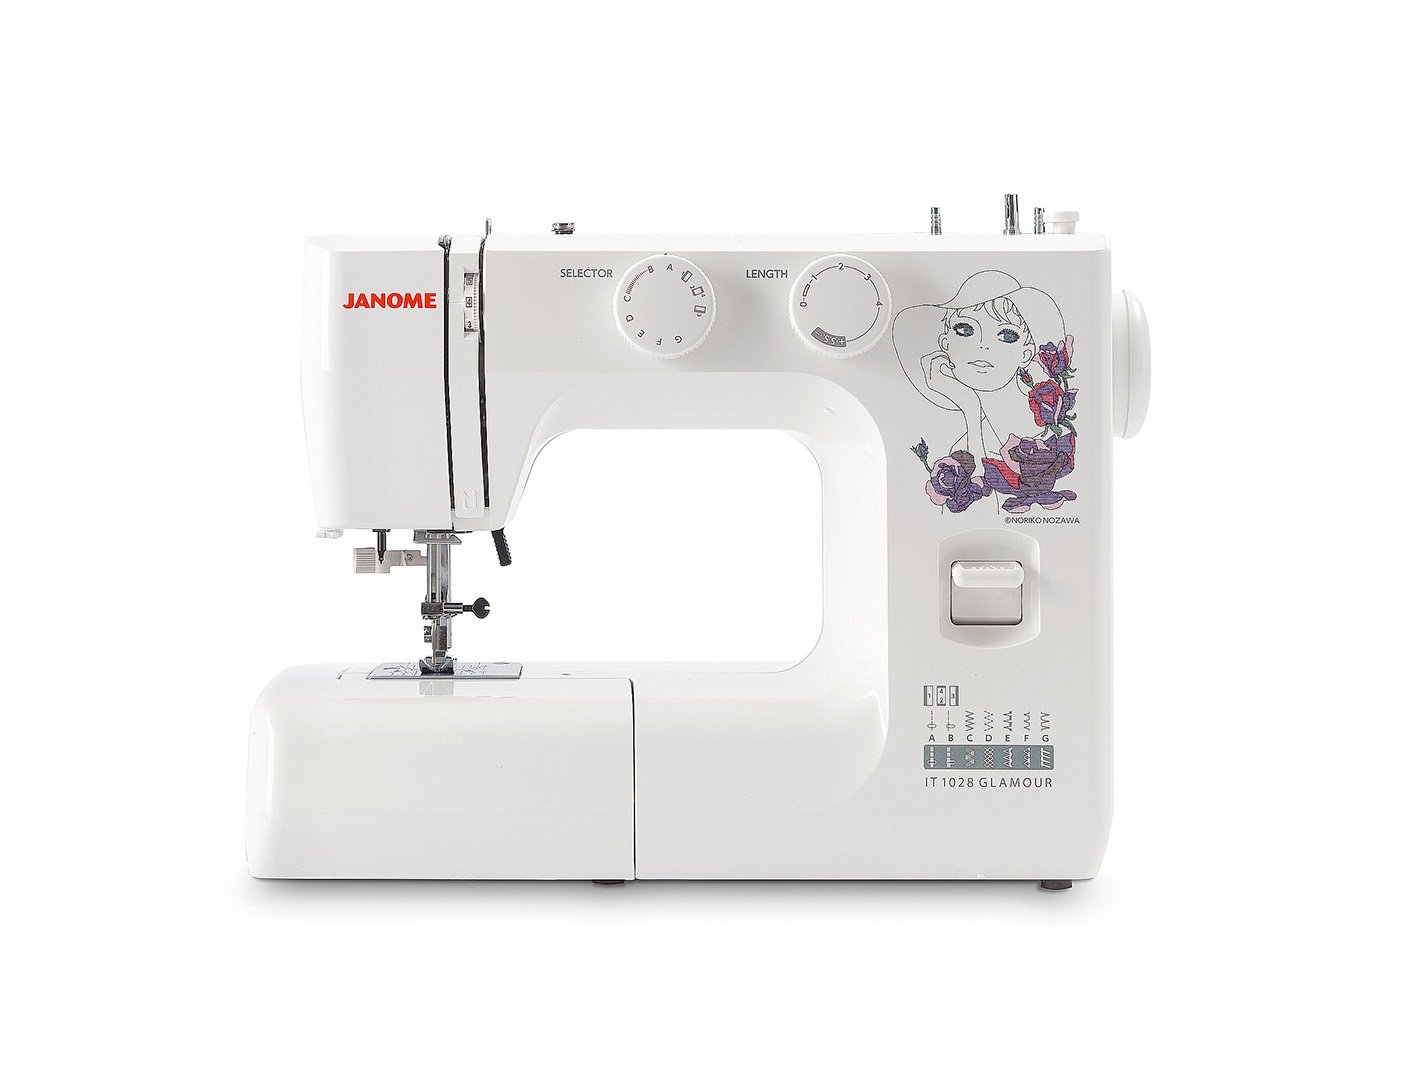
Figure 3: The Janome IT 1028 Glamour sewing machine with the accessory tray removed, revealing the free arm and the bobbin case area. This view is essential for bobbin insertion and cleaning.
Configuración
1. Desembalaxe e colocación
- Retire con coidado a máquina da súa embalaxe.
- Coloque a máquina nunha superficie plana e estable.
- Remove any protective films or packing materials.
2. Conexión de alimentación
- Asegúrese de que o interruptor de alimentación da máquina estea na posición "OFF".
- Connect the power cord to the machine's power input jack.
- Enchufe o cable de alimentación nunha toma eléctrica adecuada.
3. Winding the Bobbin
- Coloque un carrete de fío no pasador do carrete.
- Guía o fío a través da guía do fío superior e arredor do disco tensor do bobinado.
- Introduza o fío polo burato da bobina desde dentro cara a fóra.
- Coloque a bobina no eixo do devanador da bobina e empurre o eixo cara á dereita.
- Start the machine. The bobbin will wind automatically. Stop when the bobbin is full.
- Cut the thread and push the bobbin winder spindle to the left. Remove the bobbin.
4. Inserting the Bobbin
- Apague a máquina.
- Open the bobbin cover plate located on the free arm.
- Insert the bobbin into the bobbin case with the thread running in the direction indicated by the arrows.
- Pull the thread through the tension spring and into the guide slot.
- Peche a placa de cuberta da bobina.
5. Threading the Upper Thread
- Levante o elevador do prensatelas.
- Coloque un carrete de fío no pasador do carrete.
- Guia o fío pola guía de fíos superior.
- Bring the thread down the right channel, up the left channel, and through the take-up lever from right to left.
- Continue guiding the thread down to the needle bar thread guide.
- Use the built-in needle threader or manually thread the needle from front to back.
- Pull about 6 inches of thread through the needle eye.
6. Bringing Up the Bobbin Thread
- Suxeita o fío superior lixeiramente coa man esquerda.
- Turn the handwheel towards you to lower the needle into the needle plate and then raise it.
- O fío superior atrapará o fío da bobina, formando un bucle.
- Pull the loop to bring the bobbin thread up through the needle plate hole.
- Tire dos dous fíos (superior e da bobina) por debaixo do pé prensatelas e cara á parte traseira da máquina.
Instrucións de funcionamento
1. Selección de puntadas
Xire o Selector de punto (refer to Figure 2) to choose your desired stitch pattern. The available stitches are indicated by letters or symbols on the dial.
2. Axustar a lonxitude e a anchura da puntada
- Lonxitude da puntada: Usa o Dial de lonxitude de puntada (refer to Figure 2) to adjust the length of your stitches. Higher numbers indicate longer stitches.
- Ancho da puntada: For stitches that allow width adjustment, use the corresponding dial or setting. (Note: The Janome IT 1028 Glamour has adjustable stitch width, typically integrated with the stitch selector or a separate dial. Consult the machine's markings for specific controls.)
3. Costura básica
- Coloque o seu tecido debaixo do pé prensatela.
- Baixa o levantador do pé prensatela.
- Encender a máquina.
- Gently press the foot controller to start sewing. The harder you press, the faster the machine will sew.
- Guide the fabric gently with your hands, but do not pull or push forcefully.
- To secure the beginning and end of a seam, use the reverse lever to sew a few stitches backward.
- When finished, raise the needle to its highest position, lift the presser foot, and pull the fabric away from the machine.
- Use the built-in thread cutter or scissors to trim the threads.
4. Using the Free Arm
To use the free arm, simply slide off the accessory tray (refer to Figure 3). This exposes the narrow free arm, ideal for sewing small, tubular items like sleeves, pant hems, and cuffs.
5. Automatic Four-Step Buttonholes
The Janome IT 1028 Glamour features an automatic four-step buttonhole function. Refer to the stitch selector dial for the buttonhole settings (usually marked with a buttonhole symbol and steps 1-4).
- Coloque o pé do oco.
- Mark the buttonhole position on your fabric.
- Set the stitch selector to the first buttonhole step.
- Sew the first side of the buttonhole.
- Change the stitch selector to the next step and sew the bar tack.
- Continue through all four steps, following the machine's markings for each segment of the buttonhole.
- Carefully cut open the buttonhole using a seam ripper, ensuring not to cut the stitches.
Mantemento
1. Limpeza da Máquina
Regular cleaning helps maintain your machine's performance. Always unplug the machine before cleaning.
- Bobbin Area: Remove the needle plate and bobbin case. Use a small brush to remove lint and dust from the bobbin area and feed dogs.
- Exterior: Limpe as superficies exteriores cun pano suave e seco. Non empregue produtos químicos agresivos nin produtos de limpeza abrasivos.
2. Substitución da agulla
Replace the needle regularly (after 8-10 hours of sewing) or if it becomes bent, dull, or damaged. A damaged needle can cause skipped stitches or fabric damage.
- Apague a máquina e desconéctea.
- Afrouxa a agulla clamp parafuso.
- Retira a agulla vella.
- Introduza unha agulla nova coa parte plana cara á parte traseira da máquina, empuxándoa cara arriba ata o fondo.
- Apretar a agulla clamp parafuso firmemente.
Resolución de problemas
Esta sección aborda problemas comúns cos que podes atoparte. Para problemas que non aparecen na lista, ponte en contacto co servizo de atención ao cliente.
| Problema | Causa posible | Solución |
|---|---|---|
| Puntos saltados | Agulla incorrecta, agulla dobrada, enfiado incorrecto, tamaño de agulla incorrecto para o tecido. | Substitúa a agulla, volva enfiar a máquina e asegúrese de que o tipo/tamaño da agulla sexa correcto. |
| Rotura do fío (superior) | Improper threading, tension too tight, poor quality thread, bent needle, burr on needle plate. | Re-thread machine, adjust upper tension, use quality thread, replace needle, check needle plate for damage. |
| Rotura do fío (bobina) | Improperly wound bobbin, bobbin inserted incorrectly, lint in bobbin case, tension too tight. | Re-wind bobbin, re-insert bobbin correctly, clean bobbin case, adjust bobbin tension (if adjustable). |
| Puntadas irregulares | Incorrect tension settings, pulling/pushing fabric, wrong presser foot. | Adjust tension, guide fabric gently, use appropriate presser foot. |
| A máquina non arranca | Not plugged in, power switch off, foot controller not connected. | Check power connections, ensure switch is ON, connect foot controller. |
Especificacións
- Número de modelo: 8100000017663 (IT 1028 Glamour)
- Marca: XANOME
- Material: Plástico
- Peso: 8 quilogramos
- Dimensions (P x L x H): 10 cm x 35 cm x 25 cm (Depth x Width x Height)
- Fonte de enerxía: Cable eléctrico
- Stitch Types: 12
- Tipo de gancho: Oscilante
- Buttonhole Type: Automatic Four-Step
Garantía e Soporte
For warranty information, service, or technical support, please refer to the warranty card included with your product or contact your authorized Janome dealer or customer service center. Keep your purchase receipt as proof of purchase.