
1. Introdución
This manual provides detailed instructions for the setup, operation, and maintenance of your OWLENZ SD60 Wi-Fi Mini Projector. Please read this manual thoroughly before using the product to ensure proper functionality and safety. The SD60 features advanced LED light technology with 1500 lumens brightness, Wi-Fi screen sharing capabilities (Miracast/Airplay), and multiple media playback options for a versatile home theater experience. Its portable and compact design allows for easy installation and use.
2. Información importante de seguridade
- Non mire directamente á lente do proxector cando estea aceso.amp está activado.
- Asegure unha ventilación adecuada ao redor do proxector para evitar o sobreenriquecido.
- Manteña o proxector lonxe da auga ou outros líquidos.
- Empregue só o adaptador de corrente subministrado co proxector.
- Evite colocar o proxector en superficies inestables.
- The LED light technology is designed to be gentle on the eyes and has no radiation.
3. Contido do paquete
Verifique que todos os elementos que se indican a continuación estean incluídos no seu paquete. Se falta algún elemento ou está danado, póñase en contacto co servizo de atención ao cliente.
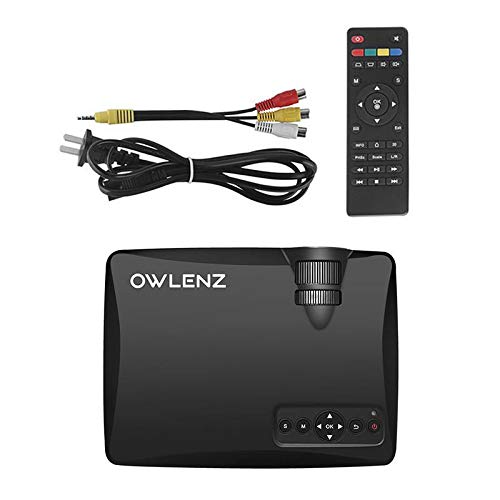
Image: OWLENZ SD60 Projector, remote control, power cable, and AV cables.
- OWLENZ SD60 Mini Projector
- Control remoto
- Cable de alimentación
- Cabo AV
- Manual de usuario (este documento)
4. Produto rematadoview
Familiarize yourself with the various parts and controls of your OWLENZ SD60 projector.
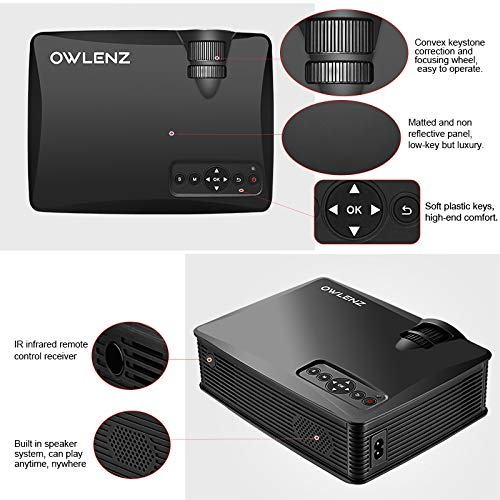
Image: Key features of the OWLENZ SD60 projector, including the focusing wheel, keystone correction, control panel, IR receiver, and built-in speaker.
- Convex Keystone Correction and Focusing Wheel: Located on the top, these allow for easy image adjustment.
- Matted and Non-Reflective Panel: Provides a sleek, low-key appearance.
- Soft Plastic Keys: For comfortable and responsive control.
- IR Infrared Remote Control Receiver: For remote operation.
- Built-in Speaker System: A 3W speaker for integrated audio playback.
- Portos de entrada: HDMI, USB, AV, SD Card slot (located on the side/rear).
5. Configuración
5.1 Conexión de alimentación
- Conecte o cable de alimentación ao porto de entrada de alimentación do proxector.
- Conecte o outro extremo do cable de alimentación a unha toma de corrente axeitada.
- Prema o botón de acendido do proxector ou do mando a distancia para acendelo.
5.2 Conexión de fontes de entrada
The projector supports various input options:
- HDMI: Connect an HDMI cable from your device (laptop, gaming console, etc.) to the projector's HDMI port.
- USB: Insira unha unidade USB no porto USB para reproducir contido multimedia directamente.
- DE: Use the provided AV cable to connect to devices with AV output.
- Tarxeta SD: Insert an SD card into the SD card slot for media playback.
After connecting, select the appropriate input source from the projector's menu using the remote or control panel.
5.3 Wi-Fi Screen Sharing (Miracast / Airplay)
The SD60 supports wireless screen sharing from compatible smartphones and tablets.
- Asegúrate de que o teu dispositivo móbil e o proxector estean conectados á mesma rede Wi-Fi.
- On the projector, navigate to the "Screen Share" or "Miracast/Airplay" option in the main menu.
- On your mobile device, activate the screen mirroring function (e.g., "Smart View" en Android, "Duplicación de pantalla" en iOS).
- Seleccione o nome do proxector da lista de dispositivos dispoñibles para establecer a conexión.
5.4 Axuste do enfoque e da distorsión trapezoidal
- Foco: Rotate the focusing wheel near the lens until the projected image is clear and sharp.
- Corrección Keystone: Use the keystone correction wheel to adjust the image shape if it appears trapezoidal (wider at the top or bottom).
6. Funcionamento
6.1 Controis básicos
Use the control panel on the projector or the remote control to navigate menus and adjust settings.
- Botón de encendido: Acende/apaga o proxector.
- Navigation Buttons (Arrows/OK): Para a navegación e selección de menús.
- Botón de orixe: Switches between input sources (HDMI, USB, AV, SD Card, Wi-Fi).
- Botón de menú: Accede ao menú de configuración do proxector.
6.2 Reprodución multimedia
Once an input source is selected, the projector will display content. For USB/SD card playback, navigate through the file browser to select your desired media.
6.3 Saída de audio
- Altavoz incorporado: The projector has a built-in 3W speaker suitable for small viewing áreas.
- Orador externo: For a better listening experience, connect external speakers or headphones to the 3.5mm audio port.
6.4 Tamaño da proxección
The projector supports projection sizes ranging from 40 to 150 inches, offering a large screen experience.
7. Mantemento
7.1 Limpeza
- Use un pano suave e seco para limpar o exterior do proxector.
- For the lens, use a lens cleaning cloth and specialized lens cleaning solution. Do not use abrasive materials.
- Regularly clean the ventilation openings to ensure proper airflow and prevent dust buildup.
7.2 LED Bulb Lifespan
The OWLENZ SD60 features an LED bulb with a lifespan of up to 30,000+ hours, significantly longer than traditional projector lamps. No regular bulb replacement is typically required under normal usage conditions.
8. Casos de uso
The OWLENZ SD60 Mini Projector is versatile and suitable for various applications:
- Teatro na casa: Goza de películas, programas de televisión e deportes nunha pantalla grande.
- Xogos: Connect gaming consoles for an immersive gaming experience.
- Finalidades educativas: Project educational content, videos, and presentations.
- Children's Entertainment: Ideal for playing videos and cartoons for children.
- Pequeno Viewing Areas: Its compact design and built-in speaker make it perfect for use in smaller rooms or spaces.
9 Solución de problemas
| Problema | Causa posible | Solución |
|---|---|---|
| Non se mostra ningunha imaxe | Incorrect input source selected; loose cable connection; source device not powered on. | Select the correct input source. Check all cable connections. Ensure the source device is powered on. |
| A imaxe está borrosa | Enfoque non axustado correctamente. | Adjust the focusing wheel until the image is clear. |
| A imaxe é trapezoidal | Keystone not adjusted correctly. | Adjust the keystone correction wheel. |
| Sen son | Volume too low; external speakers not connected properly; audio format not supported. | Increase volume. Check external speaker connection or use built-in speaker. Ensure audio format is compatible. |
| Wi-Fi screen sharing not working | Devices not on the same Wi-Fi network; screen mirroring function not activated on mobile device. | Ensure both devices are on the same Wi-Fi. Activate screen mirroring on your mobile device and select the projector. |
10. Especificacións
| Característica | Detalle |
|---|---|
| Marca | OWLENZ |
| Modelo | SD60 |
| Dimensións do produto (LxWxH) | 20.8 x 16.5 x 8 cm |
| Peso do elemento | 949 g |
| Interface de hardware | HDMI, USB |
| Tecnoloxía de conectividade | HDMI, USB, Wi-Fi |
| Dispositivos compatibles | Teléfonos intelixentes, tabletas, portátiles |
| Características especiais | Altavoz incorporado, portátil |
| Tecnoloxía de visualización | LCD |
| Brillo | 1500 lúmenes |
| LED Bulb Lifespan | Ata máis de 30,000 horas |
| Tamaño de proxección | 40 a 150 polgadas |
| Potencia do altofalante incorporado | 3W |
| Factor de forma | Portátil |
| Tipo de montaxe | Soporte de mesa |
| Wattage | 24 vatios |
| Pilas necesarias | Yes (for remote control, not included) |
11. Vídeo do produtoview
Mira este breve vídeo para unha rápida análiseview of the OWLENZ SD60 Mini Projector's features and capabilities.
Vídeo: Un breve resumoview highlighting the OWLENZ SD60 projector's display, sound, smart features, other features, portability, and use cases.
12. Garantía e soporte
The OWLENZ SD60 Mini Projector comes with a standard brand warranty. For detailed warranty information, technical support, or service inquiries, please refer to the product detail page on Amazon.in or contact OWLENZ customer service directly.
For further information, visit the product detail page: Páxina de produtos de Amazon