1. Introdución
This manual provides detailed instructions for the safe and efficient operation, maintenance, and troubleshooting of your JAVA WSD18-010B Fully Automatic Espresso Latte Machine. Please read this manual thoroughly before using the appliance and keep it for future reference.
The JAVA WSD18-010B is designed to prepare espresso, cappuccino, and latte beverages using either coffee beans or pre-ground coffee powder. It features a 15-bar pressure extraction system, an integrated conical grinder, and an automatic milk frother.
2. Instrucións de seguridade
Siga sempre as precaucións de seguridade básicas ao usar electrodomésticos para reducir o risco de incendio, descarga eléctrica e lesións ás persoas.
- Non mergulle o aparello, o cable de alimentación nin o enchufe en auga ou outros líquidos.
- Asegurar o voltagA tensión especificada no electrodoméstico coincide coa súa subministración eléctrica local.
- Manteña o aparello fóra do alcance dos nenos.
- Desenchufe o aparello antes de limpalo e cando non estea en uso.
- Non faga funcionar o aparello cun cable ou enchufe danados.
- Use só accesorios recomendados polo fabricante.
- Coloque o aparello nunha superficie estable e nivelada.
3. Produto rematadoview
Familiarize yourself with the components of your JAVA WSD18-010B machine.

Figura 1: Fronte View of the JAVA WSD18-010B. This image displays the front of the espresso machine, highlighting the control panel with its LCD display, buttons for power and coffee selection, the coffee spout, and the drip tray. A white coffee cup with the JAVA logo is placed on the drip tray.

Figure 2: Machine in Use. The JAVA WSD18-010B is shown in a home setting, preparing coffee. Two glasses of coffee, one latte and one espresso, are visible next to the machine, along with coffee beans and pastries, illustrating its use in a daily routine.
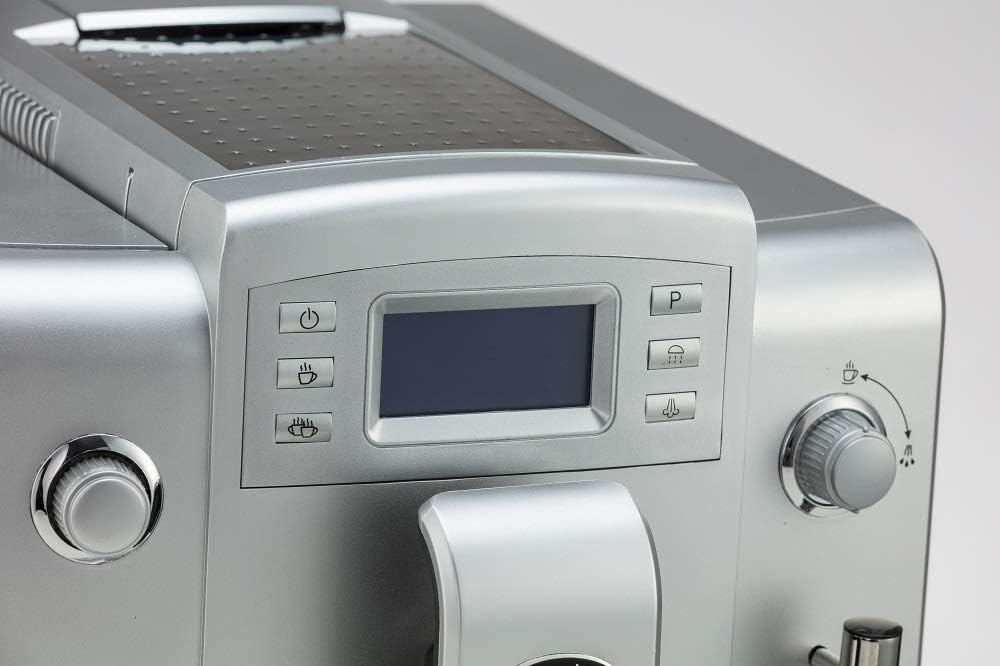
Figura 3: Detalle do panel de control. Un primeiro plano view of the machine's control panel, featuring the LCD screen and various function buttons. These buttons include power, single cup, double cup, steam, and a program button, allowing for intuitive operation.

Figure 4: Coffee Spout and Frother. This image focuses on the adjustable coffee spout and the integrated milk frother wand. The frother is designed for automatic milk foaming, simplifying the preparation of milk-based coffee drinks.
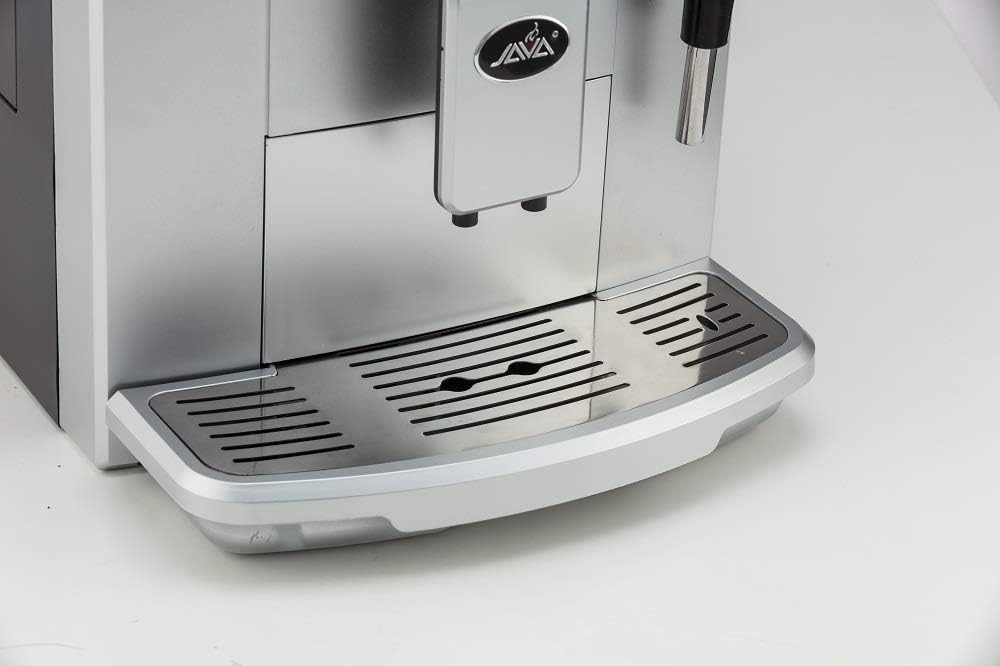
Figure 5: Drip Tray. Un detallado view of the removable drip tray and cup rest area. The design allows for easy cleaning and accommodates various cup sizes, ensuring a tidy coffee preparation experience.
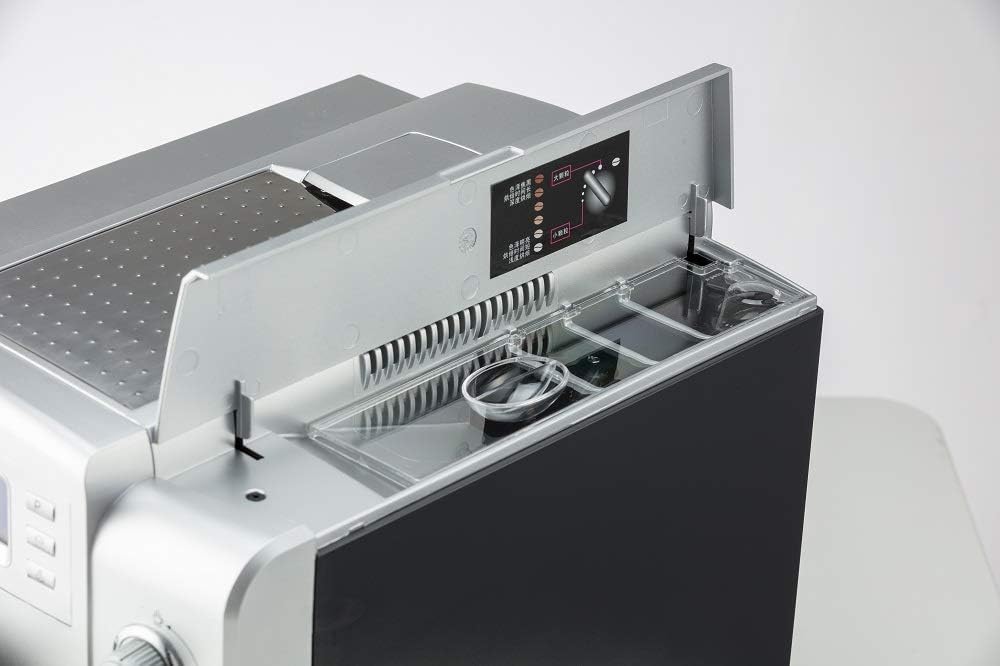
Figure 6: Top Compartments. This image shows the top of the machine with the lid open, revealing the coffee bean hopper and the access point for the water tank. Instructions for grind adjustment are also visible, indicating the machine's integrated grinding capabilities.

Figure 7: Cup Warming Plate. A view of the top surface of the machine, which functions as a cup warming plate. Two clear glass cups are placed upside down, demonstrating how cups can be pre-warmed for optimal coffee temperature.
4. Configuración
- Desembalaxe: Retire con coidado a máquina da súa embalaxe. Garde a embalaxe para futuros transportes ou almacenamentos.
- Colocación: Place the machine on a stable, level, and heat-resistant surface, away from water sources and direct sunlight. Ensure adequate ventilation around the appliance.
- Depósito de auga: Remove the 1.9L water tank, rinse it with fresh water, and fill it to the MAX level with clean, cold water. Reinsert the tank securely.
- Tolva de feixón: Open the lid on top of the machine and fill the coffee bean hopper with fresh coffee beans. Ensure the lid is closed properly.
- Conexión de alimentación: Enchufe o cable de alimentación a unha toma eléctrica conectada a terra.
- Ciclo de enxague inicial: Upon first use or after extended periods of inactivity, the machine may perform an automatic rinse cycle. Follow any on-screen prompts.
5. Instrucións de funcionamento
5.1. Preparación de café ou expreso
- Encendido: Press the power button on the control panel. The machine will heat up and perform a brief rinse cycle.
- Select Coffee Type: Use the single cup or double cup buttons to select your desired coffee strength and volume.
- Adjust Grind (Optional): If using whole beans, you can adjust the grinding thickness using the dial inside the bean hopper. There are 6 adjustable settings.
- Copa de lugar: Position a cup under the coffee spout.
- Comezar a elaborar cervexa: Press the selected coffee button again to start brewing. The machine will automatically grind beans, brew, and dispense coffee.
5.2. Using the Automatic Milk Frother
- Preparar o leite: Insert the soft suction tube into a container of cold milk.
- Posición do espumador: Place a cup under the milk frother wand.
- Activate Frother: Press the steam/froth button on the control panel. The machine will automatically froth and dispense milk into your cup.
- Combinar: Once milk is frothed, you can brew espresso into the same cup to create lattes or cappuccinos.
5.3. Usando café premoído
The machine also supports pre-ground coffee. Refer to the specific instructions in the full manual for the dedicated ground coffee compartment and selection process.
6. Mantemento e Limpeza
Unha limpeza regular garante un rendemento óptimo e unha maior duración da túa máquina.
- Automatic Cleaning System: The machine features an automatic cleaning system that activates after each use.
- Bandexa de goteo: The drip tray should be emptied and cleaned regularly. Remove the tray, discard collected liquid, and wash with warm, soapy water. Rinse thoroughly and dry before reinserting.
- Depósito de auga: Clean the 1.9L separable water tank periodically with warm, soapy water. Rinse well to remove any soap residue.
- Recipiente de pos de café: Empty and clean the used coffee grounds container regularly.
- Espumador de leite: After each use, ensure the milk frother is cleaned to prevent milk residue buildup. Run a short steam cycle with a cup of water to clear the nozzle.
- Descalcificación: The machine will indicate when descaling is required. Follow the instructions provided on the LCD display and use a suitable descaling solution.
- Limpeza exterior: Limpe o exterior da máquina cun suave, damp pano. Non use produtos de limpeza ou disolventes abrasivos.
7 Solución de problemas
If you encounter issues with your JAVA WSD18-010B, refer to the following common problems and solutions:
| Problema | Causa posible | Solución |
|---|---|---|
| A máquina non se acende. | Sen fonte de alimentación. | Comprobe se o cable de alimentación está ben conectado á toma de corrente e á máquina. |
| O café non se prepara. | Depósito de auga baleiro; grans de café baleiros; unidade de preparación bloqueada. | Refill water tank or bean hopper. Refer to manual for brewing unit cleaning. |
| O espumador de leite non produce escuma. | Frother nozzle blocked; milk too warm; incorrect milk type. | Clean the frother nozzle. Use cold, fresh milk. |
| Aparece a mensaxe "Descalcificar". | A máquina require descalcificación. | Perform a descaling cycle as per the instructions in the full manual. |
For more complex issues, please consult the full product manual or contact customer support.
8. Especificacións
- Modelo: WSD18-010B
- Marca: JAVA
- Presión: 15 bar
- Capacidade do depósito de auga: 1.9 litros
- Dimensións (L x P x A): 11.24 x 18.11 x 13.39 polgadas
- Peso neto: 20.9 libras
- Características especiais: Integrated Coffee Grinder, Automatic Milk Frother, NTC Temperature Control, Instant Boiler, LCD Display (10 languages)
- Modo de operación: Totalmente automático
- Compoñentes incluídos: Espumador de leite
- Cor: Prata
- Fabricante: Wan Shida
9. Garantía e soporte
For information regarding warranty coverage, technical support, or service inquiries, please refer to the warranty card included with your product or visit the official JAVA website. Please have your model number (WSD18-010B) and purchase date available when contacting support.