
Andoer L4 PRO
Andoer L4 Pro Motorized Camera Slider User Manual
Model: L4 PRO
1. Introdución
Grazas pola compraasing the Andoer L4 Pro Motorized Camera Slider. This compact and versatile auto dolly is designed to provide smooth, stable, and dynamic video shots for various applications, including time-lapse, macro, and low-angle filming. Its wireless remote control and adjustable speed settings offer enhanced flexibility for creative videography. This manual provides detailed instructions for setup, operation, and maintenance to ensure optimal performance and longevity of your device.
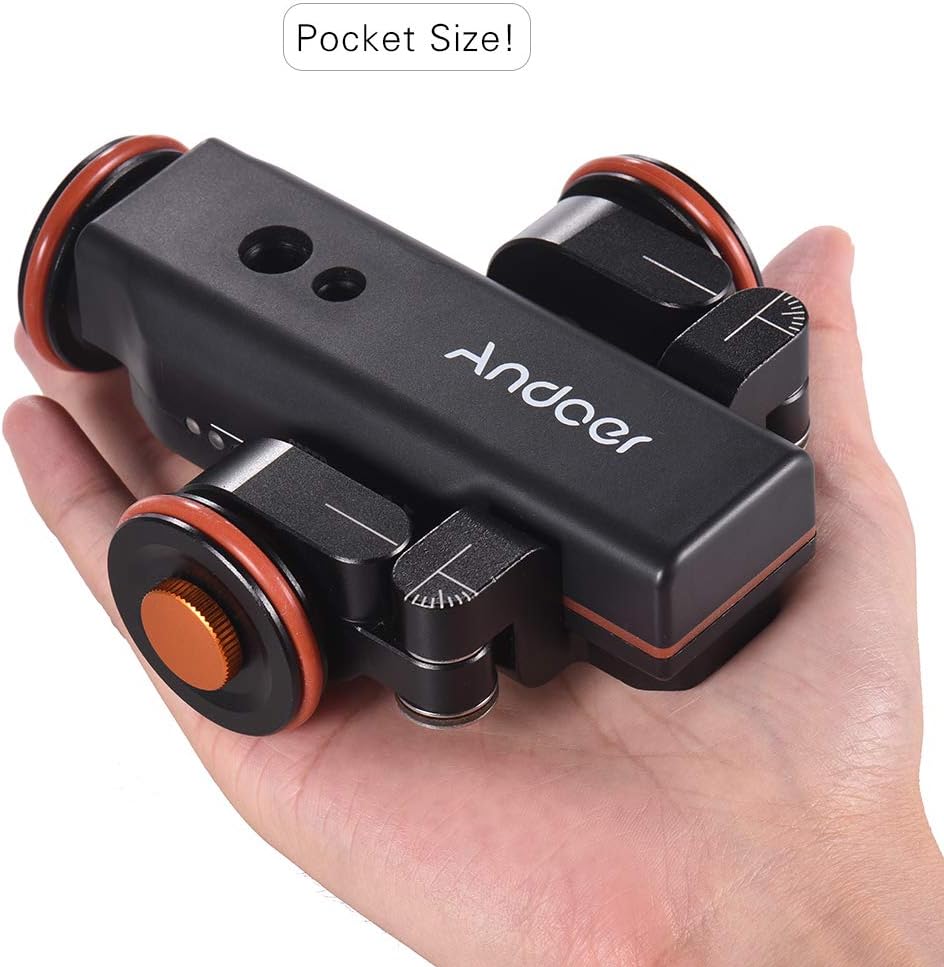
Figure 1.1: The Andoer L4 Pro Motorized Camera Slider, showcasing its compact and portable design, easily fitting into the palm of a hand.
2. Información de seguridade
Please read all safety instructions carefully before using the Andoer L4 Pro. Failure to follow these guidelines may result in damage to the product or personal injury.
- Non expoñas o dispositivo á auga nin a humidade excesiva.
- Evite deixar caer ou someter o dispositivo a fortes impactos.
- Non intente desmontar nin modificar o dispositivo. As reparacións só deben ser realizadas por persoal autorizado.
- Use só o cable de carga e o adaptador de corrente especificados.
- Ensure the device is placed on a flat, stable surface during operation to prevent tipping and damage to attached equipment.
- Non exceda a capacidade de carga máxima de 5 kg (11 lbs).
- Manter fóra do alcance dos nenos.
3. Contido do paquete
Verifique que todos os elementos que se indican a continuación estean incluídos no seu paquete:
- Andoer L4 Pro Motorized Camera Slider (Auto Dolly)
- Control remoto sen fíos
- Mini Ball Head Adapter (with 1/4" and 3/8" screws)
- Cable de carga USB
- Hex Key (for wheel adjustment)
- Junta tórica de reposto
- Manual de usuario

Figure 3.1: All components included in the Andoer L4 Pro package, laid out for inspection.
4. Produto rematadoview
Familiarize yourself with the main components of the Andoer L4 Pro Motorized Camera Slider.

Figure 4.1: Main components of the Andoer L4 Pro system, showing the motorized dolly, wireless remote, and mini ball head adapter.

Figura 4.2: Varios views of the Andoer L4 Pro, highlighting its design and adjustable wheel angles for different movement paths.
4.1 Dolly Components
- Corpo principal: Houses the motor, battery, and control electronics.
- Rodas: Three wheels, two of which are adjustable for curved paths.
- Parafusos de montaxe: 1/4" and 3/8" screw holes on top for attaching cameras, ball heads, or smartphone holders.
- Porto USB: Para cargar a batería interna.
- Interruptor de alimentación: Interruptor ON / OFF.
- Indicador de velocidade: LED lights indicating the current speed setting.

Figura 4.3: detallada view of the dolly's top mounting points (1/4" and 3/8") and side controls (USB port, ON/OFF switch).
4.2 Compoñentes do control remoto
- Botón Inicio/Pausa: Initiates or pauses movement.
- Speed Adjustment Buttons (+/-): Increases or decreases the dolly's speed.
- Direction Change Button: Reverses the dolly's direction.
- Power/Remote Control Indicator Light: Shows remote status and power.

Figura 4.4: Máisview of the wireless remote control and its functions, including the effective control distance of 6 meters (19.7 feet).
5. Configuración
5.1 Charging the Dolly
Before first use, fully charge the dolly's internal battery.
- Locate the USB charging port on the side of the dolly.
- Connect the provided USB charging cable to the dolly and a standard USB power adapter (not included) or a computer USB port.
- The charging indicator light will illuminate during charging and turn off when fully charged. A full charge takes approximately 2-3 hours and provides up to 6 hours of operation.

Figure 5.1: Information on the dolly's built-in 1800mAh rechargeable battery, indicating up to 6 hours of battery life and USB charging capability.
5.2 Attaching Your Camera or Smartphone
The dolly is compatible with various cameras, camcorders, and smartphones.
- Screw the mini ball head adapter onto the 1/4" or 3/8" mounting screw hole on top of the dolly. Ensure it is securely tightened.
- Attach your camera or smartphone holder (not included) to the ball head adapter.
- Adjust the angle of your camera/smartphone using the ball head. Ensure the setup is balanced and does not exceed the maximum load capacity of 5 kg (11 lbs).
5.3 Adjusting Wheel Angles for Movement Paths
The front two wheels can be adjusted to create straight or curved paths.
- For Straight Line Movement: Ensure all three wheels are aligned straight. Use the hex key to loosen the wheel locking screws, adjust the wheels to be parallel with the main body, and then tighten the screws.
- For Circular Movement: Loosen the locking screws on the front two wheels. Angle them inwards or outwards to achieve the desired curve radius. Ensure both front wheels are set to the same angle for a smooth circle. Tighten the screws firmly.
6. Instrucións de funcionamento
6.1 Acendido/Apagado
- To power on the dolly, slide the ON/OFF switch to the "ON" position.
- Para apagar, deslice o interruptor á posición "OFF".
6.2 Uso do control remoto sen fíos
The remote control allows for convenient operation from a distance of up to 6 meters (19.7 feet).
- Inicio / Pausa: Preme o Reproducir/Pausa button (▶‖) to start or pause the dolly's movement.
- Axuste de velocidade: Preme o +/- buttons to cycle through the three available speeds: 2.4 cm/s, 2.6 cm/s, and 2.8 cm/s. The LED indicators on the dolly will show the current speed.
- Cambio de dirección: Preme o Dirección button (curved arrow) to reverse the dolly's direction of travel.
6.3 Movement Modes
- Straight Line Movement: With wheels adjusted for straight travel, the dolly will move in a linear path. This is ideal for tracking shots.
- Movemento circular: By angling the front wheels, the dolly can perform smooth circular or arc movements. This is useful for orbiting subjects or creating dynamic panoramic shots.

Figure 6.1: Illustration of the dolly's capabilities for both circular and straight-line movements, achieved by adjusting the wheel angles.

Figure 6.2: The Andoer L4 Pro in action, demonstrating its use with both a camera and a smartphone for dynamic video capture.
7. Mantemento
Proper maintenance ensures the longevity and optimal performance of your Andoer L4 Pro.
- Limpeza: Limpe o dispositivo cun pano suave e seco. Non empregue produtos de limpeza abrasivos nin disolventes.
- Almacenamento: Store the dolly in a cool, dry place away from direct sunlight and extreme temperatures.
- Coidado da batería: If storing for extended periods, charge the battery to approximately 50% every three months to preserve battery health.
- Inspección de rodas: Periodically check the wheels for debris or wear. Clean them as needed to ensure smooth operation.
8 Solución de problemas
If you encounter issues with your Andoer L4 Pro, refer to the following common problems and solutions:
| Problema | Causa posible | Solución |
|---|---|---|
| Dolly does not move. |
|
|
| Movement is not smooth or stops intermittently. |
|
|
| Dolly does not follow a straight or perfect circular path. |
|
|
| O control remoto non responde. |
|
|
9. Especificacións
| Marca | Andoer |
| Modelo | L4 PRO |
| Dispositivos compatibles | Camera, Mobile Phone |
| Dimensións do produto (L x W x H) | 12.2 x 10.6 x 3.8 cm (4.8 x 4.2 x 1.5 polgadas) |
| Peso do elemento | 495 gramos (1.09 libras) |
| Máx. Capacidade de carga | 5 kg (11 lb) |
| Tipo de batería | Batería recargable de 1800 mAh incorporada |
| Máx. Duración da batería | Ata 6 horas |
| Método de carga | USB recargable |
| Distancia de control sen fíos | Ata 6 metros (19.7 pés) |
| Velocidades axustables | 3 speeds (2.4 cm/s, 2.6 cm/s, 2.8 cm/s) |
| Material | Aliaxe de aluminio |
| UPC | 799410730064 |
10. Garantía e soporte
Andoer products are designed and manufactured to the highest quality standards. For warranty information and technical support, please refer to the warranty card included in your package or visit the official Andoer websitio. Garde o comprobante de compra para calquera reclamación de garantía.
For further assistance, please contact Andoer customer support through their official channels.
Ask a question about this manual
Ask about setup, troubleshooting, compatibility, parts, safety, or missing instructions. Manuals+ will review the question and use this page’s manual context to help answer it.