
1. Instrucións de seguridade importantes
To reduce the risk of fire, electric shock, or injury, always follow these basic safety precautions when using your Arctic-Pro Portable Digital Ice Maker Machine:
- Le todas as instrucións antes de usar.
- Non toque superficies quentes. Use asas ou botóns.
- To protect against electrical hazards, do not immerse cord, plug, or any part of the appliance in water or other liquids.
- É necesaria unha estreita supervisión cando calquera aparello é usado por nenos ou preto de eles.
- Desenchufe da toma cando non estea en uso e antes de limpalo. Deixar arrefriar antes de poñer ou quitar pezas e antes de limpar o aparello.
- Non fagas funcionar ningún electrodoméstico cun cable ou enchufe danados, ou despois de que o electrodoméstico funcione de forma avariada ou se dane de calquera xeito. Ponte en contacto co servizo de atención ao cliente para que o examinen, reparen ou axusten.
- O uso de accesorios non recomendados polo fabricante do aparello pode provocar perigos.
- Non use ao aire libre.
- Non deixes que o cable colgue do bordo da mesa ou do mostrador nin toque superficies quentes.
- Non o coloque sobre ou preto dun queimador eléctrico ou de gas quente, nin nun forno quente.
- Conecte sempre primeiro o enchufe ao electrodoméstico e, a seguir, o cable á toma de corrente. Para desconectalo, poña calquera control na posición de apagado e, a seguir, retire o enchufe da toma de corrente.
- Non utilice o aparello para outros usos domésticos.
- Este aparello é só para uso doméstico.
- Non empregue produtos químicos ou vapores corrosivos neste aparello.
- This ice maker must be grounded.
- Non pinche os tubos do refrixerante.
2. Produto rematadoview
The Arctic-Pro Portable Digital Ice Maker Machine is designed to produce ice quickly and efficiently. It features a compact design suitable for various settings.
2.1 Compoñentes
- Unidade de fabricación de xeo
- Cesta de xeo extraíble
- Scoop de xeo
- Power Cord (3-prong plug)
2.2 Características
- Pantalla dixital: An easy-to-read LCD control panel for selecting ice size, setting timers, and controlling cleaning functions.
- Limpar View Window Lid: Allows observation of the ice making process.
- Fill Sensor: Detects water level to ensure proper operation.
- Sensores intelixentes: Prevents the ice basket from overfilling.
- Dous tamaños de cubos de xeo: Choose between small (0.75 x 0.75 inches) and large (1 x 0.75 inches) ice cubes.
- Produción rápida de xeo: Produces first batch of ice in 6-8 minutes.
- Capacidade diaria: Capable of producing up to 26 pounds of ice per day.
- Enhanced Cooling System: Features a fan for efficient heat dissipation.

Figure 1: Key features and components of the ice maker.
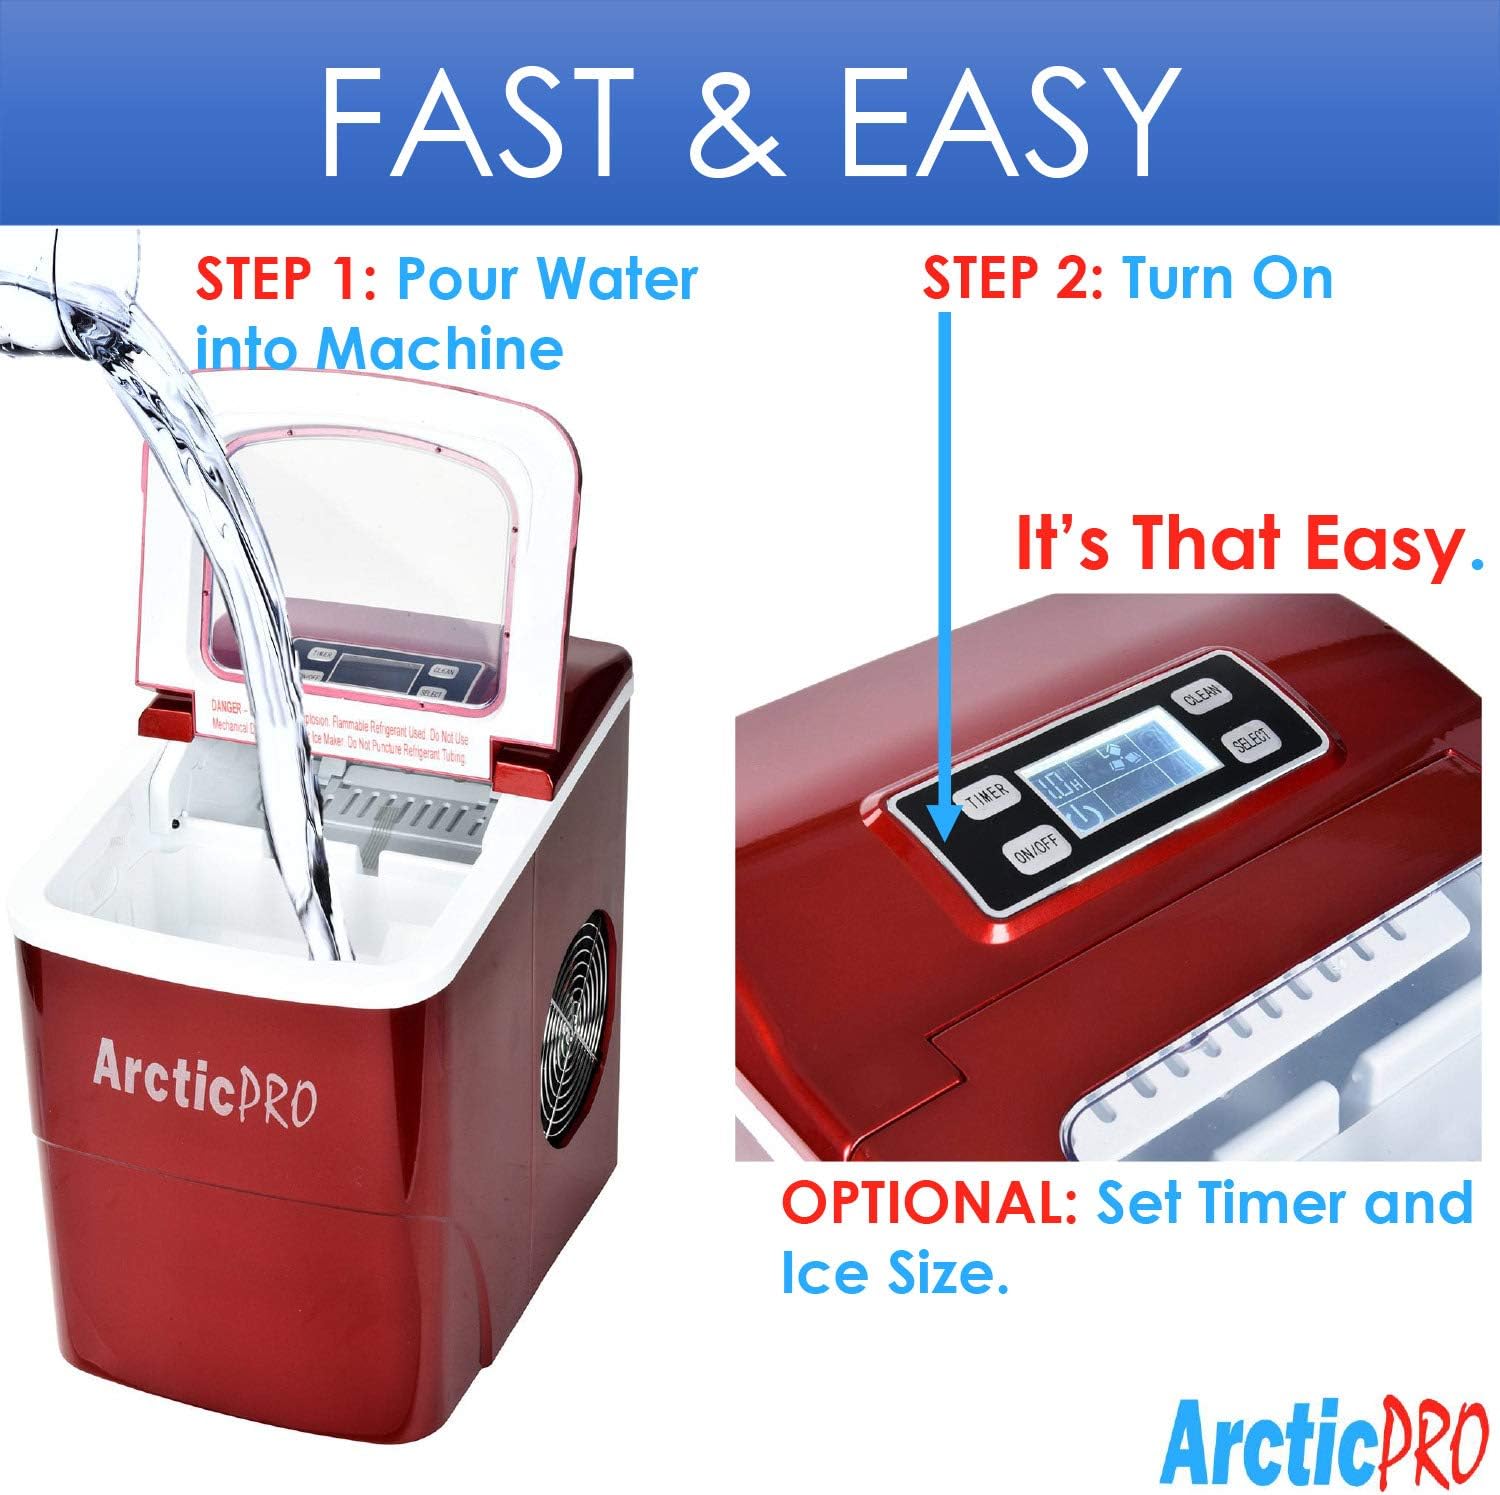
Figure 2: Ice production capabilities.
3. Instrucións de configuración
3.1 Desembalaxe
- Retire todos os materiais de embalaxe da unidade.
- Inspect the ice maker for any damage. If damaged, do not operate and contact customer service.
- Remove the ice basket and ice scoop from inside the unit.
3.2 Limpeza inicial
Before first use, clean the interior of the ice maker:
- Wash the ice basket and ice scoop with warm water and mild detergent. Rinse thoroughly.
- Limpe o interior da máquina de xeo cun pano suave dampened with warm water and a small amount of vinegar or mild detergent. Rinse with clean water and drain.
- Asegúrese de que todas as pezas estean secas antes de volver a montar.
3.3 Colocación
- Coloque a máquina de xeo sobre unha superficie estable e nivelada, lonxe da luz solar directa e de fontes de calor.
- Ensure there is adequate ventilation around the unit, especially at the back and sides where the cooling fan is located.
- Deixe polo menos 4 polgadas de espazo ao redor da unidade para unha correcta circulación do aire.
3.4 Conexión de alimentación
- Plug the 3-prong power cord into a grounded electrical outlet (115V, 60Hz).
- Allow the unit to rest for at least one hour before adding water and operating, especially if it was tilted during transport.
4. Instrucións de funcionamento
Operating your Arctic-Pro ice maker is a simple two-step process:

Figure 3: Simple operating steps.
4.1 Engadir auga
- Abra a tapa da máquina de xeo.
- Pour potable water into the water reservoir. Do not exceed the 'MAX FILL LINE' indicated inside the reservoir.
- Pecha a tapa.

Video 1: Demonstrates adding water to the ice maker. Note: This video is a customer-generated preview and may not represent official instructions.
4.2 Comezo da produción de xeo
- Preme o ON/OFF button on the digital control panel to turn on the unit.
- Usa o SELECCIONAR button to choose your desired ice cube size: Small (S) or Large (L). The selected size will be indicated on the digital screen.
- The ice maker will begin its cycle. The first batch of ice cubes will typically be ready in 6-8 minutes.
4.3 Indicadores
- Xeo cheo: An indicator light or message on the digital screen will illuminate when the ice basket is full. The unit will automatically pause ice production. Remove ice from the basket to resume production.
- ENGADIR AUGA: An indicator light or message will illuminate when the water reservoir is low. Add water to the reservoir to resume ice production.
4.4 Timer Function (Optional)
The digital screen allows you to set a timer for operation. Refer to the specific instructions in your product packaging for detailed timer setup.
5. Mantemento e Limpeza
A limpeza e o mantemento regulares garanten un rendemento óptimo e unha maior duración da súa máquina de xeo.
5.1 Limpeza diaria
- After each use, unplug the unit.
- Remove the ice basket and empty any remaining ice.
- Drain any remaining water from the reservoir using the drain plug located at the bottom of the unit.
- Limpar o interior cun pano suave.
5.2 Limpeza semanal
- Perform the daily cleaning steps.
- Prepare a solution of warm water and a small amount of white vinegar or a food-grade ice maker cleaner.
- Pour the solution into the water reservoir and allow it to sit for 10-15 minutes.
- Escorrer a solución completamente.
- Rinse the reservoir thoroughly with clean water multiple times to remove any residue.
- Limpe o exterior cun suave, damp pano.
5.3 Almacenamento
If storing the ice maker for an extended period:
- Ensure the unit is thoroughly cleaned and completely dry.
- Leave the lid slightly ajar to prevent mold and mildew growth.
- Almacenar nun lugar fresco e seco.
6 Solución de problemas
Review os seguintes problemas e solucións comúns antes de contactar co servizo de atención ao cliente.
| Problema | Causa posible | Solución |
|---|---|---|
| A máquina de xeo non se acende | Sen fonte de alimentación | Check if the power cord is securely plugged into a grounded outlet. Test the outlet with another appliance. |
| Sen produción de xeo | Lack of water in reservoir | Add water to the reservoir up to the MAX FILL LINE. |
| A temperatura ambiente é demasiado alta | Ensure the ice maker is in a cool environment and not exposed to direct sunlight or heat sources. | |
| Air circulation blocked | Ensure adequate space around the unit for ventilation. Clean any dust from the fan vents. | |
| Os cubos de xeo son demasiado pequenos ou están turbios | A temperatura da auga é demasiado alta | Use colder water when filling the reservoir. |
| Acumulación de mineral | Perform a thorough cleaning and descaling as per maintenance instructions. Use filtered water. | |
| "ICE FULL" indicator is on, but basket is not full | Ice blocking sensor | Rearrange ice in the basket or remove some ice to clear the sensor path. |
| Ruído inusual durante o funcionamento | Sons de funcionamento normal | Some gurgling or fan noise is normal. If the noise is excessive or unusual, contact customer service. |
7. Especificacións
| Característica | Especificación |
|---|---|
| Nome do modelo | Máquina portátil para fabricar xeo |
| Número de modelo | 21738 |
| Dimensións (D x W x H) | 11.5" x 8.75" x 12.5" |
| Capacidade diaria de produción de xeo | Ata 26 libras |
| Primeiro tempo de produción de xeo | 6-8 minutos |
| Tamaños de cubos de xeo | Small (0.75"x0.75"), Large (1"x0.75") |
| Wattage | 100 vatios |
| Voltage | 115 voltios |
| Nivel de ruído | 45 decibeis |
| Material | Plástico |
| Compoñentes incluídos | Ice Maker, Ice Basket, Small Ice Scoop |

Figura 4: Dimensións do produto.
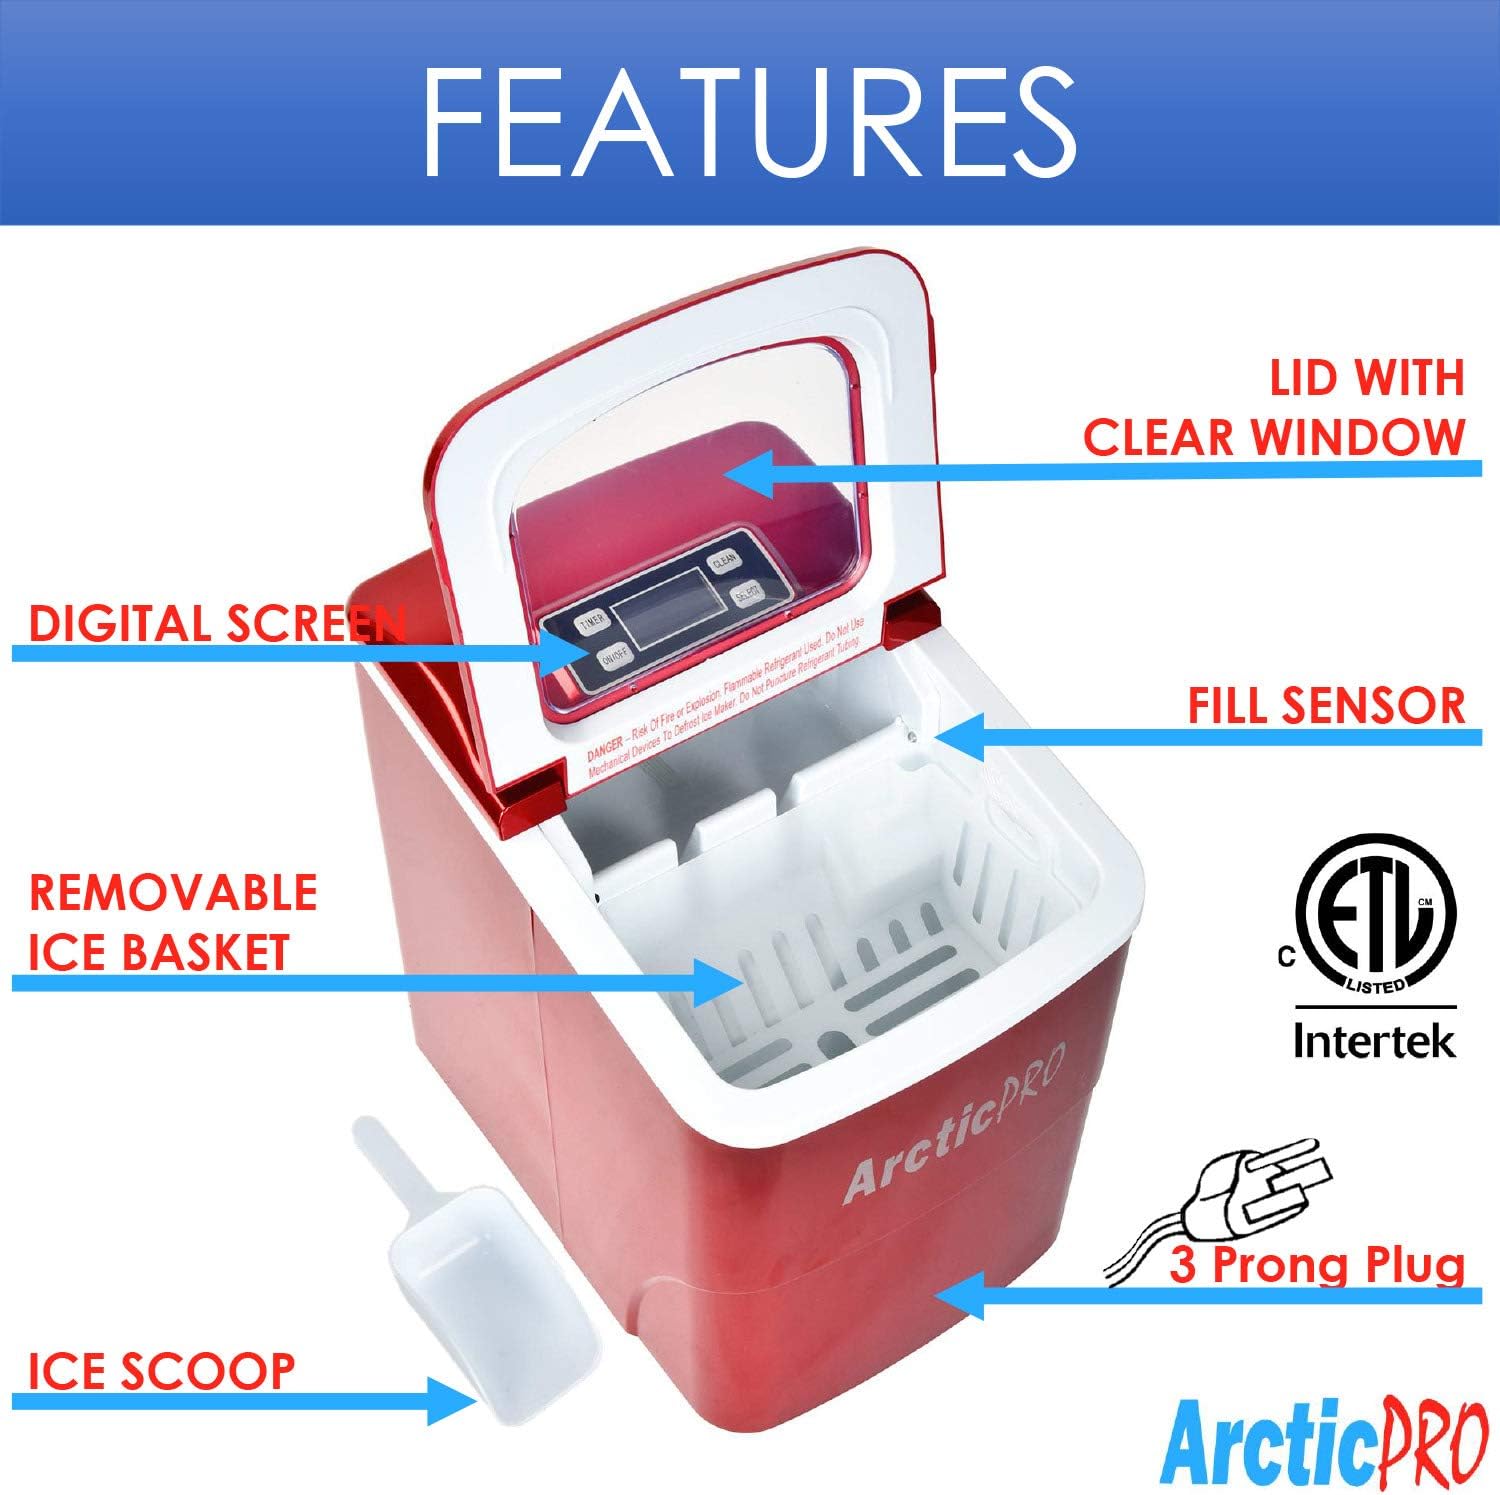
Figure 5: Ice cube size comparison.
8. Garantía e atención ao cliente
Arctic-Pro products are manufactured to high-quality standards. For warranty information, product registration, or technical assistance, please refer to the warranty card included with your purchase or visit the official Arctic-Pro websitio.
If you encounter any issues not covered in this manual, please contact Arctic-Pro customer support for further assistance.