1. Configuración e instalación
Proper installation of the sealing ring is crucial for the safe and effective operation of your pressure cooker. Follow these steps carefully.
1.1 Preparación inicial
Upon receiving your new GJS Gourmet rubber gasket, it is recommended to soak it in warm, soapy water for a few minutes. This helps to straighten out the flexible silicone material, making installation easier.

Image 1: The GJS Gourmet 6-quart rubber gasket, made from durable food-grade silicone.
1.2 Removing the Old Gasket
Carefully remove the old sealing ring from the lid of your Cook's Essentials electric pressure cooker. Note its position and orientation for reference during new gasket installation.

Image 2: Diagram illustrating the location of the sealing ring within the pressure cooker lid.
1.3 Installing the New Gasket
Place the new GJS Gourmet rubber gasket into the designated groove on the underside of your pressure cooker lid. Ensure it is seated firmly and evenly all around the rim. The soapy water from the initial soak will help the gasket slide into place effortlessly.
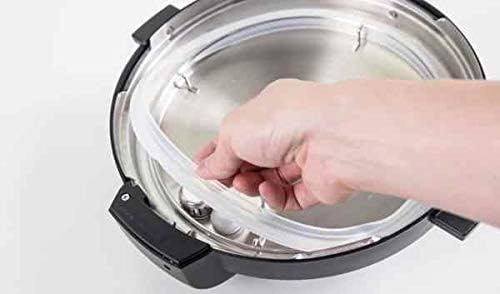
Image 3: A hand demonstrating the installation of the new gasket into the pressure cooker lid.
1.4 Video Guide: Gasket Installation
Video 1: This video demonstrates the steps for installing a silicone pressure cooker sealing ring. It shows soaking the new ring, removing the old one, and fitting the new ring into the lid.
2. Operating with the New Gasket
After installing the new gasket, ensure the lid closes securely and forms a tight seal before operating your pressure cooker. A properly installed gasket is essential for maintaining pressure and ensuring safe cooking.
3. Mantemento e coidados
To prolong the life of your GJS Gourmet rubber gasket and ensure optimal performance, regular maintenance is recommended.
3.1 Limpeza
The silicone gasket is dishwasher safe. For best results, remove the gasket from the lid after each use and wash it thoroughly with warm, soapy water or place it in the dishwasher. Ensure it is completely dry before re-installing.
3.2 Substitución
It is recommended to replace your pressure cooker gasket every 18-24 months, or sooner if you notice any signs of wear, deformation, or if the gasket no longer forms a tight seal. A loose or damaged gasket can lead to steam leakage and improper pressure build-up.
4 Solución de problemas
If you experience issues with your pressure cooker after installing the new gasket, consider the following:
- Fuga de vapor: Ensure the gasket is correctly seated in the lid's groove and is not twisted or pinched. If the gasket appears stretched or deformed, it may need replacement.
- Tapa sen selar: Verify that the gasket is the correct size for your pressure cooker model (6-quart Cook's Essentials Electric Pressure Cooker Model CEPC660). Check the dimensions of your inner pot: the outer diameter should be approximately 24.0 cm, and the inner diameter should be approximately 22.0 cm.
5. Especificacións
| Marca | GJS Gourmet |
| Compatibilidade de capacidade | 6 cuartos |
| Material | Silicona |
| Cor | Limpar |
| Peso do elemento | 1.76 onzas (0.05 quilogramos) |
| Apto para lavalouza | Si |
| UPC | 727040672355, 644216536801 |
| Modelo compatible | Cook's Essentials Electric Pressure Cooker Model CEPC660 |
6. Información da garantía
Specific warranty details for the GJS Gourmet Rubber Gasket are not available in the provided product information. Please refer to the product packaging or contact the manufacturer directly for warranty inquiries.
7. Apoio
For additional support or questions regarding your GJS Gourmet product, please visit the official GJS Gourmet store on Amazon: GJS Gourmet Store. Contact information for direct support is not available in the provided product data.