1. Introdución
This manual provides detailed instructions for the installation, operation, and maintenance of your EMANER Model 7042-WH Dual-Head LED Security Light. Please read this manual thoroughly before installation and retain it for future reference.

Fronte view of the EMANER Dual-Head LED Security Light, highlighting its two rotatable light heads and motion sensor. A 120V warning label is visible.
2. Información de seguridade
AVISO: Risk of electric shock. Disconnect power at the fuse or circuit breaker before installation or servicing. All wiring connections must be in accordance with local and national electrical codes.
- Ensure the power supply is 120V AC.
- Non instale preto de materiais combustibles.
- This product is designed for outdoor use and is IP65 waterproof rated.
- Consulte a un electricista cualificado se non está seguro sobre o proceso de instalación.
- Non mire directamente á fonte de luz LED cando estea acesa.
3. Produto rematadoview e Compoñentes
The EMANER Model 7042-WH is a dual-head LED security light featuring a rotatable design and multiple intelligent control modes. Key components include:
- Rotatable Light Heads: Two adjustable LED light panels.
- Sensor de movemento PIR: Sensor infravermello pasivo para a detección de movemento.
- Diales de control: For adjusting time delay and sensitivity.
- Hardware de montaxe: Includes mounting strap, screws, and wire nuts.

A diagram providing precise measurements of the security light's length, width, height, and the dimensions of the rotatable light heads and PIR motion sensor.
4. Especificacións
| Característica | Especificación |
|---|---|
| Marca | EMANER |
| Número de modelo | 7042-WH |
| Cor | White Fixture |
| Material | ABS Plastic + Aluminum internal |
| Tipo de fonte de luz | LED |
| Wattage | 28 vatios |
| Brillo | 2800 lúmenes |
| Temperatura da cor | 5000K branco luz diurna |
| Voltage | 120 voltios |
| Nivel de resistencia á auga | Impermeable IP65 |
| Ángulo de detección | 180 graos |
| Distancia de detección | 20-70 feet (adjustable) |
| Tipo de montaxe | Wall mount, Eave/Soffit mount |
| Dimensións do produto | 9 cm de longo x 6.4 cm de ancho x 7.4 cm de alto |
| Peso do elemento | 1.74 libras |
5. Configuración e instalación
This LED security light is designed for easy installation. Follow these steps carefully:
5.1 Preinstalación
- Apague a enerxía: Disconnect power at the circuit breaker or fuse box before beginning installation.
- Select mounting location: Choose a wall or eave/soffit location that provides the desired coverage and is within reach of existing wiring. Recommended mounting height is 6.5-12 feet.
- Unpack contents: Ensure all components are present: light fixture, mounting strap, screws, and wire nuts.
5.2 Cableado e montaxe
- Attach the mounting strap to your existing electrical outlet box using the provided screws.
- Conecte os cables eléctricos:
- Conecta o negro (Live) wire from the fixture to the negro (Live) wire from the outlet box.
- Conecta o branco (Neutral) wire from the fixture to the branco (Neutral) wire from the outlet box.
- Conecta o green/bare copper (Ground) wire from the fixture to the green/bare copper (Ground) wire from the outlet box.
- Carefully tuck the wires into the outlet box.
- Align the light fixture with the mounting strap and secure it with the decorative cover and fixture mounting screw.
- Adjust the light heads and motion sensor to your desired angles.
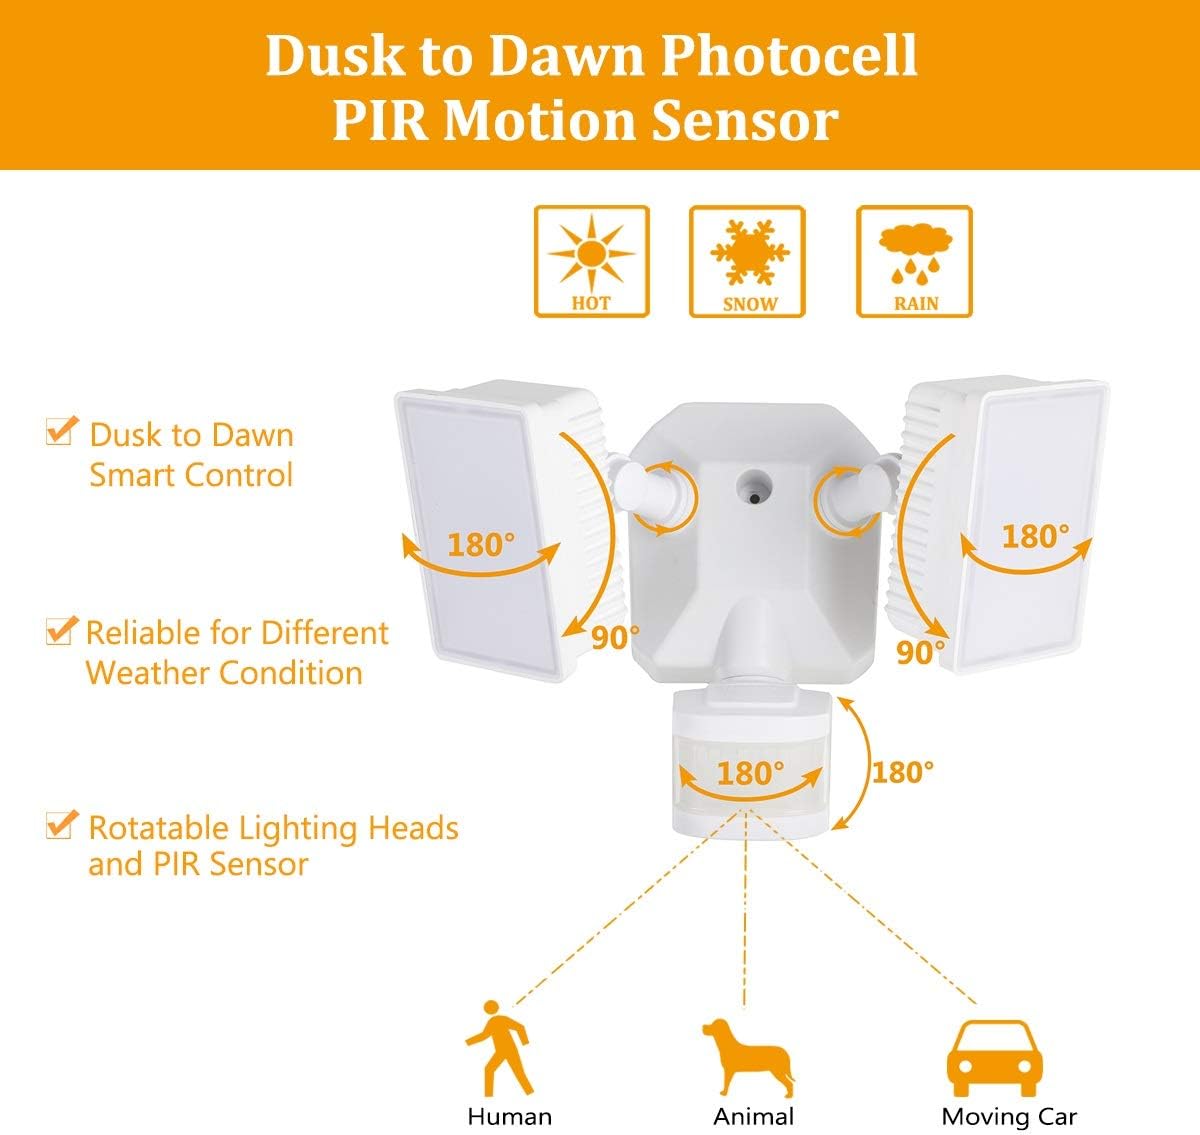
Diagram for installing the security light, detailing wire connections, mounting strap, back plate, and attaching the light head and sensor.
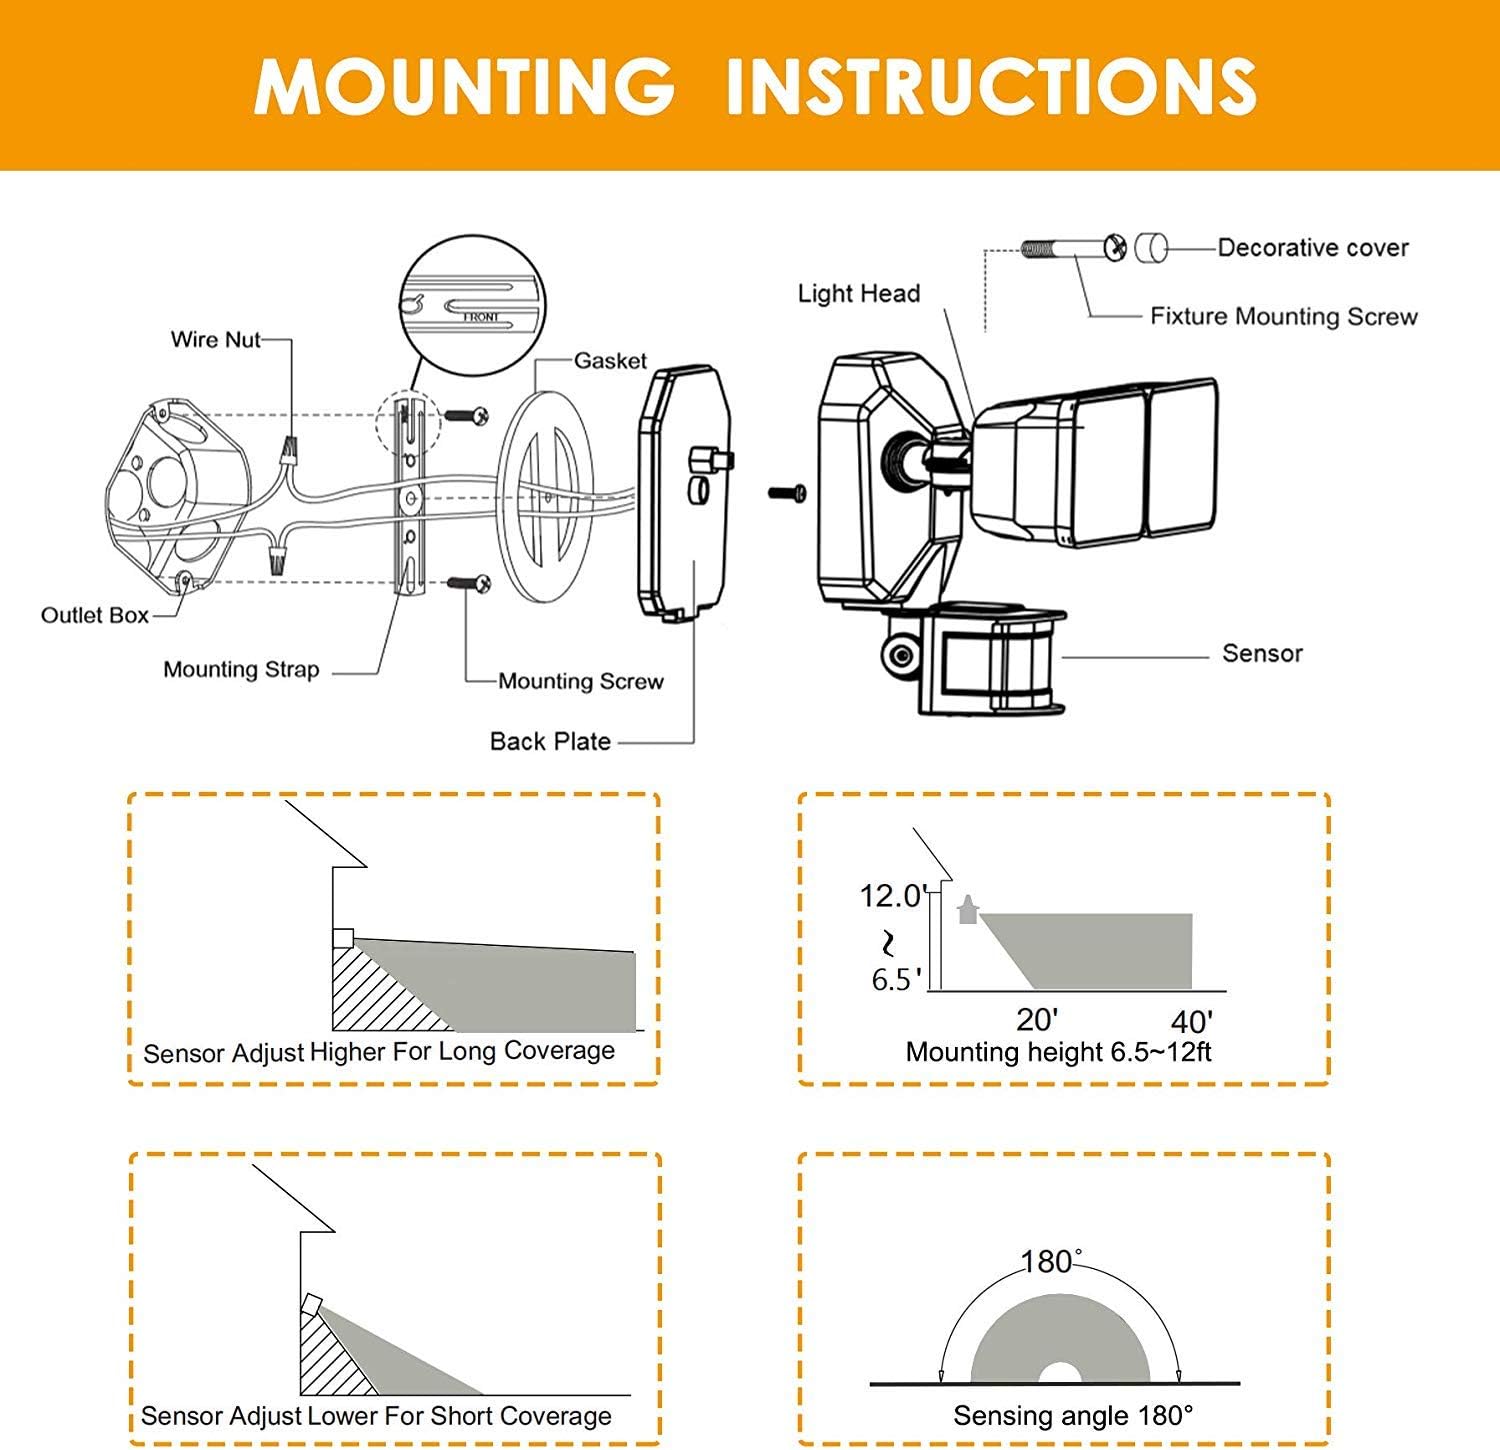
Illustrations showing two common installation methods: mounting the light under an eave or soffit, and mounting it directly onto a wall.
6. Modos de funcionamento e configuración
The security light features a control panel with dials for TIME and SENSITIVITY, and a slide switch for selecting operating modes. All modes operate only at night or in dark environments, automatically turning off at dawn.

An infographic explaining the various operating modes: TEST, AUTO, Motion Sensor, 6 Hours, and Dusk to Dawn (PC) modes, along with their respective time delay and sensitivity settings.
6.1 Panel de control rematadoview

Detallado view of the control panel, showing the 'TIME' dial (5S, 3MIN, TEST) and 'SENSITIVITY' dial (+/-) for adjusting light duration and motion detection range.
- TIME Dial: Adjusts how long the light stays on after motion is detected (5 seconds to 3 minutes). The 'TEST' setting is for initial setup.
- SENSITIVITY Dial: Adjusts the motion sensor's detection range (Low to High sensitivity, 20-70 feet).
- Mode Slide Switch: Selects between AUTO, OFF (Motion Sensor), 6H (6 Hours), and PC (Dusk to Dawn Stay On) modes.
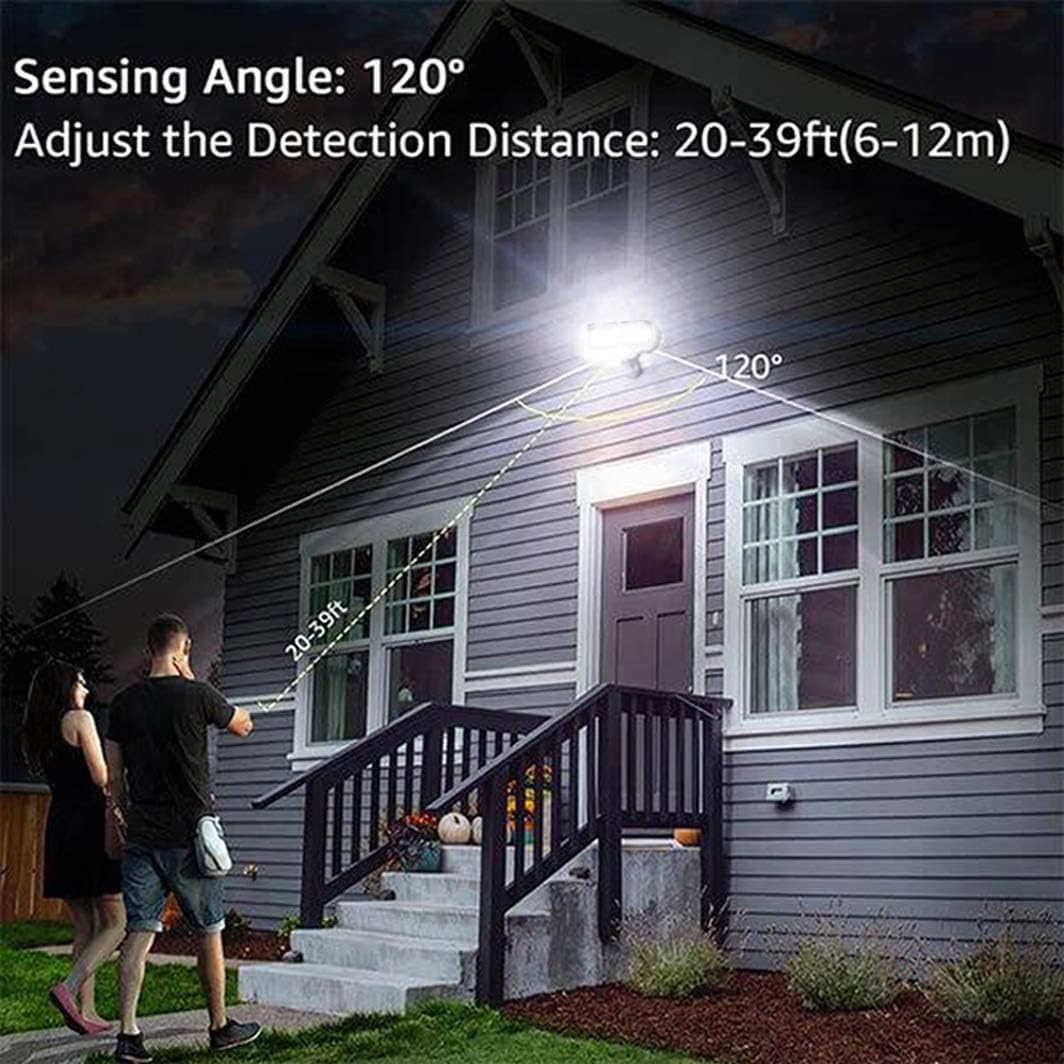
An illustration demonstrating the motion sensor's 120-degree sensing angle and adjustable detection distance of 20-39 feet (6-12 meters) from a mounting height of 6.5-12 feet.
6.2 Modos de funcionamento
- Modo de PROBA: (Slide switch to 'TEST' on TIME dial) This mode is for testing after installation. When connected to AC power, the light will turn on for 5 seconds based on the time delay setting.
- AUTO Dim Light Mode: (Slide switch to 'AUTO') The security light turns on with dim light at dusk. When motion is detected, it switches to 100% brightness. After no motion is detected for the set time delay (5 seconds to 3 minutes), it returns to dim light. Automatically turns off at dawn.
- Motion On/Off Mode: (Slide switch to 'OFF') The security flood light only turns on at 100% brightness when motion is activated. It automatically turns off when no motion is detected for the set time delay. Automatically turns off at dawn.
- 6 Hours Mode: (Slide switch to '6H') The flood light turns on at 100% brightness and stays on for 6 hours. After 6 hours, it automatically switches to 'AUTO Dim Light Mode'. Automatically turns off at dawn.
- Dusk to Dawn Stay On Mode (PC Mode): (Slide switch to 'PC') The motion security light turns on with bright light (100% brightness) and stays on all night. It automatically turns off in the daytime.
7. Mantemento
Regular maintenance ensures optimal performance and longevity of your EMANER LED Security Light.
- Limpeza: Limpe periodicamente os cabezales das luces e a lente do sensor de movemento cun pano suave eamp pano. Non use produtos de limpeza ou disolventes abrasivos.
- Inspección: Annually inspect the wiring and mounting for any signs of wear, damage, or loose connections.
- Non hai pezas reparables polo usuario: The LED light source is non-removable and not user-serviceable. Do not attempt to open the light heads.
8 Solución de problemas
Se tes problemas coa luz de seguridade, consulta os seguintes problemas e solucións comúns:
| Problema | Causa posible | Solución |
|---|---|---|
| A luz non se acende pola noite. | 1. A enerxía está apagada. 2. Photocell sensor is detecting ambient light. 3. Problema de cableado. | 1. Comprobe o disxuntor/fusible. 2. Ensure the sensor is not obstructed or exposed to other light sources. 3. Verify all wiring connections are secure. |
| A luz permanece acesa continuamente. | 1. Mode set to 'PC' (Dusk to Dawn Stay On). 2. Constant motion detected. 3. Erro de cableado. | 1. Change mode to 'AUTO' or 'OFF'. 2. Adjust sensor sensitivity or angle to avoid constant triggers. 3. Volve comprobar o cableado. |
| Light flashes or cycles on/off rapidly. | 1. Intermittent power supply. 2. Sensor interference. 3. Faulty unit. | 1. Check power connections. 2. Ensure no objects are moving within the sensor's range. 3. Ponte en contacto co servizo de atención ao cliente se os problemas persisten. |
| O sensor de movemento non detecta. | 1. Sensibilidade definida demasiado baixa. 2. Sensor obstructed or misaligned. 3. Temperature too high (reduces PIR effectiveness). | 1. Increase SENSITIVITY setting. 2. Clear obstructions and adjust sensor angle. 3. This is normal behavior in very hot weather. |
9. Información da garantía
The EMANER Model 7042-WH LED Security Light comes with a 2 anos de garantía do fabricanteEsta garantía cobre defectos de materiais e fabricación en condicións normais de uso. Conserve o comprobante de compra para reclamacións de garantía.
10. Atención ao cliente
For technical assistance, warranty claims, or any questions regarding your EMANER product, please contact EMANER customer service. You can typically find contact information on the product packaging or through the retailer where the product was purchased.
Alternatively, you may visit the official EMANER brand store online or use the 'Ask a question' feature on the product's retail page.