
Introdución
This manual provides detailed instructions for the setup, operation, and maintenance of your Homtime C1 Mini Snooze Alarm Clock. Please read this manual thoroughly before using the product to ensure proper function and longevity.

Image: The Homtime C1 Mini Alarm Clock, light blue in color, is shown on a decorative tray next to a small potted plant. The digital display shows the time 20:08.
Produto rematadoview
The Homtime C1 Mini is a compact digital alarm clock designed for convenience and functionality. It features a clear LCD display, dual USB charging ports for mobile devices, and a snooze function. Its design is suitable for various environments including bedrooms, offices, and for travel.
Características principais:
- Pantalla dixital da hora
- Función de repetición
- Portos de carga USB duales
- Dimmable LCD Screen
- Deseño compacto e portátil
Contido do paquete:
- Homtime C1 Mini Alarm Clock
- Adaptador de alimentación
- Manual de usuario (este documento)
Configuración
- Conexión de alimentación: Connect the provided power adapter to the DC input port on the back of the alarm clock. Plug the adapter into a standard wall outlet. The display will illuminate.
- Battery Installation (Optional for backup): Para facer unha copia de seguridade da configuración da hora e da alarma durante un apagadotages, install 3 AAA batteries (not included) into the battery compartment located on the bottom of the unit. Ensure correct polarity.
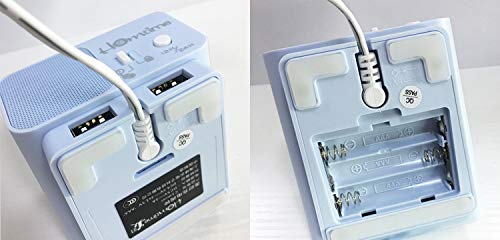
Image: A split image showing the bottom of the Homtime C1 Mini. The left side displays the rear with two USB charging ports and a power input. The right side shows the open battery compartment, designed for AAA batteries.
Instrucións de funcionamento
1. Axustar a hora
- Manteña premido o "Time Set" button (usually located on the top or back) until the hour digits begin to flash.
- Usa o "+" or "-" buttons to adjust the hour. Pay attention to AM/PM indicators if present.
- Preme o "Time Set" de novo para confirmar a hora e pasar ao axuste dos minutos.
- Usa o "+" or "-" botóns para axustar os minutos.
- Preme o "Time Set" botón unha última vez para gardar a configuración de hora.
2. Configuración da alarma
- Manteña premido o "Alarm Set" botón ata que os díxitos da hora da alarma comecen a parpadear.
- Usa o "+" or "-" botóns para axustar a hora da alarma.
- Preme o "Alarm Set" button again to confirm the alarm hour and move to alarm minute adjustment.
- Usa o "+" or "-" botóns para axustar os minutos da alarma.
- Preme o "Alarm Set" button one last time to save the alarm setting.
- Para activar/desactivar a alarma, prema o botón "Alarm On/Off" button (or a dedicated alarm icon button). An alarm icon will appear on the display when active.
3. Función de repetición da alarma
When the alarm sounds, press the large button on the top of the clock (often labeled "Adiar" or simply the main control button). The alarm will pause for approximately 9 minutes and then sound again. To turn off the alarm completely, press any other button or let it sound for its full duration.
4. Brillo da pantalla
The LCD screen has multiple brightness levels. Press the "Dimmer" button (or a dedicated light icon button) repeatedly to cycle through the available brightness settings (e.g., High, Medium, Low, Off).
5. Portos de carga USB
The Homtime C1 Mini features dual USB charging ports on the back of the unit. These ports are designed to charge compatible mobile devices such as smartphones and tablets. Simply connect your device's USB charging cable to one of the ports. Charging will begin automatically.
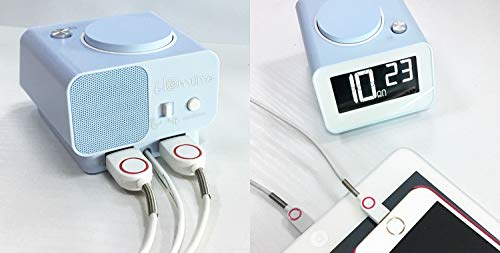
Imaxe: A parte traseira view of the Homtime C1 Mini alarm clock, showing two white USB charging cables plugged into its dual USB ports. This illustrates the charging functionality.
Mantemento
- Limpeza: Wipe the unit with a soft, dry cloth. Do not use abrasive cleaners or solvents, as they may damage the surface.
- Potencia: Ensure the power adapter is securely connected. Disconnect from power during extended periods of non-use.
- Ambiente: Avoid placing the clock in direct sunlight, near heat sources, or in excessively humid environments.
Resolución de problemas
| Problema | Causa posible | Solución |
|---|---|---|
| A pantalla do reloxo está en branco. | Sen poder nin poder outage. | Check power adapter connection. If using battery backup, ensure batteries are installed correctly and are not depleted. |
| Non soa a alarma. | A alarma non está activada ou está configurada incorrectamente. | Ensure the alarm is turned ON (alarm icon visible). Verify the alarm time is set correctly. |
| A carga por USB non funciona. | Problema co cable ou incompatibilidade do dispositivo. | Try a different USB cable. Ensure the device is compatible with USB charging. Check if the clock is powered on. |
| A pantalla é demasiado brillante/escura. | É preciso axustar a configuración do brillo. | Press the "Dimmer" button to cycle through brightness levels. |
Especificacións
- Marca: Hora local
- Modelo: C1 Mini
- Tipo de visualización: LCD dixital
- Fonte de enerxía: Electrical (AC Adapter)
- Copia de seguridade da batería: 3 pilas AAA (non incluídas)
- Características especiais: Alarm, Dual USB Charging Ports, Dimmable Screen
- Material do cadro: Acrilonitrilo butadieno estireno, plástico
- Tipo de montaxe: Mesa
- País de orixe: China
Garantía e Soporte
For warranty information and customer support, please refer to the warranty card included with your product or visit the official Homtime websitio. Conserve o recibo de compra para reclamacións de garantía.
For further assistance, you may contact Homtime customer service through their official channels. Please have your model number (C1 Mini) and purchase details ready.