
1. Introdución
Grazas pola compraasing the UHAPPY U18 Portable Mini HD LED Projector. This manual provides essential information for the safe and efficient operation of your device. Please read it thoroughly before use and retain it for future reference.
Precaucións de seguridade
- Non mire directamente á lente do proxector cando estea aceso.amp está activado.
- Asegure unha ventilación adecuada ao redor do proxector para evitar o sobreenriquecido.
- Non expoñas o proxector á choiva nin á humidade.
- Empregue só o adaptador de corrente subministrado co proxector.
- Non intente abrir nin reparar o proxector vostede mesmo. Encargue calquera mantemento a persoal cualificado.
2. Produto rematadoview
Familiarize yourself with the components and ports of your UHAPPY U18 projector.
Contido do paquete
The following items are included in your projector package:

Image: Contents of the UHAPPY U18 projector package, including the projector, power adapter, AV cable, remote control, and user manual.
- UHAPPY U18 Mini LED Projector
- Adaptador de alimentación
- Cabo AV
- Control remoto
- Manual de usuario (este documento)
Projector Components and Ports

Imaxe: Ángulo de arriba abaixo view of the UHAPPY U18 projector, highlighting the lens, focus adjustment, and control panel.

Imaxe: Arriba view of the UHAPPY U18 projector, showing the integrated control buttons.

Imaxe: Fronte view of the UHAPPY U18 projector, focusing on the projection lens.
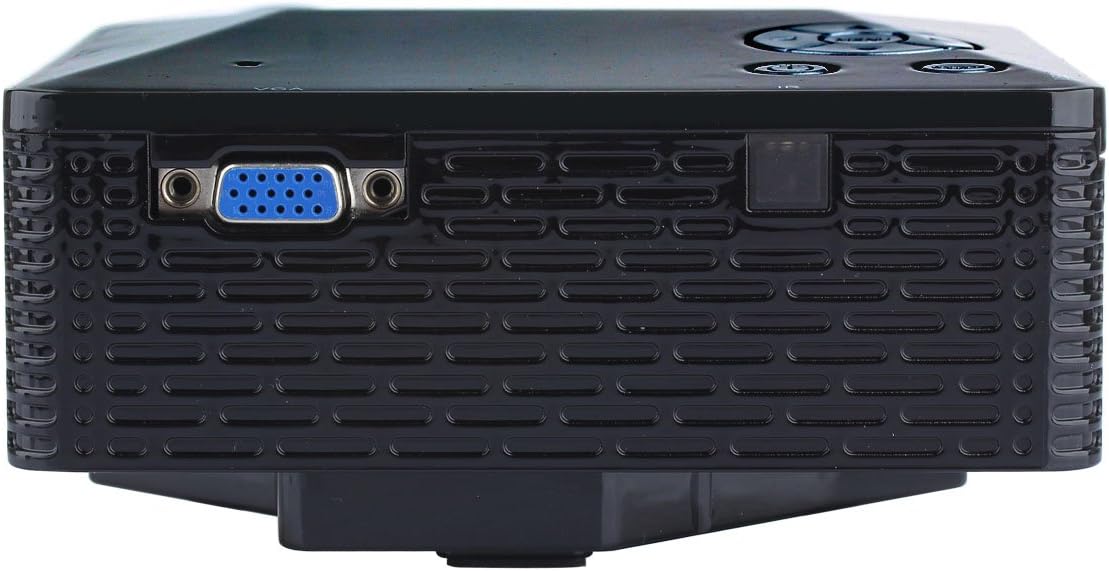
Imaxe: Lateral view of the UHAPPY U18 projector, illustrating the VGA input port.
The projector features various input ports for connectivity:
- Entrada HDMI: For connecting devices like laptops, gaming consoles, or media players.
- Porto USB: For connecting USB storage devices to play media directly.
- Ranura para tarxetas SD: For inserting SD memory cards to play media directly.
- Entrada AV: Para conectar dispositivos antigos usando o cable AV incluído.
- Entrada VGA: For connecting computers or laptops with a VGA output.
- DC-IN: Porto de entrada de enerxía.
- Saída de auriculares: For connecting external audio devices or headphones.
- Perilla de enfoque: Located near the lens for adjusting image clarity.
3. Configuración
3.1 Colocación
Place the projector on a stable, flat surface. Ensure there is adequate space around the projector for ventilation. The ideal projection distance is between 1 to 4 meters, yielding an image size of 20 to 80 inches.
3.2 Conexión de alimentación
- Conecte o adaptador de corrente ao porto DC-IN do proxector.
- Enchufe o adaptador de alimentación nunha toma eléctrica adecuada.
3.3 Conexión de dispositivos de entrada
Choose the appropriate cable and port based on your source device:
- HDMI: Connect an HDMI cable from your device (e.g., laptop, DVD player) to the projector's HDMI port.
- VGA: Conecta un cable VGA do teu ordenador ao porto VGA do proxector.
- DE: Use the provided AV cable to connect devices with AV output (e.g., older DVD players, set-top boxes) to the projector's AV port.
- Tarxeta USB/SD: Insira unha unidade USB no porto USB ou unha tarxeta SD na ranura para tarxetas SD.
4. Instrucións de funcionamento
4.1 Acendido/Apagado
- Para acender: Press the power button on the projector or the remote control. The LED indicator will light up.
- Para apagar: Press the power button again. It is recommended to allow the projector to cool down for a few minutes before unplugging it.
4.2 Selección da fonte
After powering on, you may need to select the input source:
- Press the 'Source' button on the projector or the remote control.
- Use the navigation buttons to select the desired input (HDMI, VGA, AV, USB, SD) and press 'OK' or 'Enter'.
4.3 Axuste do foco
If the projected image appears blurry:
- Rotate the focus knob located near the projector lens until the image becomes clear and sharp.
4.4 Navegación por menús
Use the 'Menu' button on the projector or remote to access settings. Use the navigation arrows to move through options and 'OK' or 'Enter' to confirm selections. The projector supports multiple languages including English, Czech, Slovak, Danish, German, Spanish, French, Croatian, Italian, Hungarian, Dutch, Norwegian, Polish, Portuguese, Romanian, Slovene, Serbian, Finnish, Swedish, Bulgarian, Greek, Russian, and Chinese.
4.5 Formatos de medios admitidos
When playing media directly from USB or SD card, the projector supports the following formats:
- Imaxe: BMP, JPEG, PNG
- Vídeo: MPEG1, MPEG2, MPEG4, RM, RMVB, AVI, FLV, WMV
5. Mantemento
5.1 Limpeza da lente
Usa un pano suave e sen fiapos deseñado especificamente para lentes ópticas para limpar con coidado a lente do proxector. Evita o uso de materiais abrasivos ou produtos químicos agresivos.
5.2 Limpeza xeral
Wipe the projector's exterior with a soft, dry cloth. Do not use liquid cleaners directly on the device. Ensure ventilation openings are free from dust and obstructions.
5.3 Almacenamento
When not in use, store the projector in a cool, dry place, away from direct sunlight and extreme temperatures. It is advisable to cover the lens to protect it from dust.
6 Solución de problemas
Se tes problemas co teu proxector, consulta os seguintes problemas e solucións comúns:
| Problema | Causa posible | Solución |
|---|---|---|
| Non hai imaxe na pantalla | Seleccionouse unha fonte de entrada incorrecta Conexión de cable solta Dispositivo de orixe non acendido | Seleccione a fonte de entrada correcta. Comprobe todas as conexións de cable. Asegúrate de que o dispositivo fonte estea acendido e emitindo un sinal. |
| A imaxe está borrosa | Enfoque non axustado | Rotate the focus knob until the image is clear. |
| Sen son | O volume moi baixo External audio device not connected Configuración de audio do dispositivo fonte | Increase projector volume. Connect external speakers/headphones to the audio output. Check audio settings on your source device. |
| O proxector sobrequéntase e apágase | Ventilación bloqueada Uso prolongado en ambientes cálidos | Asegúrate de que as aberturas de ventilación estean despexadas. Allow the projector to cool down. Operate in a well-ventilated area. |
7. Especificacións
Technical specifications for the UHAPPY U18 Portable Mini HD LED Projector:
- Sistema de imaxe: LCD
- Resolución nativa: 320x240
- Lamp: LED
- Vida LED: 20,000 horas
- Brillo: 60 LM
- Contraste: 300:1
- Lente: F=125
- Tamaño da imaxe: 20-80 polgadas
- Distancia de proxección: 1-4 metros
- Modo de proxección: Proxección frontal
- Modo de operación: Mando a distancia/manual
- Terminais de entrada: AV, VGA, USB, SD, HDMI
- Saída: Auriculares
- Potencia: 24 W
- Cor: 16.77 millóns de cores
- Relator: 1.0 W * 2
- Temperatura de traballo: 10-35 °C
- Dimensións: 135 x 132 x 52 mm
- Peso: 0.44 kg
8. Garantía e soporte
This product is manufactured by Generic. For warranty information and technical support, please refer to the documentation provided at the time of purchase or contact your retailer. Keep your purchase receipt as proof of purchase.