
1. Introdución
Grazas pola compraasing the MUSE M-10 Red Radio Alarm Clock. This manual provides essential information for the safe and efficient operation of your device. Please read these instructions carefully before use and retain them for future reference.

Figure 1: MUSE M-10 Red Radio Alarm Clock. This image shows the front view of the red alarm clock with its digital LED display showing '12:00' and various control buttons on the top panel.
2. Instrucións de seguridade
- Lea todas as instrucións antes de facer funcionar o aparello.
- Do not expose this appliance to rain or moisture to prevent fire or shock hazards.
- Ensure the power adapter is easily accessible.
- Use só anexos/accesorios especificados polo fabricante.
- Non coloque o produto baixo a luz solar directa nin preto de fontes de calor.
- Avoid placing the product on surfaces that are unstable or subject to vibration.
- Non abras a c.asing; encomende todo o mantemento a persoal cualificado.
- Elimina as baterías usadas de forma responsable, seguindo as normativas locais.
3. Produto rematadoview
3.1 Panel frontal e pantalla
The front panel features a clear 0.6-inch white LED display for time and alarm indicators.
3.2 Controis do panel superior
The top panel houses all control buttons for easy access:
- MEM: Memory button for saving and recalling radio presets.
- CONXUNTO: Button for setting time and alarm parameters.
- AL1: Alarm 1 setting button.
- AL2: Alarm 2 setting button.
- << HR: Hour adjustment button (backward).
- MIN >>: Minute adjustment button (forward).
- AMORTAR: Activates the snooze function during an alarm.
- DURMIR: Activa a función do temporizador de sono.
- DIMMER: Axusta o brillo da pantalla.

Figura 2: Máisview of the MUSE M-10 Red Radio Alarm Clock's functions, including its 0.6-inch white LED display, PLL radio, 20 FM presets, dimmer, dual alarm, snooze, and sleep features.
4. Configuración
4.1 Conexión de alimentación
Connect the provided AC adapter to the DC IN jack on the rear of the unit and then plug it into a standard wall outlet. The unit will power on and the display will light up.
4.2 Instalación da batería de reserva
For time and alarm settings backup during a power outage, install 2 x AAA batteries (not included) into the battery compartment located on the bottom of the unit. Ensure correct polarity (+/-) when inserting batteries.
5. Instrucións de funcionamento
5.1 Axustar a hora
- Manteña premido o SET botón ata que os díxitos das horas parpadeen.
- Usa o << HR or MIN >> botóns para axustar a hora.
- Preme SET again, and the minute digits will flash.
- Usa o << HR or MIN >> botóns para axustar os minutos.
- Preme SET unha vez máis para confirmar e saír do modo de axuste da hora.
5.2 Configuración de alarmas (alarma 1 e alarma 2)
A unidade conta con dúas alarmas independentes.
- Manteña premido o AL1 (ou AL2) button until the alarm hour digits flash.
- Usa o << HR or MIN >> botóns para axustar a hora de alarma desexada.
- Preme AL1 (ou AL2) again, and the alarm minute digits will flash.
- Usa o << HR or MIN >> botóns para axustar os minutos da alarma desexados.
- Preme AL1 (ou AL2) again to select the alarm source: Zumbador or Radio.
- Preme AL1 (ou AL2) once more to confirm and activate the alarm. An alarm icon will appear on the display.
5.3 Funcionamento da radio FM
The unit has a PLL FM radio with 20 preset stations.
- Afinación: Preme o << HR or MIN >> buttons to manually tune the radio frequency. Press and hold these buttons for automatic scanning to the next available station.
- Gardando presets: Sintoniza a emisora desexada. Mantén premido o botón MEM button until 'P01' (or the next available preset number) flashes. Use << HR or MIN >> para seleccionar un número predefinido e, a seguir, prema MEM de novo para gardar.
- Recordando presets: Prema brevemente o MEM para percorrer as emisoras predefinidas gardadas.
5.4 Función Snooze
Cando soe unha alarma, prema o botón AMORTAR button to temporarily silence the alarm for approximately 9 minutes. The alarm will sound again after this period.
5.5 Función do temporizador de sono
Preme o DURMIR button repeatedly to set a sleep timer (e.g., 90, 60, 30, 15 minutes, or OFF). The radio will play for the selected duration and then automatically turn off.
5.6 Atenuador de pantalla
Preme o DIMMER button repeatedly to cycle through display brightness levels: High, Low, or Off.

Figure 3: Key features of the MUSE M-10 Red Radio Alarm Clock, including snooze, radio or buzzer alarm, dimmable display, and FM PLL radio with 20 presets.
6. Mantemento
- Limpeza: Limpe a unidade cun pano suave e seco. Non empregue produtos de limpeza abrasivos nin solventes.
- Substitución da batería: Replace backup batteries annually or when the display shows signs of dimming during power outages.
- Almacenamento: If storing the unit for an extended period, remove the backup batteries to prevent leakage.
7 Solución de problemas
| Problema | Causa posible | Solución |
|---|---|---|
| Sen alimentación/Pantalla apagada | O adaptador de corrente non está conectado ou está avariado. | Check power adapter connection. Try a different outlet. |
| A alarma non soa | A alarma non está activada ou está configurada incorrectamente. | Ensure alarm icon is visible on display. Re-check alarm time and source settings. |
| Mala recepción de radio | FM antenna not extended or poor signal area. | Fully extend the FM wire antenna. Adjust its position for better reception. |
| Perda de tempo/configuración despois dun apagadotage | Backup batteries not installed or depleted. | Install new AAA batteries for backup. |
8. Especificacións
- Modelo: M-10 VERMELLO
- Marca: MUSA
- Visualización: 0.6-inch White LED, Digital
- Radio: Radio FM PLL con 20 presintonías
- Alarma: Dual Alarm (Buzzer or Radio)
- Características especiais: Snooze, Sleep Timer, Display Dimmer (High/Low/Off)
- Fonte de enerxía: AC Adapter (included), 2 x AAA batteries for backup (not included)
- Dimensións (L x W x H): 12 x 7 x 10.9 cm (aproximadamente 4.7 x 2.8 x 4.3 polgadas)
- Peso: 200 gramos (aproximadamente 0.44 libras)
- Material: Plástico
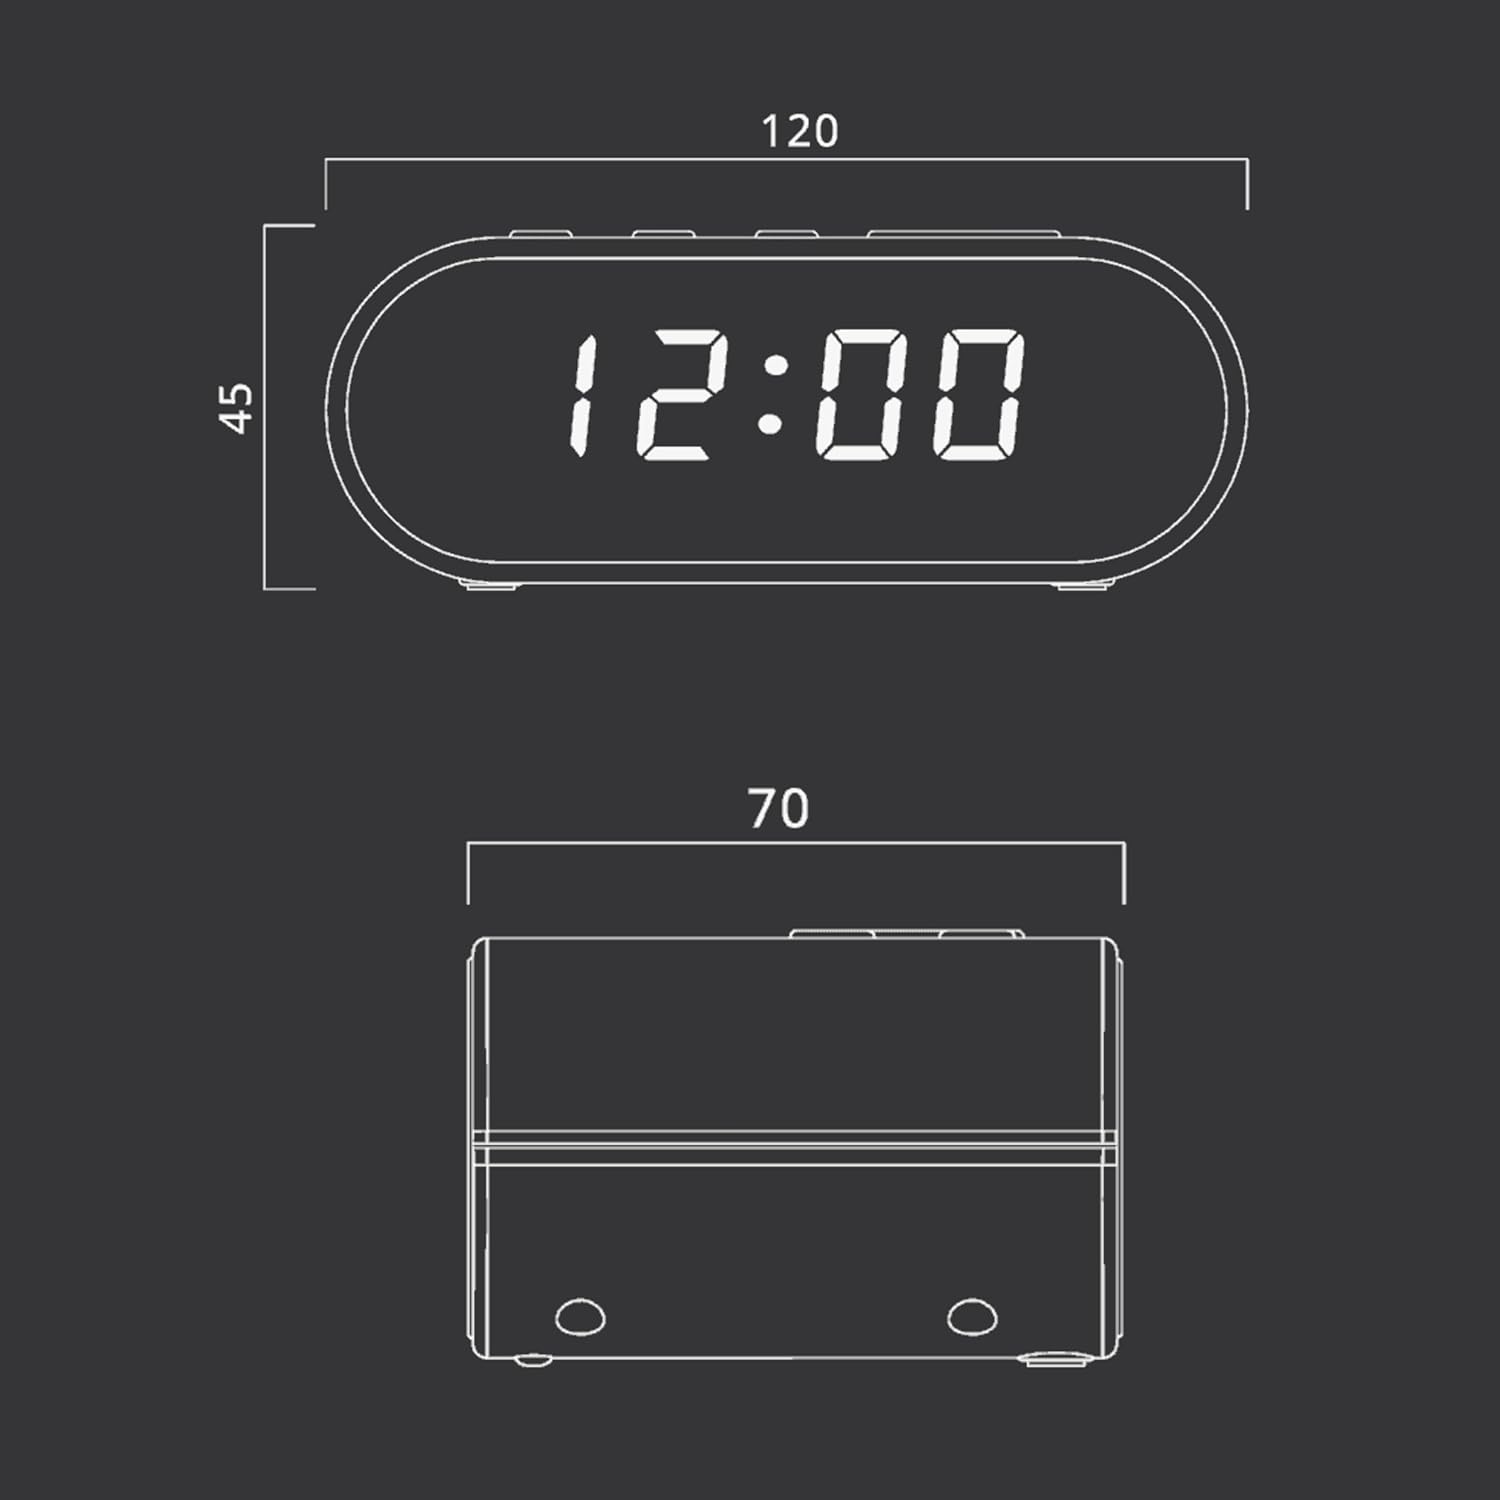
Figure 4: Dimensional drawing of the MUSE M-10 Red Radio Alarm Clock, showing its length (120mm), width (70mm), and height (45mm).
9. Garantía e soporte
For warranty information or technical support, please refer to the warranty card included with your product or contact your local MUSE distributor. Keep your purchase receipt as proof of purchase.