1. Introdución e finalview
The Escort EDM 1111A is a versatile digital multimeter designed for accurate measurement of various electrical parameters. This device is essential for electricians, technicians, and hobbyists for testing circuits, components, and power sources. It features a clear digital display and a rotary dial for selecting different measurement functions.

The Escort EDM 1111A Digital Multimeter with red and black test leads connected, ready for use.
As funcións clave inclúen:
- DC Voltage (DCV) measurement
- Vol. ACtage (ACV) measurement
- DC Current (DCA) measurement
- AC Current (ACA) measurement
- Medición de resistencia (Ω).
- Capacitance (CX) measurement
- Diode and Transistor (hFE) testing
2. Configuración
2.1 Instalación da batería
The Escort EDM 1111A requires a DC 9V 006P battery for operation. To install or replace the battery:
- Asegúrese de que o multímetro estea apagado.
- Localice o compartimento da batería na parte traseira da unidade.
- Carefully slide open or unscrew the battery cover.
- Insert a new 9V 006P battery, observing the correct polarity (+/-).
- Coloque a tapa da batería de forma segura.

A parte traseira view of the Escort EDM 1111A Digital Multimeter, showing the battery compartment cover and the product label.
2.2 Conexión dos cables de proba
The multimeter comes with two test leads, typically one red (positive) and one black (negative/common). Proper connection is crucial for accurate and safe measurements.
- Para a maioría dos volumestage, resistance, and low current measurements, connect the black lead to the 'COM' (Common) jack.
- Connect the red lead to the 'V-Ω-mA' jack for voltage, resistencia e miliampmedicións de corrente aquí.
- Para medicións de corrente alta (ata 10 A), conecte o cable vermello á toma de 10 A. Always ensure the correct jack is used to prevent damage to the meter or circuit.

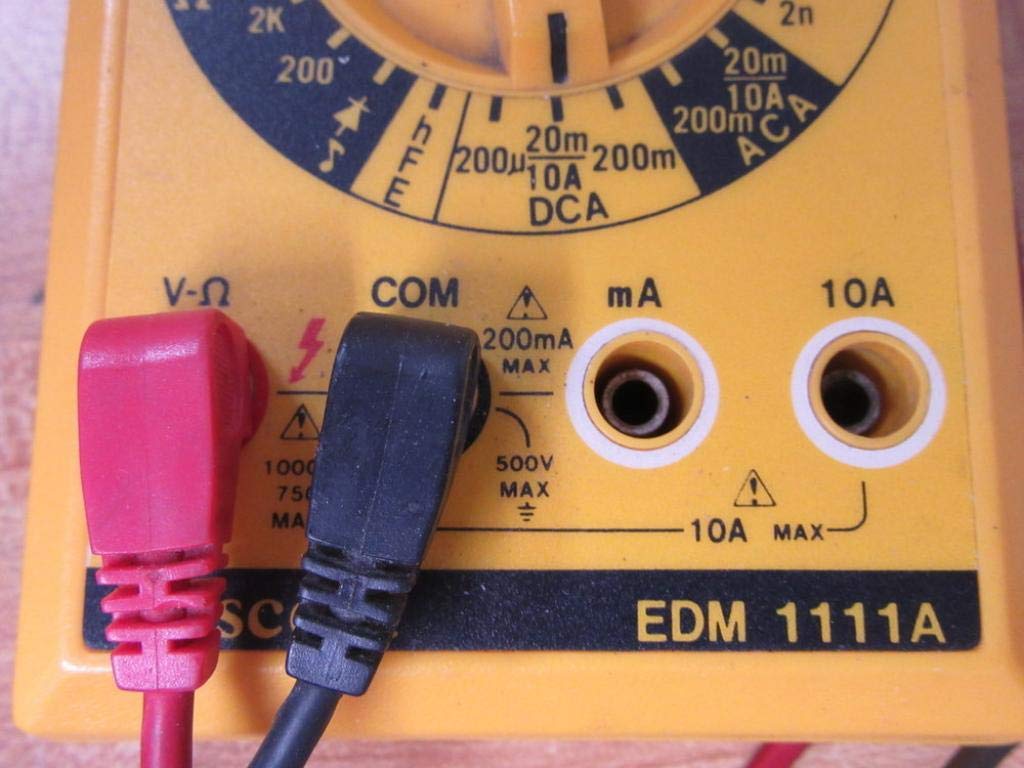
A closer look at the input jacks (V-Ω, COM, mA, 10A) and the lower portion of the rotary dial, indicating current measurement ranges.

The red and black test probes (leads) used with the Escort EDM 1111A Digital Multimeter, featuring pointed tips for electrical contact.
3. Instrucións de funcionamento
Before taking any measurements, ensure the test leads are correctly connected and the rotary dial is set to the appropriate function and range.

Detallado view of the rotary selector dial on the Escort EDM 1111A Digital Multimeter, displaying various measurement functions such as DCV, ACV, Ω, DCA, ACA, and CX.
3.1 Medir Vol. CCtage (DCV)
- Set the rotary dial to the desired DCV range (e.g., 200m, 2, 20, 200, 1000). Choose a range higher than the expected voltage.
- Connect the red lead to the positive (+) side of the circuit and the black lead to the negative (-) side.
- Le o voltago valor da pantalla.
3.2 Medición AC Voltage (ACV)
- Set the rotary dial to the desired ACV range (e.g., 200m, 2, 20, 200, 750). Choose a range higher than the expected voltage.
- Conecte os cables de proba a través da tensión de CAtage source. Polarity does not matter for AC voltage.
- Le o voltago valor da pantalla.
3.3 Medición da resistencia (Ω)
- Asegúrese de que o circuíto ou compoñente estea desconectado antes de medir a resistencia.
- Set the rotary dial to the desired Ω range (e.g., 200, 2K, 20K, 200K, 2M, 20M, 200M).
- Conecte os cables de proba ao compoñente que se vai medir.
- Lea o valor de resistencia na pantalla.
3.4 Measuring DC Current (DCA)
- Asegúrate de que o circuíto estea desenergizado.
- Set the rotary dial to the desired DCA range (e.g., 200µ, 2m, 20m, 200m, 10A).
- Importante: For currents up to 200mA, use the 'V-Ω-mA' jack for the red lead. For currents up to 10A, use the '10A' jack.
- Break the circuit and connect the multimeter in series with the load. The current must flow through the multimeter.
- Re-energize the circuit and read the current value.
3.5 Measuring AC Current (ACA)
- Asegúrate de que o circuíto estea desenergizado.
- Set the rotary dial to the desired ACA range (e.g., 200µ, 2m, 20m, 200m, 10A).
- Importante: For currents up to 200mA, use the 'V-Ω-mA' jack for the red lead. For currents up to 10A, use the '10A' jack.
- Cortar o circuíto e conectar o multímetro en serie coa carga.
- Re-energize the circuit and read the current value.
3.6 Measuring Capacitance (CX)
- Asegúrese de que o condensador estea completamente descargado antes da proba.
- Set the rotary dial to the CX range (e.g., 2n, 20n, 200n, 2µ, 20µ).
- Conecte os cables de proba aos terminais do condensador.
- Lea o valor da capacidade na pantalla.
3.7 Diode and Transistor (hFE) Testing
Refer to the specific markings on the dial for diode and transistor testing functions. Typically, diode test mode allows checking the forward voltage drop of a diode, and hFE mode is used for measuring the DC current gain of transistors.
4. Mantemento
4.1 Substitución da batería
Replace the 9V 006P battery when the low battery indicator appears on the display or if the multimeter fails to power on. Follow the instructions in Section 2.1.
4.2 Limpeza
Para limpar o multímetro, use un pano suave eamp pano. Non empregue produtos de limpeza abrasivos nin disolventes, xa que poden danar o casing or display. Ensure the device is turned off and disconnected from any circuits before cleaning.
4.3 Almacenamento
When not in use for extended periods, store the multimeter in a cool, dry place, away from direct sunlight and extreme temperatures. Consider removing the battery to prevent leakage, which could damage the internal components.
5 Solución de problemas
| Problema | Causa posible | Solución |
|---|---|---|
| Sen pantalla ou pantalla escura | Batería baixa ou esgotada | Replace the 9V 006P battery. |
| Lecturas incorrectas | Incorrect range selected Poor lead connection Damaged test leads Incorrect input jack used | Seleccione o intervalo axeitado. Ensure leads are firmly connected. Inspect and replace damaged leads. Verify leads are in the correct V-Ω-mA or 10A jack. |
| "OL" (Sobrecarga) móstrase | Measurement exceeds selected range | Cambia a un rango superior. |
| Sen pitido de continuidade | Continuity function not selected Circuito aberto | Ensure dial is on continuity/diode test. Check the circuit for breaks. |
6. Especificacións
| Parámetro | Valor |
|---|---|
| Modelo | EDM 1111A |
| Dimensións do produto (L x W x H) | 8 x 4 x 2 polgadas |
| Peso do elemento | 1.84 libras |
| Fonte de enerxía | DC 9V 006P Battery |
| Tipo de medida | Multímetro |
| Fabricante | Escolta |
| Data de primeira dispoñibilidade | 21 de novembro de 2019 |
| DC Voltage Rangos | 200 mV, 2 V, 20 V, 200 V, 1000 V |
| Vol. ACtage Rangos | 200 mV, 2 V, 20 V, 200 V, 750 V |
| Rangos de corrente continua | 200µA, 2mA, 20mA, 200mA, 10A |
| Rangos de corrente CA | 200µA, 2mA, 20mA, 200mA, 10A |
| Rangos de resistencia | 200Ω, 2KΩ, 20KΩ, 200KΩ, 2MΩ, 20MΩ, 200MΩ |
| Capacitance Ranges | 2nF, 20nF, 200nF, 2µF, 20µF |
7. Información da garantía
For specific warranty details regarding your Escort EDM 1111A Digital Multimeter, please refer to the documentation provided at the time of purchase or contact the manufacturer directly. Warranty terms typically cover defects in materials and workmanship under normal use.
8. Atención ao cliente
If you encounter any issues or have questions not covered in this manual, please contact Escort customer support. Have your product model number (EDM 1111A) and serial number (if applicable, found on the back label) ready when contacting support for faster assistance.
The product label on the back of the Escort EDM 1111A, indicating 'DIGITAL MULTIMETER DC 9V 006P BATTERY', serial number, and 'MADE IN TAIWAN R.O.C.'.