1. Introdución
This manual provides comprehensive instructions for the operation and maintenance of your BAOFENG UV-82 8 Watts High Power 2-Way Radio. Please read this manual thoroughly before using the device to ensure proper function and safety. This transceiver is designed for reliable two-way communication across various environments, offering dual-band capabilities and multiple power output options.
2. Contido do paquete
The following items are included in your BAOFENG UV-82 package. Please verify all components are present upon unboxing.
- 1x UV-82 8W Radio
- 1x Dual Band Antenna
- 1x 7.4V 2000mAH Li-ion Battery
- 1x Earphone Mic / Headset with Dual PTT Button
- 1x clip de cinto
- 1 correa de man
- 1 x Manual en inglés
- 1 x adaptador de alimentación
- 1x Desktop Charger (100V~240V)

Image: All components included in the BAOFENG UV-82 package, including the radio, battery, antenna, charger, power adapter, headset, belt clip, hand strap, and user manual.

Image: The retail packaging box for the BAOFENG Dual Band/Dual Watch/Dual PTT radio.
3. Produto rematadoview
The BAOFENG UV-82 is a high-power dual-band FM transceiver designed for reliable two-way communication. It features adjustable power output (8W/5W/1W), dual standby capability, and a robust design suitable for various environments. Key features include:
- High power version UV-82 8 watts radio with 3 power levels (8W/5W/1W).
- 50 CTCSS/ 104 DCS coder for enhanced privacy and signal filtering.
- Long range handheld radio with a talk range up to 5-8km under optimal conditions.
- FCC certified (ID: 2AJGM-UV82) ensuring compliance with regulatory standards.
- Large LCD Display for clear information viewing.
- Built-in LED Flashlight for utility in low-light conditions.
- Transmitter Time-Out Timer (TOT) to prevent accidental continuous transmission.
- Busy Channel Lock-Out (BCLO) to prevent transmitting on an occupied frequency.

Imaxe: Fronte view of the BAOFENG UV-82 radio, showcasing its display, keypad, and antenna.
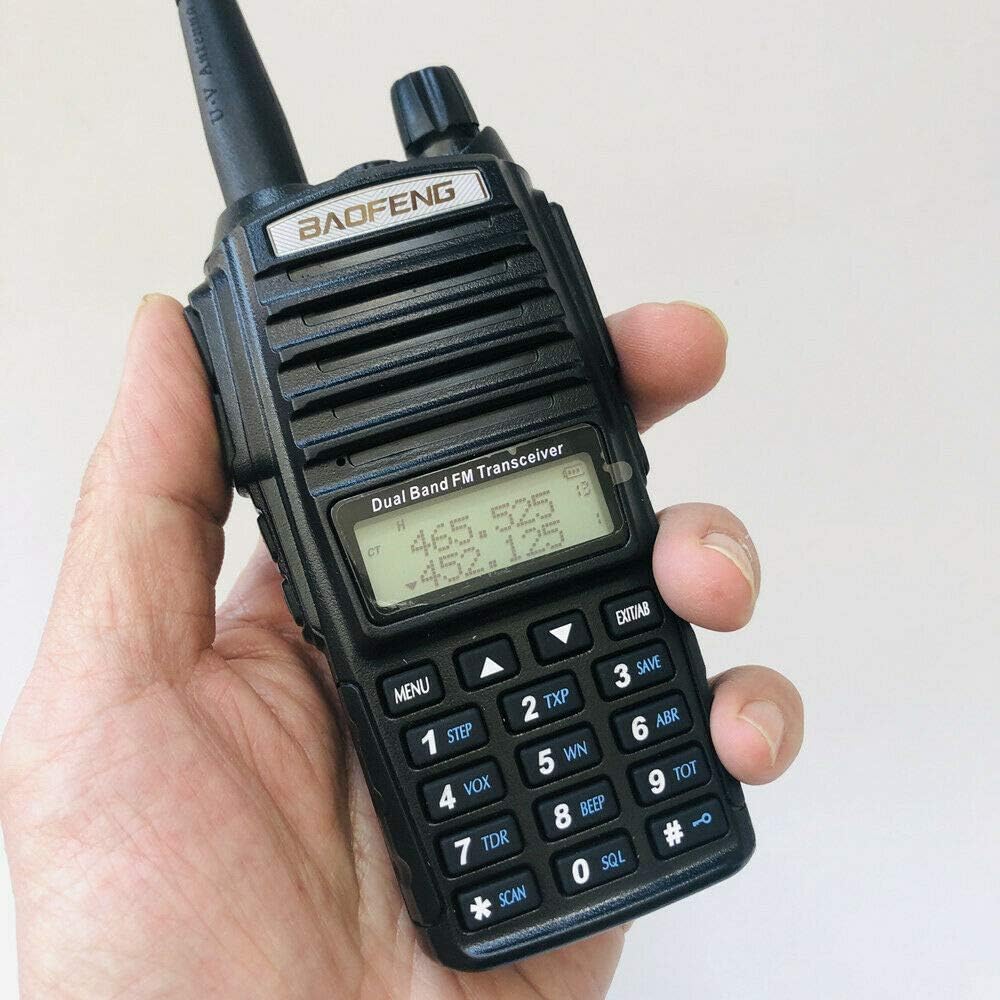
Image: The BAOFENG UV-82 radio held in a hand, illustrating its compact size and ergonomic design.

Imaxe: Un ángulo view of the BAOFENG UV-82 radio, providing a clear look at its side controls and overall form factor.
4. Configuración
4.1 Instalación da batería
Align the battery pack with the grooves on the back of the radio. Slide the battery upwards until it clicks securely into place. Ensure it is firmly seated to maintain power connection.

Image: The back of the BAOFENG UV-82 radio with its battery detached, illustrating the battery compartment and the separate battery pack.
4.2 Conexión da antena
Screw the antenna clockwise into the connector on the top of the radio until it is finger-tight. Do not overtighten, as this may damage the connector.
4.3 Carga da batería
Place the radio with the battery installed into the desktop charger. Ensure the charging contacts align properly. The charger indicator light will typically illuminate red to indicate charging and turn green when the battery is fully charged. Connect the power adapter to the desktop charger and a suitable power outlet (100V~240V).
4.4 Attaching Belt Clip and Hand Strap
Attach the belt clip to the designated screw holes on the back of the radio using the provided screws. Secure the hand strap through the loop on the top side of the radio for convenient carrying.
5. Instrucións de funcionamento
5.1 Acendido/apagado e control de volume
Rotate the top knob clockwise to power on the radio and adjust the volume. Rotate counter-clockwise until a click is heard to power off the device.
5.2 Selección de canle/frecuencia
Usa o ARRIBA/ABAIXO arrow keys on the keypad to navigate through channels or frequencies. Press the MENÚ button to access settings and EXIT/AB to switch between VFO A and VFO B (Variable Frequency Oscillators) for dual watch operation.
5.3 Botón Push-to-Talk (PTT)
Manteña premido o PTT button located on the left side of the radio to transmit. Speak clearly into the microphone. Release the PTT button to return to receive mode.
5.4 Dual PTT Function (for included headset)
The included earphone mic/headset features dual PTT buttons. The upper PTT button transmits on the A VFO, and the lower PTT button transmits on the B VFO, allowing for quick switching between two monitored frequencies without manual selection on the radio.
5.5 Selección de potencia alta/baixa
Preme o TXP button (typically assigned to the '2' key on the keypad) to cycle through the available transmit power settings: High (8W), Medium (5W), and Low (1W). Select the appropriate power level based on your communication needs and battery conservation.
5.6 CTCSS/DCS (Tone Squelch)
CTCSS (Continuous Tone-Coded Squelch System) and DCS (Digital-Coded Squelch) codes are used to filter out unwanted signals and ensure you only hear transmissions from radios using the same code. Refer to the radio's menu settings to configure CTCSS or DCS for specific channels or frequencies.
5.7 lanterna LED
Preme o MONI button (usually located on the side, below the PTT button) to activate the built-in LED flashlight. Press the button again to turn the flashlight off.
6. Mantemento
6.1 Limpeza
Limpe a radio cun suave, damp pano. Non empregues produtos químicos agresivos, solventes nin produtos de limpeza abrasivos, xa que poden danar a radio.asing and internal components. Ensure the radio is completely dry before use or storage.
6.2 Coidado coa batería
To prolong the life of your Li-ion battery, avoid overcharging or completely discharging it. It is recommended to charge the battery when the low battery indicator appears. Store the battery in a cool, dry place when not in use for extended periods.
6.3 Almacenamento
Store the radio in a dry, dust-free environment away from direct sunlight, extreme temperatures, and corrosive materials. Remove the battery if storing the radio for an extended period.
7 Solución de problemas
- A radio non se acende: Check if the battery is properly installed and charged. Ensure the power/volume knob is rotated clockwise to the 'on' position.
- No transmission/reception: Verify the antenna is securely attached. Check frequency/channel settings to ensure they are correct. Confirm that the PTT button is fully pressed during transmission. Ensure that CTCSS/DCS settings match the receiving radio, if applicable.
- Mala calidade de audio: Adjust the volume. Check the antenna connection. Move to an area with better signal reception, away from obstructions or interference. Ensure the microphone is not obstructed during transmission.
- Autonomía curta da batería: Ensure the battery is fully charged before use. Reduce transmit power if high power is not necessary for your communication range. Limit continuous transmission time.
8. Especificacións
| Característica | Especificación |
|---|---|
| Número de modelo | UV-82 |
| Peso do elemento | 1.04 libras |
| Dimensións do paquete | 8.07 x 7.2 x 2.52 polgadas |
| Tipo de batería | 1 batería de iones de litio (incluída) |
| Marca | BAOFENG |
| Cor | Negro |
| Número de canles | 200 |
| Característica especial | Long Range |
| Rango de frecuencias | 144-146MHz / 420-450MHz |
| Rango de conversación máximo | 8 Quilómetros |
| Tecnoloxía de sintonizador | UHF, VHF |
| Voltage | 7.4 voltios (DC) |
| Nivel de resistencia á auga | Resistente á auga |
9. Información da garantía
BAOFENG products typically come with a limited manufacturer's warranty. For specific warranty terms and conditions, including duration and coverage, please refer to the warranty card included in your product packaging or visit the official BAOFENG website. It is important to retain your purchase receipt as proof of purchase for any warranty claims.
10. Apoio
For technical assistance, advanced troubleshooting beyond the scope of this manual, or service inquiries, please contact BAOFENG customer support. Contact information, including phone numbers and email addresses, can usually be found on the official BAOFENG website or on the product packaging. Online resources, such as FAQs and software downloads, may also be available.