1. Introdución
Welcome to the KODAK Mini 2 Retro Portable Photo Printer user manual. This guide provides comprehensive instructions for setting up, operating, and maintaining your new portable photo printer. The KODAK Mini 2 Retro is designed for ease of use, allowing you to print high-quality, credit card-sized photos directly from your smartphone or tablet.
Featuring KODAK's advanced 4PASS dye-sublimation technology, your prints will be vibrant, durable, and resistant to fingerprints and water. Its compact and lightweight design makes it an ideal companion for capturing and sharing memories anywhere.

Image: The KODAK Mini 2 Retro printer, shown with an initial 8-sheet cartridge and two 30-sheet refill packs, highlighting the complete bundle.
2. Que hai na caixa
Upon opening your KODAK Mini 2 Retro package, please verify that all the following components are included:
- KODAK Mini 2 Retro Printer
- Initial 8-sheet Photo Paper Cartridge
- 60 Sheets of Photo Paper (refill packs)
- USB-C Charging Cable (Note: Charging adapter not included)
- Manual de inicio rápido

Image: A visual representation of the KODAK Mini 2 Retro printer, two 30-sheet cartridges, an initial 8-sheet cartridge, and the user guide, illustrating the package contents.
3. Guía de configuración
3.1. Cargando a impresora
Before first use, fully charge your KODAK Mini 2 Retro printer. Connect the included USB-C cable to the printer's charging port and plug the other end into a USB power adapter (not included) or a computer's USB port. The LED indicator will show charging status.
3.2. Installing the KODAK Photo Printer App
The KODAK Mini 2 Retro printer operates via a dedicated mobile application. Download the 'KODAK Photo Printer' app from your device's app store:
- For Android devices: Search on Google Play Store.
- For iOS devices: Search on Apple App Store.
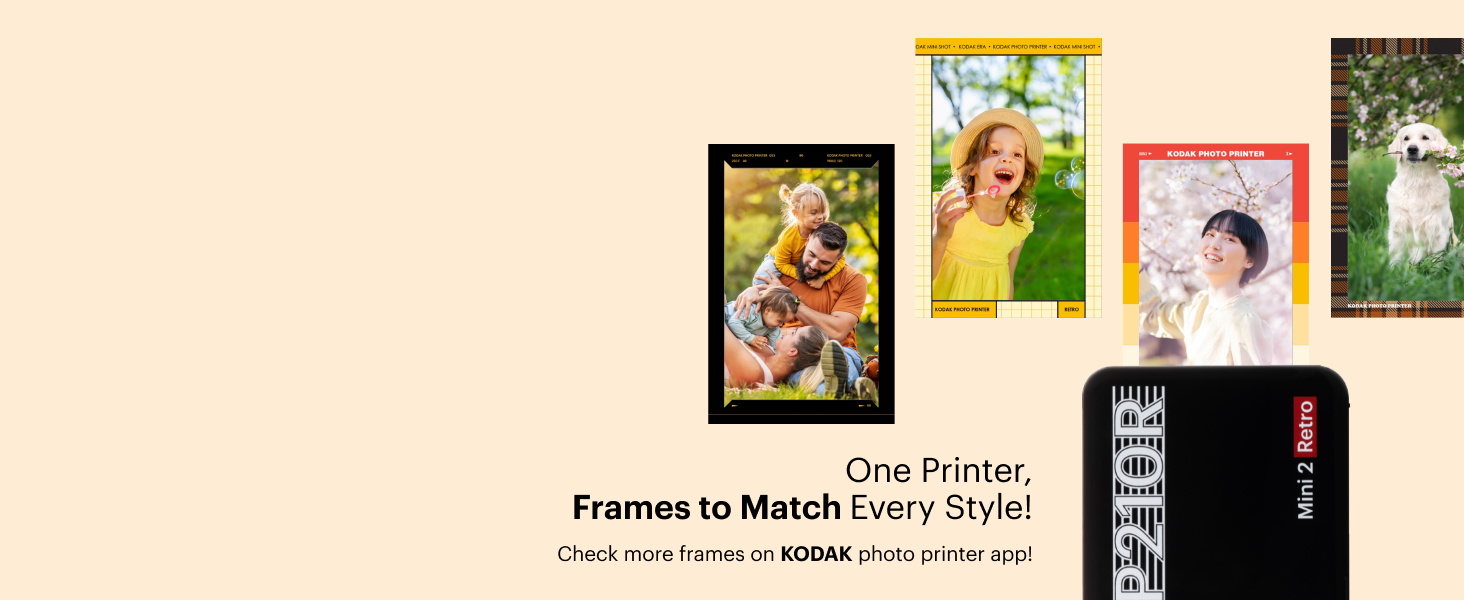
Image: Icons for Google Play and Apple App Store, indicating where to download the KODAK Photo Printer app for your mobile device.
3.3. Emparellamento Bluetooth
Once the app is installed and the printer is charged:
- Turn on your KODAK Mini 2 Retro printer.
- Active o Bluetooth no seu teléfono intelixente ou tableta.
- Open the KODAK Photo Printer app. The app will guide you through the pairing process. Select your printer from the list of available devices.
- Confirm the pairing on both your device and the printer if prompted.

Image: The KODAK Mini 2 Retro printer shown next to a smartphone displaying the KODAK Photo Printer app, with a Bluetooth symbol indicating connectivity.
3.4. Loading the Photo Paper Cartridge
The KODAK Mini 2 Retro uses an all-in-one paper and ribbon cartridge. To load a new cartridge:
- Open the cartridge cover on the side of the printer.
- Gently insert the new cartridge into the slot, ensuring it is oriented correctly.
- Push the cartridge in until you hear a distinct "click" sound, indicating it is securely locked in place.
- Pecha a tapa do cartucho.

Image: A three-step visual guide demonstrating the process of inserting the photo paper cartridge: 1) Insert the paper, 2) Pull out and Push In, 3) Hear the "Click" sound.
4. Funcionamento da impresora
4.1. Impresión de fotos
The KODAK Mini 2 Retro uses 4PASS dye-sublimation technology, which prints photos in layers of yellow, magenta, cyan, and a protective laminate. This process ensures high-quality, durable prints.
- Open the KODAK Photo Printer app on your connected device.
- Select the photo you wish to print from your gallery.
- Utilize the app's editing features to adjust your photo as desired (see section 4.2).
- Choose your preferred print type: Sen bordes for a full-bleed image, or Borde to add a white frame for notes or decoration.
- Tap the print button in the app. The printer will process and eject the photo. Do not touch the paper during the printing process as it will pass through the printer multiple times for each color layer.

Image: A side-by-side comparison illustrating the difference between a borderless photo print and a photo print with a white border, both produced by the KODAK Mini 2 Retro.
4.2. Creative Editing Features
The KODAK Photo Printer app offers various features to enhance your photos before printing:
- Axustes básicos: Crop, rotate, and adjust brightness, contrast, and saturation.
- Filtros: Apply various artistic filters to your photos.
- Cadros: Choose from a wide selection of decorative frames to personalize your prints.
- Decoración: Add stickers, text, or draw on your photos.

Imaxe: Unha exposición de colaxeasing various frame designs and creative options available within the KODAK Photo Printer app, demonstrating how users can personalize their photos.
5. Mantemento
5.1. Limpeza da impresora
To ensure optimal print quality and longevity of your printer, occasional cleaning is recommended:
- Use a soft, dry, lint-free cloth to wipe the exterior of the printer.
- Avoid using liquid cleaners or abrasive materials, as these can damage the printer's surface.
- Do not attempt to clean the inside of the printer or the print head directly. The 4PASS cartridges are designed to minimize internal dust accumulation.
5.2. Substitución do cartucho
When the photo paper or ink ribbon in your cartridge is depleted, the printer will indicate this, and you will need to replace the cartridge. Follow the steps outlined in section 3.4 for loading a new cartridge. Always use genuine KODAK 4PASS cartridges for best results.
6 Solución de problemas
If you encounter issues with your KODAK Mini 2 Retro printer, please refer to the following common problems and solutions:
| Problema | Causa posible | Solución |
|---|---|---|
| A impresora non se acende. | Batería baixa ou sen carga. | Connect the printer to a power source using the USB-C cable and allow it to charge. |
| Non se pode conectar por Bluetooth. | Bluetooth is off on device, printer is off, or pairing issue. | Ensure Bluetooth is enabled on your mobile device and the printer is turned on. Restart both devices and try pairing again through the app. |
| No photo prints or blank prints. | Cartridge is empty or not properly inserted. | Check if the cartridge is empty. If so, replace it. Ensure the cartridge is inserted correctly and clicks into place. |
| Mala calidade de impresión (rachas, cores descoloridas). | Dirty print path or faulty cartridge. | Ensure the printer is clean. Try replacing the cartridge with a new one. |
| Printer jams. | Carga incorrecta de papel ou presenza dun obxecto estraño. | Carefully open the cartridge cover and remove any jammed paper. Ensure the cartridge is loaded correctly. Do not force paper. |
If the problem persists after attempting these solutions, please contact KODAK customer support for further assistance.
7. Especificacións
Below are the technical specifications for the KODAK Mini 2 Retro Portable Photo Printer:
| Característica | Detalle |
|---|---|
| Marca | KODAK |
| Nome do modelo | Mini 2 Retro |
| Número de modelo | CAR-P210RB |
| Tecnoloxía de impresión | Dye Sublimation (4PASS) |
| Tecnoloxía de conectividade | Bluetooth |
| Dispositivos compatibles | Teléfonos intelixentes, tabletas (Android, iOS) |
| Medios impresos | Papel fotográfico brillante |
| Tamaño da folla | 2.1 x 3.4 polgadas |
| Capacidade máxima da folla de entrada | 60 sheets (per cartridge) |
| Saída da impresora | Cor |
| Velocidade de impresión máxima (cor) | 1 ppm |
| Dimensións do produto | 1.18" D x 1.97" W x 0.39" H |
| Peso do elemento | 8.1 onzas (0.23 quilogramos) |
| Baterías | 1 D batteries required (included) |
| UPC | 192143003359 |
8. Garantía e soporte
For detailed warranty information, please refer to the documentation included with your product or visit the official KODAK Photo Printer website. If you require technical support or have questions not covered in this manual, please contact KODAK customer service.
You can also find additional resources and a downloadable PDF version of the user manual at the following link: KODAK Mini 2 Retro User Manual (PDF)