1. Información de seguridade
Please read and understand this entire manual before attempting to assemble, operate, or install the product. Failure to do so could lead to electric shock, fire, or other injuries.
- Desconecte sempre a alimentación no disyuntor principal antes da instalación ou do mantemento.
- All electrical connections must be in accordance with local codes, ordinances, and the National Electric Code. If you are unfamiliar with electrical wiring, consult a qualified electrician.
- Ensure the installation site can support the weight of the fan.
- Non faga funcionar o ventilador con as aspas ou a carcasa danadas.
- Keep hands clear of fan blades during operation.
2. Produto rematadoview
2.1 Características principais
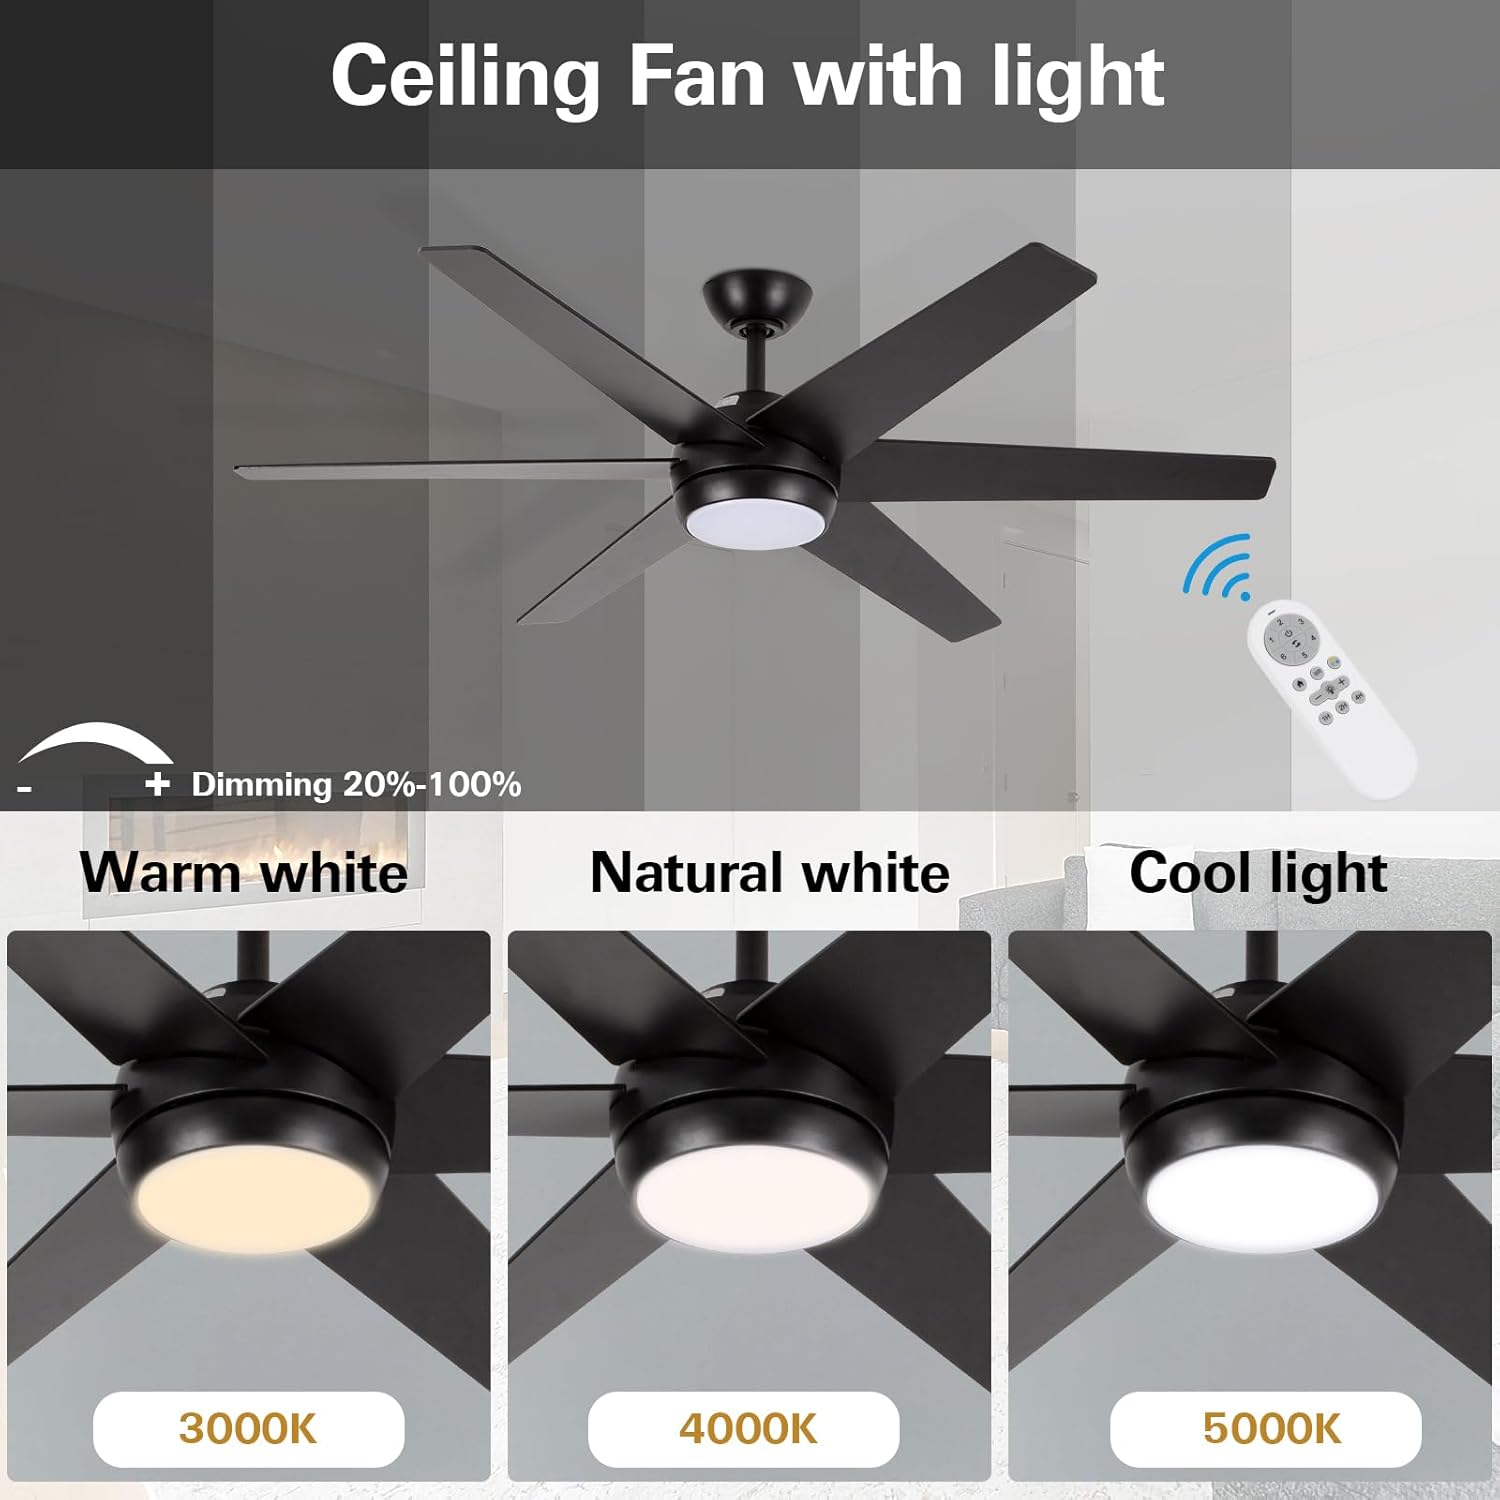
- Deseño minimalista moderno: 52-inch ceiling fan with metal motor housing and six dual-color blades. Features an acrylic cover and flicker-free integrated LED light.
- Luz LED regulable: Replaceable 18W LED light source with three color temperature options (3000K Warm White, 4000K Natural White, 5000K Cool White) and adjustable brightness (20%–100%).
- Motor reversible silencioso: Allows for downward airflow in summer for cooling and upward airflow in winter for warm air distribution. Designed for quiet operation.
- Multifunction Remote Control: Offers six fan speeds, a natural wind option, 1/2/4-hour timer functions, and a security anti-theft function (light turns on for 5 minutes every two hours).
2.2 Especificacións
| Atributo | Especificación |
|---|---|
| Marca | hikolidade |
| Número de modelo | HYK-52BK-LED-RC |
| Tamaño | 52 polgadas |
| Cor | Negro |
| Material | Wood (blades), Metal (shade) |
| Fonte de luz | Integrated LED (18W) |
| Temperatura da cor | 3000K, 4000K, 5000K |
| Brillo | 870 lúmenes |
| Método de control | Control remoto |
| Velocidades do ventilador | 6 speeds + Natural Wind |
| Función de temporizador | 1, 2, 4 horas |
| Uso interior/exterior | Só interior |
| Dimensións do produto | 52 cm de longo x 13.2 cm de ancho x 5.9 cm de alto |
2.3 Imaxes visuais do produto


3. Instalación
For detailed visual instructions, please refer to the official installation video below. Ensure power is disconnected at the circuit breaker before beginning installation.
Vídeo: Official Installation Guide for hykolity 52 inch Ceiling Fan with LED Light and Remote Control. This video demonstrates the step-by-step process of assembling and mounting the fan, including wiring connections.
3.1 Guía de instalación paso a paso
- Prepare the Downrod:
- Loosen the hanging ball screw and remove the horizontal bolt to detach the hanging ball.
- Remove the lower latch from the hanging pipe.
- Prepare the Motor Assembly:
- Partially loosen the preassembled set screws in the yoke at the top of the motor assembly.
- Assemble Downrod to Motor:
- Thread the main wiring harness through the hole at the bottom of the lifting pipe (downrod).
- Slip the downrod into the motor assembly yoke, aligning the holes for the safety pin and cotter pin.
- Tighten the set screws in the motor assembly yoke.
- Install Remote Control Receiver:
- Insert the remote control receiver (BCE) into the lifting pipe.
- Put the crossbolt back through the lifting ball to secure it, then replace the original latch and tighten the lifting screw.
- Mount the Hanging Bracket:
- Install the hanging bracket to the outlet box using the provided outlet box screws (or original screws).
- Connect the GROUND (GREEN) wires from the fan and remote control receiver to the BARE/GREEN supply wire from the ceiling.
- Connect the BLACK wire from the remote control receiver to the BLACK supply wire from the ceiling.
- Connect the WHITE wire (labeled AC IN N) from the remote control receiver to the WHITE supply wire from the ceiling.
- Connect the wire group from the remote control receiver to the wire group from the motor assembly.
- Colgar o ventilador:
- Grab the fan firmly with two hands. Slide the downrod through the opening in the hanging bracket and let the hanging ball rest on the hanging bracket.
- Xire a ranura da bola colgante ata que se alinee coa pestana do soporte colgante.
- Gently slide the remote control receiver flat-side up into the mounting bracket.
- Re-insert the screw that was removed and then tighten both screws securely.
- Instalar as aspas do ventilador:
- Loosen the screws and remove the installation fan blade decorative panel.
- Slide a blade through one of the narrow, rectangular openings on the motor housing, aligning holes in the blade with holes in the blade arm.
- Insert 3 blade attachment screws with fingers first and then tighten screws securely with a Phillips screwdriver. Repeat this procedure for the remaining blades.
- Instalar o kit de luces LED:
- Connect the wire group from the motor housing to the wire group from the LED light kit. Ensure Molex connections snap together securely.
- Aperte os 3 parafusos cun desaparafusador Phillips.
- Adxunta Lampsombra:
- Xire o lampshade clockwise to ensure fixation.
4. Instrucións de funcionamento
The hykolity ceiling fan is operated using the included multifunction remote control.
4.1 Funcións de control remoto
- Velocidade do ventilador (1-6): Axusta a velocidade do ventilador de baixa (1) a alta (6).
- Ventilador On/Off: Acende ou apaga o ventilador.
- Motor reversible: Cambia a dirección das aspas do ventilador para os modos de verán (fluxo de aire descendente) ou de inverno (fluxo de aire ascendente).
- Luz On/Off: Acende ou apaga a luz LED integrada.
- Light Dimming (20%-100%): Adjusts the brightness of the LED light.
- Color Temperature (3000K/4000K/5000K): Cycles through Warm White, Natural White, and Cool White light settings.
- Vento natural: Activates a mode that simulates natural breeze by varying fan speeds.
- Timer Function (1H/2H/4H): Sets the fan to automatically turn off after 1, 2, or 4 hours.
- Security Anti-Theft Function: Activates a mode where the light turns on for 5 minutes every two hours.
4.2 Reversible Motor Operation
The reversible motor feature allows you to optimize air circulation for different seasons:
- Modo verán: Set the fan to rotate counter-clockwise to create a downward airflow, producing a cooling effect.
- Modo de inverno: Set the fan to rotate clockwise to circulate warm air upwards, helping to distribute heat evenly throughout the room.
5. Mantemento
Un mantemento regular garante un rendemento óptimo e unha maior duración do teu ventilador de teito.
- Limpeza: Use un suave, damp pano para limpar as aspas do ventilador e a carcasa do motor. Non empregue produtos de limpeza abrasivos nin disolventes.
- Inspección da lámina: Periodically check the fan blades for any signs of damage or warping. Ensure all blade attachment screws are secure.
- Conexións eléctricas: Annually inspect all electrical connections for tightness and wear.
- Fonte de luz: The integrated LED light source is replaceable. Contact customer service for replacement parts if needed.
6 Solución de problemas
If you experience issues with your hykolity ceiling fan, refer to the following common problems and solutions:
| Problema | Causa posible | Solución |
|---|---|---|
| O ventilador non comeza | No power to the fan; loose wiring connections; remote control battery dead. | Comprobe o disxuntor; asegúrese de que todas as conexións do cableado estean seguras; substitúa a pila do mando a distancia. |
| Light does not turn on/off | Loose wiring connection to light kit; LED light source failure; remote control issue. | Check light kit wiring; contact customer service for LED replacement; ensure remote is functioning correctly. |
| O fan fai un zumbido | Loose mounting screws; unbalanced blades; motor issue. | Tighten all mounting screws; ensure blades are balanced and securely attached; if noise persists, contact customer service. |
| O control remoto non funciona | Dead battery; remote not paired with receiver; interference. | Replace battery; refer to remote pairing instructions (if applicable, usually automatic); ensure no strong interference sources nearby. |
7. Garantía e atención ao cliente
For warranty information or any further assistance, please contact hykolity customer service. Refer to the product packaging or the official hykolity websitio web para obter detalles específicos da garantía e información de contacto.
If you encounter any issues during use, feel free to contact us for assistance.