Midea MWD2N2B
Midea MWD2N2B Bottom-Load Water Dispenser User Manual
Model: MWD2N2B
1. Información importante de seguridade
Lea atentamente todas as instrucións antes de usar este aparello para garantir un funcionamento seguro e evitar lesións ou danos. Garde este manual para futuras consultas.
- Seguridade eléctrica: Ensure the dispenser is plugged into a grounded 115V/60Hz outlet. Do not use extension cords.
- Seguridade da auga quente: The hot water function can reach temperatures of ≥85℃. Exercise extreme caution. This unit includes a child safety lock for the hot water faucet.
- Colocación: Coloque o dispensador sobre unha superficie firme e nivelada, lonxe da luz solar directa e de fontes de calor. Asegúrese de que haxa unha ventilación axeitada arredor da unidade.
- Calidade da auga: Use only potable water. Do not use any other liquids in the dispenser.
- Limpeza: Unplug the unit before cleaning. Be gentle when cleaning the exterior as the surface can scratch easily.
- Protección contra sobrecalentamento: The dispenser is equipped with a double safety element to prevent overheating.
2. Produto rematadoview
The Midea MWD2N2B is a sleek, bottom-load water dispenser designed for convenience and efficiency, providing cold, warm, and hot water on demand.

Características principais:
- Bottom-load design for easy water bottle replacement.
- Three temperature settings: Cold, Warm, and Hot.
- LED night light for visibility in low light conditions.
- Touch controls with LED indicators for various functions.
- Self-cleaning function activated by a switch.
- Indicators for self-cleaning, cold water, and power.
- High-power cooling compressor: cools water from 25℃ to 10℃ in 25-30 minutes.
- Hot water capacity: 4 liters per hour (≥85℃).
- Cold water capacity: 2.5 liters per hour (≤10℃).
- Child lock for hot water faucet.
- Stainless steel water tank.
- Water bottle change indicator.
3. Guía de configuración
3.1 Desembalaxe e colocación
- Retire con coidado o dosificador da súa embalaxe.
- Place the dispenser on a flat, stable, and level surface. Ensure there is at least 10 cm (4 inches) of space from the back and sides of the unit to allow for proper ventilation.
- Evite colocar o dispensador baixo a luz solar directa ou preto de aparellos que xeran calor.
3.2 Installing the Water Bottle
- Abra a porta inferior do armario do dispensador.
- Remove the cap from a new 19-liter (5-gallon) water bottle.
- Insert the probe from the dispenser into the opening of the water bottle.
- Slide the water bottle into the lower cabinet. Ensure the bottle is seated correctly and the probe is fully inserted.
- Close the cabinet door. The water bottle change indicator light will turn off once the bottle is correctly installed and water begins to fill the internal tanks.
3.3 Inicio inicial
- Before plugging in the unit, ensure water has filled the internal tanks. You may hear gurgling sounds as the tanks fill.
- Once the tanks are full, plug the dispenser into a grounded 115V/60Hz electrical outlet.
- Turn on the hot and cold water switches located on the back of the unit.
- Allow approximately 15-30 minutes for the water to reach optimal temperatures.
4. Instrucións de funcionamento
4.1 Dispensación de auga
- Auga Fría: Place your cup under the cold water faucet. Press the cold water button on the touch panel. The cold water indicator light will illuminate. Release the button to stop dispensing.
- Auga morna: Place your cup under the warm water faucet. Press the warm water button on the touch panel. Release the button to stop dispensing.
- Auga quente: For safety, the hot water faucet has a child lock. First, slide or press the child safety lock button (refer to the diagram on the control panel). While holding the lock, press the hot water button. The hot water indicator light will illuminate. Release both to stop dispensing.
4.2 Luz nocturna LED
The dispenser features an LED night light for easy visibility in low-light conditions. This light can be activated or deactivated via a dedicated button on the control panel.
4.3 Función de autolimpeza
The self-cleaning function helps maintain the hygiene of the internal water tanks. To activate:
- Ensure a water bottle is installed.
- Press the self-cleaning switch/button on the control panel. The self-cleaning indicator light will illuminate.
- The cycle will run automatically. Do not dispense water during this process.
- Once the cycle is complete, the indicator light will turn off.
5. Mantemento
Regular maintenance ensures the longevity and hygienic operation of your Midea water dispenser.
5.1 Limpeza do exterior
- Desconecte o dispensador antes de limpalo.
- Limpe as superficies exteriores cun suave, damp pano.
- Atención: The surface can scratch easily. Avoid abrasive cleaners or harsh scrubbing pads.
- Seque ben cun pano limpo e suave.
5.2 Limpeza da bandexa de goteo
- A bandexa de goteo debe baleirarse e limparse regularmente para evitar o desbordamento e o crecemento de bacterias.
- Remove the drip tray from its slot.
- Empty any accumulated water and wash the tray with mild soap and water.
- Enxágüe ben e seque antes de volver colocar.
5.3 Internal Cleaning (Self-Cleaning Function)
Utilize the built-in self-cleaning function periodically as described in Section 4.3 to sanitize the internal water paths and tanks.
5.4 Descalcificación (recomendada anualmente)
Co tempo, pódense acumular depósitos minerais dentro do depósito de auga quente. Para descalcificar:
- Desconecte o dispensador e drene toda a auga dos depósitos de auga quente e fría.
- Prepare a descaling solution (e.g., a mixture of water and food-grade citric acid or white vinegar, following product instructions).
- Pour the solution into the hot water tank (usually accessed from the top or back, refer to specific diagrams if available).
- Deixar repousar a solución de 30 minutos a unha hora.
- Escorrer a solución completamente.
- Rinse the tanks thoroughly with clean water multiple times to remove any residue.
- Refill with fresh water and resume normal operation.
6 Solución de problemas
Antes de contactar co servizo de atención ao cliente, comproba os seguintes problemas e solucións comúns:
| Problema | Causa posible | Solución |
|---|---|---|
| Sen dispensación de auga. | Water bottle empty or not installed correctly. Unit not plugged in or power switch off. | Replace water bottle or ensure it's properly seated. Check power connection and switches. |
| Water not cold/hot enough. | Hot/cold switch off. Insufficient time for cooling/heating. Poor ventilation. | Ensure hot/cold switches are on. Allow 15-30 minutes for temperature stabilization. Ensure adequate space around the unit. |
| Fuga do dispensador. | Drip tray full. Water bottle cracked or seal faulty. | Empty and clean drip tray. Inspect water bottle for damage; replace if necessary. |
| Ruído insólito. | Compressor operating (normal). Unit not level. | Some noise from the compressor is normal. Ensure the unit is on a level surface. |
| Self-cleaning light stays on. | Self-cleaning cycle in progress. | Wait for the cycle to complete. Do not dispense water during this time. |
7. Especificacións
| Característica | Detalle |
|---|---|
| Marca | Midea |
| Modelo | MWD2N2B |
| Cor | Negro |
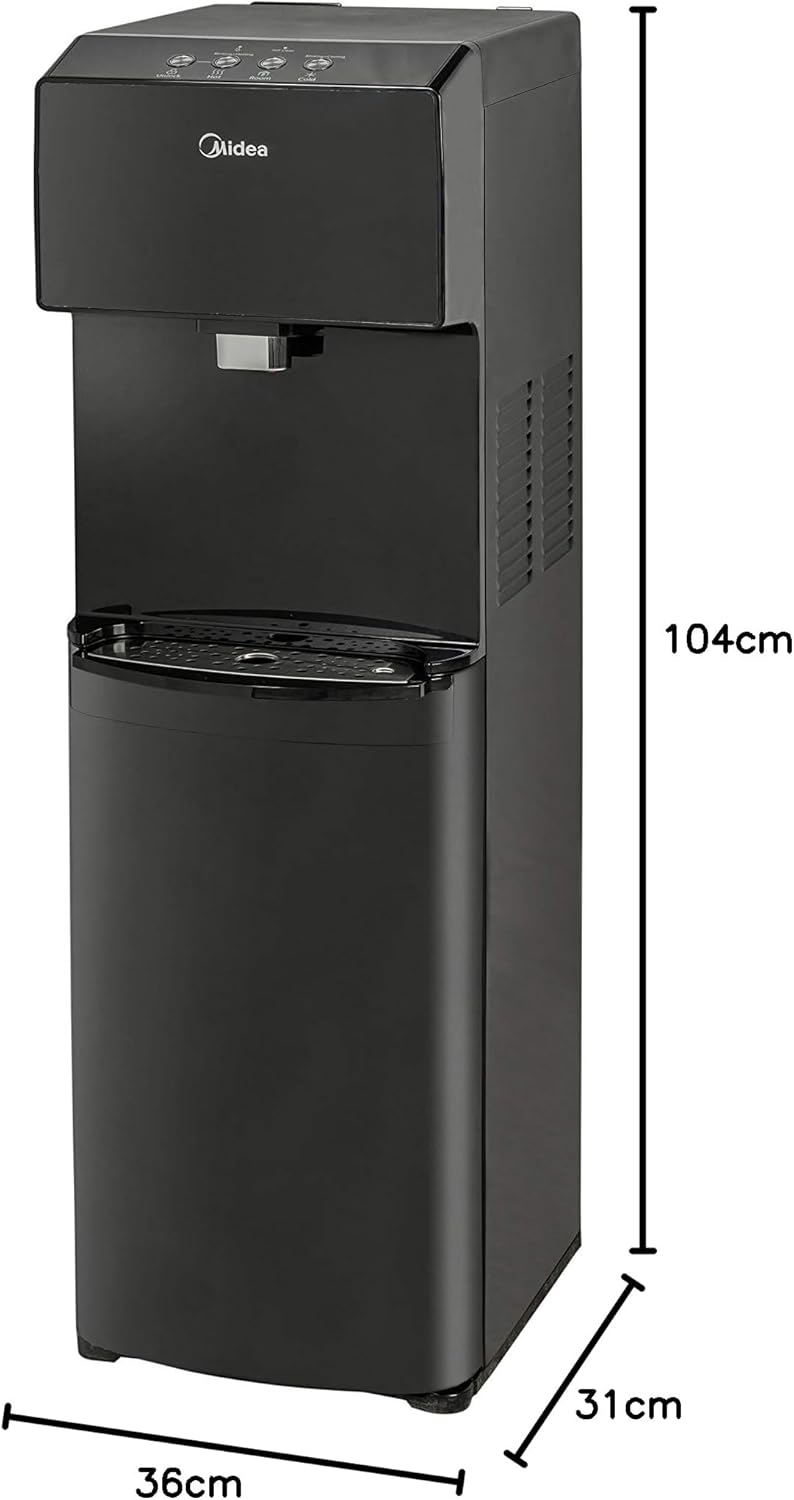
| Dimensións (D x W x H) | 31 cm x 36 cm x 104 cm (aprox. 12.2 polgadas x 14.2 polgadas x 40.9 polgadas) |
| Peso | 17 kg (aprox. 37.5 lbs) |
| Voltage | 115 voltios |
| Frecuencia | 60 Hz |
| Material | Stainless Steel (tank) |
| Temperatura da auga quente | ≥85℃ (≥185°F) |
| Capacidade de auga quente | 4 litros por hora |
| Temperatura da auga fría | ≤10℃ (≤50°F) |
| Capacidade de auga fría | 2.5 litros por hora |
| Rendemento de refrixeración | Cools from 25℃ to 10℃ in 25-30 minutes |
| Tipo de instalación | Autónomo |
8. Garantía e soporte
Midea is committed to providing high-quality products. If you are not satisfied with the performance of your Midea product, you may contact the Midea contact center within 60 days of product delivery to your home to request an exchange.
For further assistance, technical support, or warranty claims, please refer to the contact information provided with your purchase or visit the official Midea websitio.
Garde o comprobante de compra para calquera consulta relacionada coa garantía.
Ask a question about this manual
Ask about setup, troubleshooting, compatibility, parts, safety, or missing instructions. Manuals+ will review the question and use this page’s manual context to help answer it.