
CANDY CS4 1061DE/1-S
Candy CS41061DE/1-S Slim Washing Machine User Manual
Model: CS4 1061DE/1-S | Brand: CANDY
1. Introdución
This manual provides essential information for the safe and efficient operation of your Candy CS41061DE/1-S Slim Washing Machine. Please read these instructions carefully before using the appliance and keep them for future reference. Proper installation, use, and maintenance will ensure optimal performance and longevity of your washing machine.

Imaxe 1: Fronte view of the Candy CS41061DE/1-S Slim Washing Machine. This image shows the compact design, control panel, and front-loading door.
2. Normas xerais de seguridade
It is crucial to adhere to the following safety guidelines to prevent accidents and ensure the safe operation of the appliance.
- This appliance is intended for domestic use only. Any other use, such as in commercial kitchens, agricultural settings, hotels, or bed & breakfasts, is not covered by the warranty. Improper use may void the product warranty.
- Os nenos deben ser supervisados para asegurarse de que non xogan co aparello.
- Os nenos menores de 3 anos deben manterse afastados do aparello a non ser que estean continuamente supervisados.
- If the power supply cable is damaged, it must be replaced by a special cable or assembly available from the manufacturer or its service agent.
- Only use the inlet hose supplied with the appliance for connection to the water mains. Old hoses must not be reused.
- A presión da auga debe estar entre 0.05 MPa e 0.8 MPa.
- Ensure that no carpet obstructs the base of the washing machine or the ventilation openings.
- Despois da instalación, o aparello debe colocarse de xeito que o enchufe sexa accesible.
- The maximum dry laundry capacity varies by model. Refer to the appliance's specifications for details.

Image 2: Excerpt from the user manual detailing general safety rules. This section highlights important precautions for safe operation.
3. Configuración e instalación
Proper installation is essential for the washing machine's performance and safety. Follow these steps carefully.
3.1 Desembalaxe e colocación
- Retire todos os materiais de embalaxe.
- Remove the transport bolts located at the rear of the machine. These bolts secure the drum during transit and must be removed before use. Failure to do so will cause severe vibration and damage.
- Position the washing machine on a firm, level floor. Adjust the feet to ensure the appliance is stable and level.
3.2 Conexión de abastecemento de auga
- Conecta a mangueira de entrada de auga a unha billa de auga fría cunha rosca de 3/4". Asegúrate de que a conexión estea ben axustada para evitar fugas.
- Do not use old or previously used hoses.
3.3 Conexión de auga de descarga
Connect the drain hose correctly to ensure proper water discharge.
- Drain Hose to Standpipe:
- Use only the supplied drain hose.
- Hook the drain hose onto a standpipe with adequate dimensions (Fig. 2-7).
- Ensure the support is sufficient to prevent the hose from slipping. The standpipe should be between 80-100 cm high.
- Drain Hose to Sink Connection:
- The connection must be located above the siphon (Fig. 2-9).
- A connection with a stopper (A) must be removed to prevent malfunctions.
- Asegure a mangueira de descarga cun clamp.
AVISO!
- The drain hose must not be immersed in water and must be securely fastened and free of kinks.
- If the drain hose is placed on the floor or at a height lower than 80 cm, the washing machine will continuously drain water during filling.
- The drain hose must not be extended. Contact customer service if an extension is needed.

Image 3: Diagrams illustrating correct drain water connection methods for the washing machine, including standpipe and sink connections (Fig. 2-7, 2-8, 2-9).
3.4 Conexión eléctrica
- Asegurar o voltage and frequency of the power supply match the ratings on the appliance's rating plate.
- Connect the appliance to a grounded electrical outlet. Do not use adapters or extension cords.
4. Instrucións de funcionamento
This section guides you through the daily operation of your Candy washing machine.
4.1 Antes do primeiro uso
- Run a short wash cycle without laundry to clean the drum. Use a small amount of detergent.
4.2 Carga da roupa
- Clasifica a roupa por tipo de tecido, cor e grao de sucidade.
- Open the door and load the laundry, ensuring not to overload the machine. The maximum capacity is 6 kg.
- Pecha a porta firmemente.
4.3 Deterxente e aditivos
- Tire o caixón do deterxente.
- Add detergent to the main wash compartment and fabric softener to the designated compartment. Refer to detergent packaging for dosage.
- Push the drawer back in.
4.4 Selección de programas
- Turn the program selector knob to choose the desired wash program (e.g., Cotton, Synthetics, Delicates, Quick Wash).
- Use the function buttons to select additional options such as temperature, spin speed (up to 1000 RPM), or delayed start.
4.5 Inicio dun ciclo de lavado
- Prema o botón Inicio/Pausa para iniciar o programa seleccionado.
- The display will show the remaining time or program status.
4.6 Fin de ciclo
- At the end of the cycle, the machine will signal completion.
- Abre a porta e retira a roupa.
- Deixa a porta lixeiramente entreaberta para permitir que o tambor seque ao aire e evitar cheiros.
5. Mantemento e Limpeza
Un mantemento regular garante a lonxevidade e a eficiencia da túa lavadora.
5.1 Limpeza do exterior
- Limpe o exterior cun suave, damp pano. Non use produtos de limpeza ou disolventes abrasivos.
5.2 Limpeza do caixón do deterxente
- Remove the detergent drawer by pressing the release lever.
- Enxágüeo con auga corrente para eliminar calquera residuo de deterxente.
- Limpar a carcasa do caixón cun cepillo.
- Volva colocar o caixón.
5.3 Limpeza da xunta da porta
- Limpe regularmente a xunta de goma da porta con adamp cloth to remove lint, dirt, and detergent residue. This prevents mold and odors.
5.4 Limpeza do filtro de drenaxe
- The drain filter should be cleaned periodically to prevent blockages.
- Localice a tapa do filtro na parte inferior frontal da máquina.
- Coloca un recipiente pouco profundo debaixo para recoller a auga residual.
- Carefully unscrew the filter counter-clockwise and remove it.
- Limpa o filtro con auga corrente, eliminando calquera pelusa ou obxectos estraños.
- Screw the filter back in clockwise until tight.
6 Solución de problemas
Antes de contactar co servizo de asistencia, comprobe os seguintes problemas comúns e as súas solucións.
| Problema | Causa posible | Solución |
|---|---|---|
| A máquina non arranca | No power supply; Door not closed; Program not selected; Start button not pressed. | Check power plug and fuse; Ensure door is firmly closed; Select a program; Press the Start/Pause button. |
| Auga que non enche | Billa da auga pechada; mangueira de entrada dobrada; presión da auga demasiado baixa. | Abrir a billa da auga; Endereitar a mangueira; Comprobar a presión do subministro de auga. |
| A auga non drena | Drain hose kinked or blocked; Drain filter blocked. | Straighten or clear drain hose; Clean the drain filter (refer to Maintenance section). |
| Vibración / ruído excesivos | Parafusos de transporte non retirados; Máquina non nivelada; Carga desigual. | Retire os parafusos de transporte; Axuste os pés niveladores; Redistribua a roupa dentro do tambor. |
| Residuos de deterxente no caixón | Insufficient water pressure; Detergent clumping; Drawer dirty. | Check water pressure; Use less detergent or dissolve it first; Clean detergent drawer. |
7. Especificacións
Key technical specifications for the Candy CS41061DE/1-S Slim Washing Machine.
| Característica | Especificación |
|---|---|
| Número de modelo | CS4 1061DE/1-S |
| Marca | DOCE |
| Capacidade | 6 kg |
| Velocidade de xiro máxima | 1000 RPM |
| Clase de eficiencia enerxética | D (Nova etiqueta da UE) |
| Dimensións (H x W x D) | 89 x 60 x 45 cm |
| Peso | 61 kg |
| Cor | Branco |
| Localización de acceso | Cargador frontal |
| Características especiais | Inicio atrasado |
| Tipo de control | Pulsador |
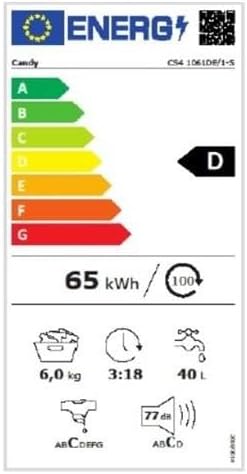
Image 4: Energy label for the Candy CS41061DE/1-S washing machine, indicating its energy efficiency class D, 6 kg capacity, and 1000 RPM spin speed.
8. Garantía e soporte
For warranty information and technical support, please refer to the warranty card included with your appliance or visit the official CANDY websitio. Garde o recibo da compra como xustificante da mesma.
If you encounter issues not covered in the troubleshooting section, please contact CANDY customer service for assistance.
Ask a question about this manual
Ask about setup, troubleshooting, compatibility, parts, safety, or missing instructions. Manuals+ will review the question and use this page’s manual context to help answer it.