
BESTTEN Almond Dimmer Light Switch User Manual
Model: LUXDMWK600-12-3
For Dimmable LED, Halogen, and Incandescent Bulbs
1. Produto rematadoview
The BESTTEN Almond Dimmer Light Switch is designed to provide adjustable lighting levels for various bulb types. It supports both single-pole and 3-way applications and includes a decorator wall plate. This dimmer features a memory function to recall the last dimmed setting and an adjustable dimming range to prevent flickering.

Figure 1: BESTTEN Almond Dimmer Light Switch with included wall plate.
2. Contido do paquete
- Interruptores de atenuación
- Parafusos
- Placas de parede
3. Información de seguridade
- AVISO: Para evitar incendios, descargas eléctricas ou a morte, desconecte a alimentación no disxuntor ou na caixa de fusibles e comprobe que estea desconectada antes de conectar o cableado.
- Instalar de acordo con todos os códigos eléctricos nacionais e locais.
- Use only with compatible dimmable bulbs (LED, CFL, Incandescent, Halogen).
- Do not use with non-dimmable bulbs or motor-driven appliances like fans.
- Only one dimmer switch can be installed in a 3-way circuit.
4. Instrucións de instalación
4.1 Wiring for Single-Pole Application
A single-pole application controls a light fixture from one location. Ensure power is off before proceeding.

Figure 2: Single-pole wiring diagram. Connect the hot wire to the silver screw, the load wire to the brass screw, and the ground wire to the green screw. No neutral wire is required.
4.2 Wiring for 3-Way Application
A 3-way application controls a light fixture from two locations. Only one dimmer switch can be installed in a 3-way circuit. Ensure power is off before proceeding.

Figure 3: 3-way wiring diagram. Connect the hot wire to the silver screw, the load wire to one brass screw, and the traveler wire to the other brass screw. Connect the ground wire to the green screw. No neutral wire is required.
4.3 Dimming Range Adjustment
This dimmer features an adjustable dimming range to optimize performance and eliminate flickering with various dimmable LED/CFL bulbs. Follow these steps to adjust the dimming range:
- Acende o interruptor e move o regulador de corredera á configuración máis baixa (á esquerda).
- Rotate (counter-clockwise) the sensitivity dial (located on the side of the switch) all the way up. NOTA: If the dial stops in either direction, do not force it.
- Rotate (clockwise) the sensitivity dial down slowly until the preferred lowest light level is achieved and the lights are not flickering.

Figure 4: Location of the sensitivity dial for dimming range adjustment.
Video 1: Demonstration of the dimming range setting process to eliminate flickering.
5. Funcionamento
- On/Off: Press the top or bottom of the rocker switch to turn the lights on or off.
- Adormecer: Use the horizontal slider to adjust the light intensity. Move the slider up for brighter light and down for dimmer light.
- Función de memoria: The switch remembers the last dimmed light setting and will turn on to that exact light level when activated.
6. Compatibilidade
This dimmer switch is universally compatible with most dimmable LED, CFL, incandescent, and halogen bulbs.
- LED/CFL regulable: Up to 150 Watts (minimum load: 3W)
- Incandescente/Halóxeno: Ata 600 vatios

Figure 5: Bulb compatibility and wattage valoracións.
7. Dimensións do produto
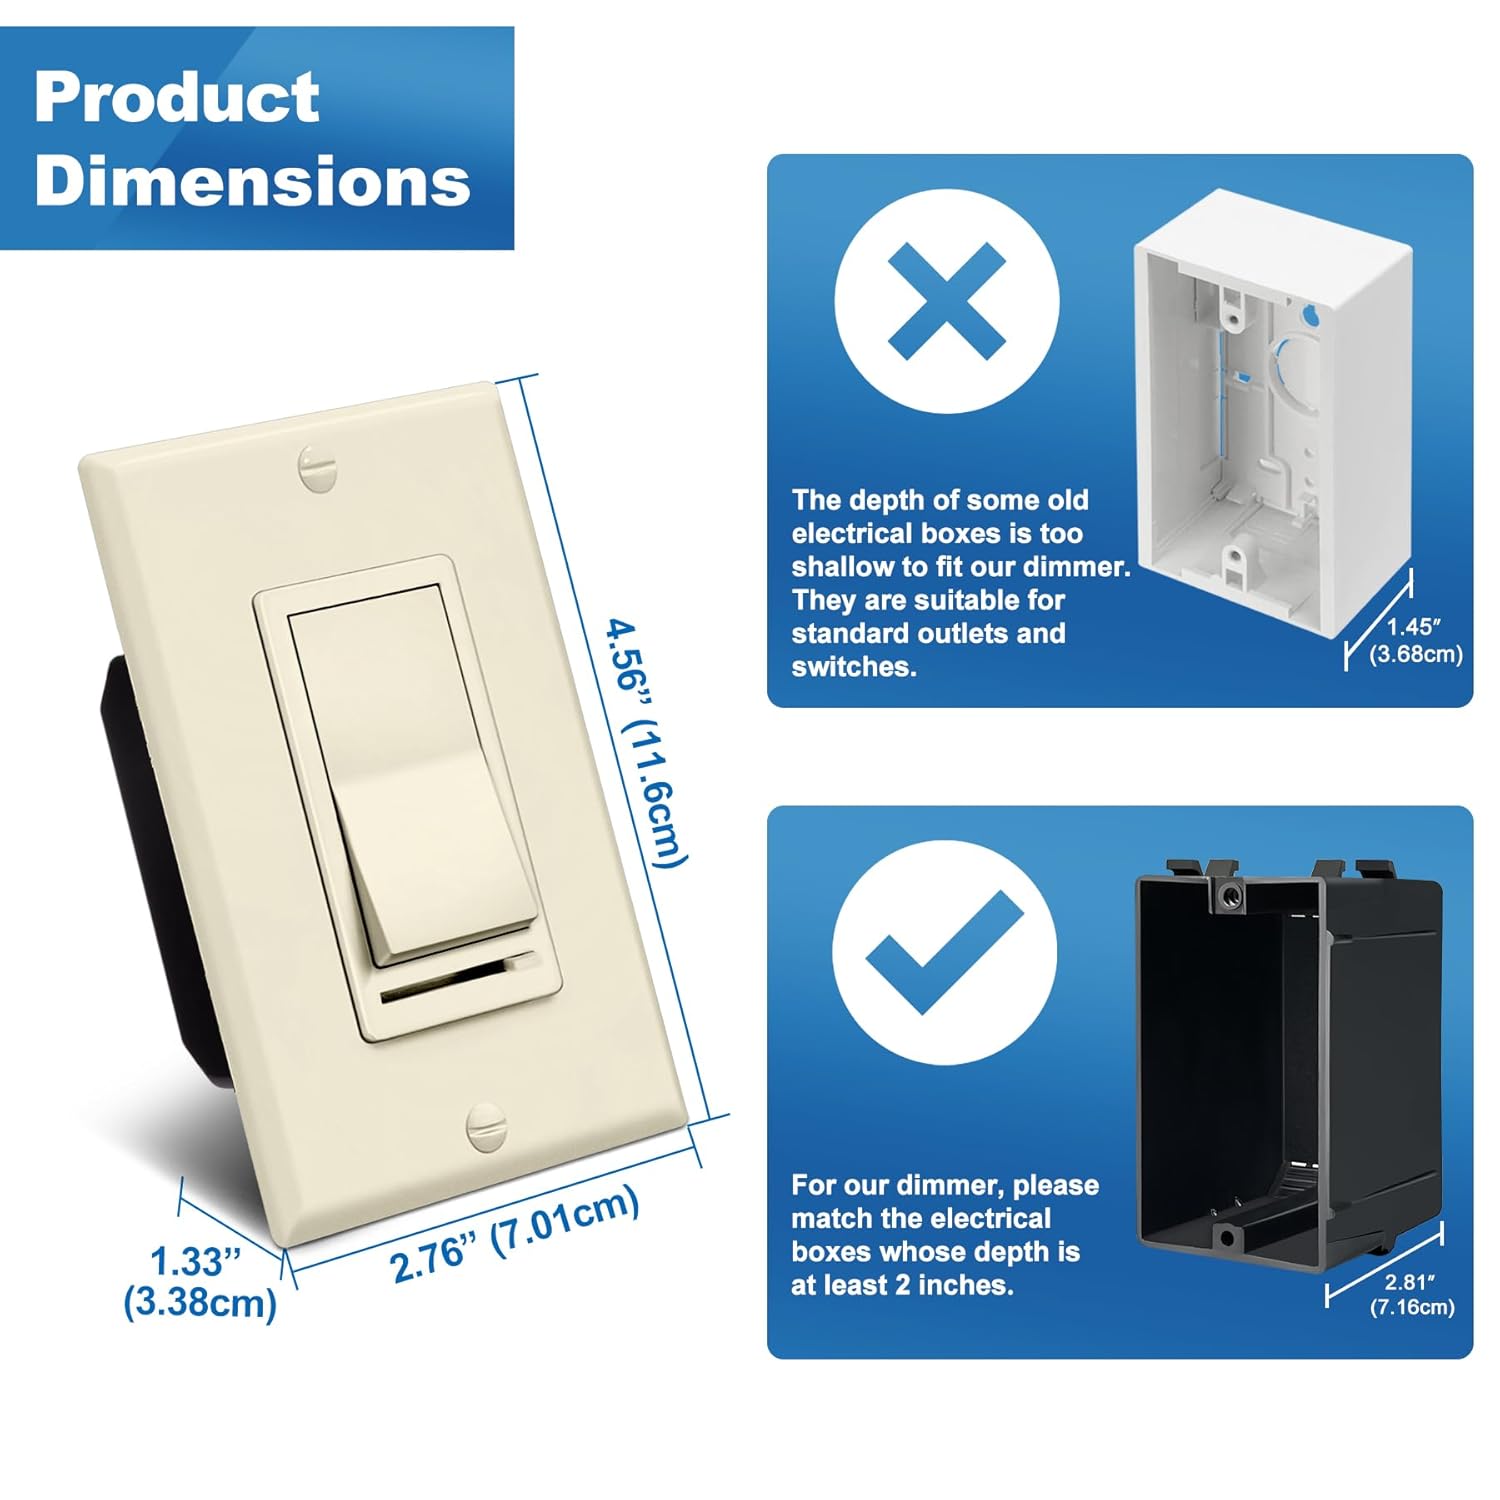
Figure 6: Product dimensions. The switch measures approximately 4.13 x 2.12 x 1.35 inches. Ensure your electrical box has a depth of at least 2 inches for proper fit.
8. Especificacións
| Característica | Especificación |
|---|---|
| Modo de operación | ACENDIDO APAGADO |
| Valoración actual | 15 Amps |
| Vol. Operativotage | 120 voltios |
| Tipo de contacto | Fíos |
| Tipo de conector | Crimpado |
| Marca | MELLOR |
| Tipo de cambio | Dimmer |
| Terminal | Parafuso |
| Material | Polycarbonate, Brass (Contact Material) |
| Dimensións do artigo (L x W x H) | 4.13 x 2.12 x 1.35 polgadas |
| Tipo de circuíto | 3-way (also supports Single-Pole) |
| Tipo de montaxe | Soporte de parede |
| Tipo de actuador | Rocker |
| Clasificación de temperatura superior | 40 graos centígrados |
| Wattage (LED/CFL regulables) | Max. 150W (Min. Load: 3W) |
| Wattage (incandescente) | Max. 600W |
| Cor | Améndoa |
| Clasificación de protección internacional | IP20 |
| Especificación Met | UL |
| Número de modelo | LUXDMWK600-12-3 |
9 Solución de problemas
- Luces parpadeantes: If your lights are flickering, rotate the side adjustment wheel (sensitivity dial) as described in Section 4.3 to fine-tune the dimming range. Dimmable LEDs may not dim the same as incandescent or halogen bulbs, and their dimming range can vary by manufacturer.
- Lights Not Turning On/Off Consistently (3-Way): In 3-way applications, ensure the line and load wires are correctly identified and connected. Incorrect wiring can cause inconsistent operation or flickering. Only one dimmer switch should be installed in a 3-way circuit.
- Switch Does Not Fit in Electrical Box: The dimmer switch has dimensions of 4.13 x 2.12 x 1.35 inches. Ensure your electrical box has a depth of at least 2 inches to accommodate the switch.
10. Mantemento
To clean the dimmer switch and wall plate, wipe with a soft, damp pano. Non empregue produtos de limpeza abrasivos nin disolventes. Asegúrese de que a corrente estea desconectada antes de limpar.
11. Garantía e soporte
Para obter información sobre a garantía ou asistencia técnica, consulte o sitio web oficial do fabricante website or contact their customer service. Keep your purchase receipt for proof of purchase.