1. Introdución
This manual provides detailed instructions for the setup, operation, maintenance, and troubleshooting of your UF-TOOLS 7-Inch LCD Digital Microscope. Please read this manual thoroughly before using the device to ensure proper functionality and to maximize its lifespan.
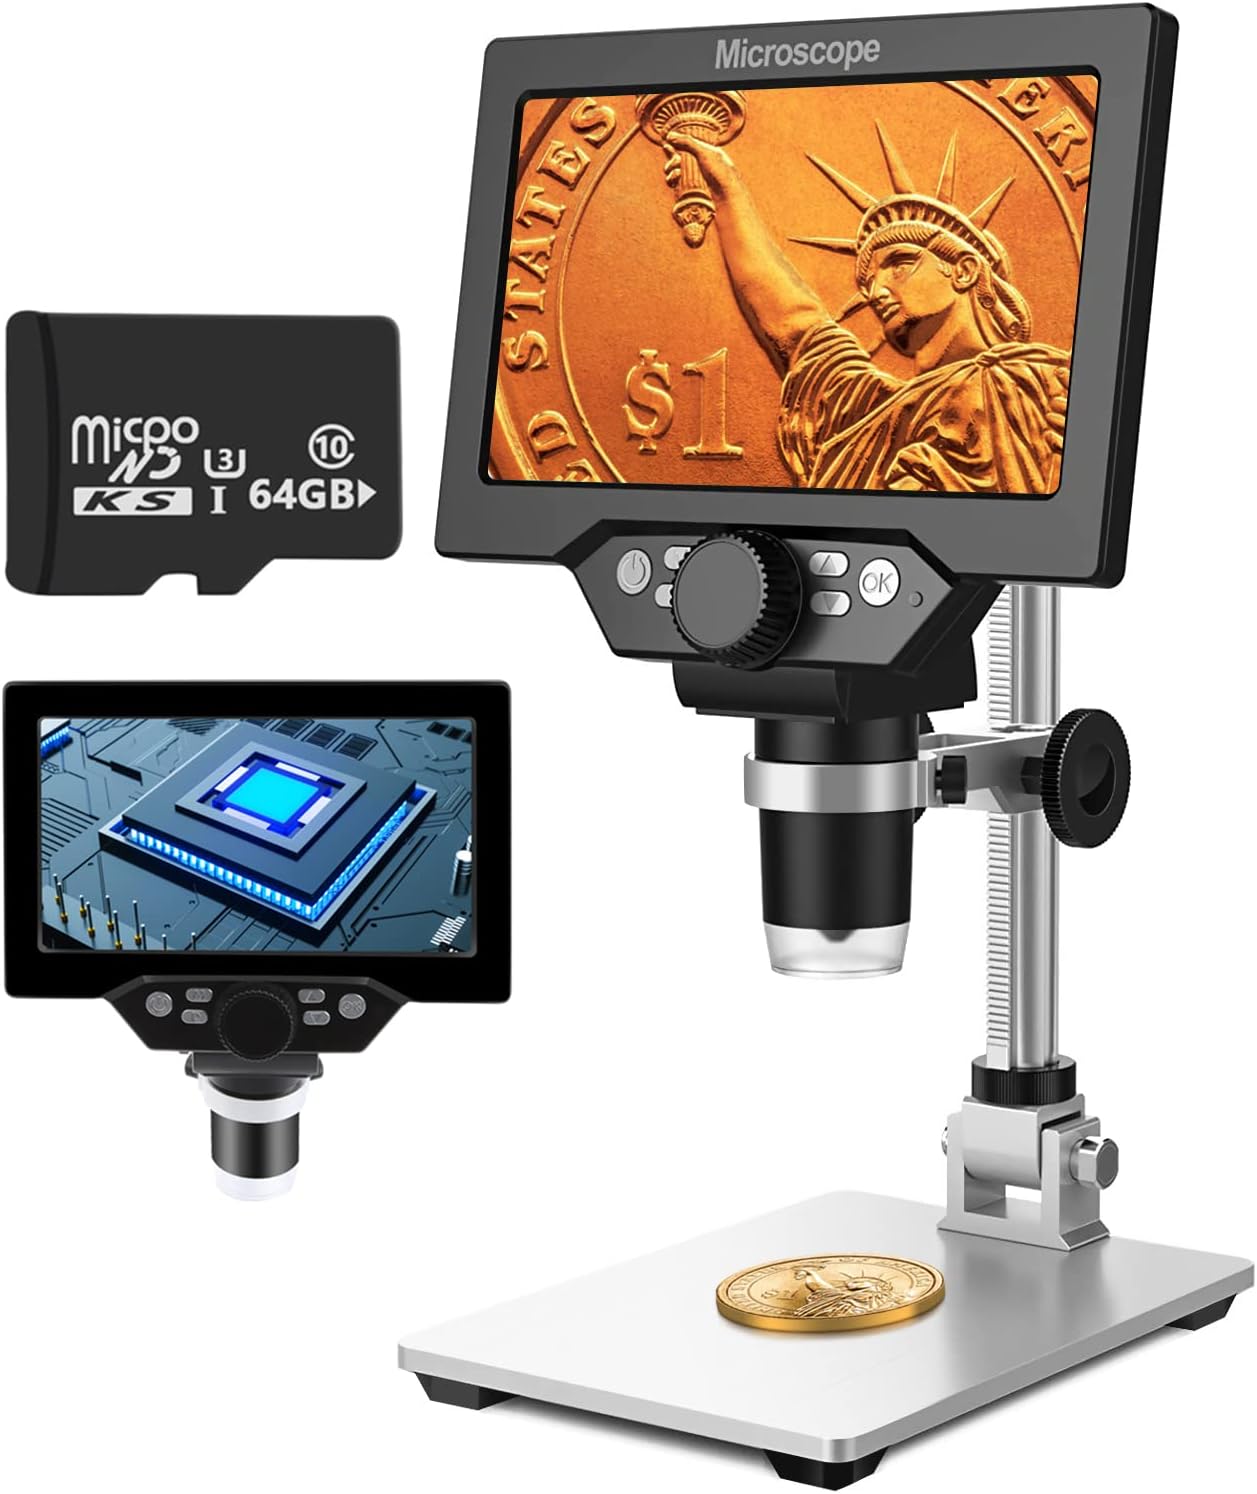
Image 1.1: UF-TOOLS 7-Inch LCD Digital Microscope with included 64GB TF card, showing the main unit and stand.
1.1 Características principais
- Pantalla LCD de 7 polgadas: Provides a clear, high-definition display for direct viewing without a computer.
- Aumento de 10X a 1200X: Continuous zoom capability for observing various objects.
- Cámara de 12 MP: Captures high-resolution images and 1080P video.
- 64GB TF Card: Included for direct storage of photos and videos. Supports up to 128GB.
- 8 luces LED axustables: Ensures optimal illumination for detailed observation.
- Flexible Aluminum Alloy Stand: Allows for 90° angle adjustment and 2-10cm focus distance adjustment.
- Batería integrada de 3000 mAh: Offers portability with up to 6 hours of operation on a full charge.
- Conectividade PC: Compatible with Windows 7/8/10 for larger display and data transfer.
2. Contido do paquete
Verifique que todos os elementos que se indican a continuación estean presentes no seu paquete:
- UF-TOOLS 7-Inch LCD Digital Microscope Unit
- Adjustable Aluminum Alloy Stand
- Tarxeta TF de 64 GB
- Cable USB
- Adaptador de alimentación (se está incluído)
- Manual de usuario (este documento)

Image 2.1: The microscope package includes a 64GB TF card for storage.
3. Guía de configuración
3.1 Montaxe do microscopio
- Desembale con coidado todos os compoñentes da caixa.
- Attach the microscope unit to the adjustable aluminum alloy stand. Ensure it is securely fastened using the provided screws or locking mechanisms.
- Insert the 64GB TF card into the designated slot on the microscope unit.
- Coloque o microscopio montado sobre unha superficie estable e plana.

Image 3.1: Product dimensions and adjustable stand features, including 270° rotation and height adjustment.
3.2 Carga da batería
The microscope has a built-in 3000mAh rechargeable battery. Before first use, fully charge the device.
- Connect the USB cable to the microscope's charge port and the other end to a power adapter or a computer's USB port.
- O indicador luminoso de carga mostrará o estado da carga.
- A full charge typically provides up to 6 hours of continuous use.

Image 3.2: The microscope features a long-lasting rechargeable battery, charged via USB.
4. Instrucións de funcionamento
4.1 dispositivo sobreview e Controis

Imaxe 4.1: Acabadoview of the microscope's controls and ports, including charge port, MicroSD slot, light regulation, fixed knob, lifting adjusting bracket knob, and various function buttons.
- Encendido/apagado: Manteña premido o botón de acendido para acender ou apagar o dispositivo.
- Video/Camera Playback: Use dedicated buttons to switch between video recording, photo capture, and playback modes.
- System Key Programming: Access menu settings for various configurations.
- Object Distance Adjustment: Axusta a distancia entre a lente e o obxecto.
- Páxina arriba/abaixo: Navigate through menus or captured media.
- Confirm Key/Camera Button: Select options or capture photos/videos.
- Light Regulation: Adjust the brightness of the 8 LED lights.
- Fixed Knob: Secures the microscope unit to the stand.
- Lifting Adjusting Bracket Knob: Adjusts the height of the microscope unit on the stand.
4.2 Axuste da ampliación e do enfoque
- Place the object you wish to observe on the base plate.
- Adjust the height of the microscope unit using the Lifting Adjusting Bracket Knob to get a rough focus.
- Use the focus wheel on the microscope lens to fine-tune the focus until the image on the 7-inch LCD screen is clear.
- The magnification range is 10X to 1200X. Adjust the distance between the lens and the object, along with the focus wheel, to achieve the desired magnification.

Image 4.2: The microscope features an adjustable screen, free length adjustment, and precise focus control.

Image 4.3: Digital magnification from 10X to 1200X, demonstrating the zoom capability on small objects.
4.3 Uso das luces LED
The microscope is equipped with 8 adjustable LED lights to illuminate your subject. Use the Light Regulation control to increase or decrease brightness as needed for optimal viewing.

Image 4.4: The 8 LED lights provide adequate illumination for observing objects in various lighting conditions.
4.4 Capturar fotos e vídeos
With the included 64GB TF card, you can directly save images and videos.
- In photo mode, press the Confirm/Camera button to capture an image.
- In video mode, press the Confirm/Camera button to start recording, and press again to stop.
- Captured media can be reviewed using the playback function.
Conectividade de PC 4.5
Para view observations on a larger screen or transfer files, connect the microscope to a Windows PC (Windows 7/8/10) using the provided USB cable.
- Connect the microscope to your PC via the USB cable.
- The microscope should be recognized as a storage device or a webcam, depending on the mode selected on the microscope.
- You can then access the stored images/videos or use the microscope as a live camera feed.

Image 4.5: Connect the microscope to a PC for a larger viewing experience and data management.
5. Mantemento
5.1 Limpeza
- Lente: Use a soft, lint-free cloth specifically designed for optical lenses. For stubborn smudges, a small amount of lens cleaning solution can be applied to the cloth, not directly to the lens.
- Pantalla: Wipe the LCD screen gently with a microfiber cloth. Avoid harsh chemicals.
- Corpo: Clean the microscope body and stand with a soft, dry cloth. Do not use abrasive cleaners or solvents.
5.2 Almacenamento
- Garde o microscopio nun lugar fresco e seco, lonxe da luz solar directa e de temperaturas extremas.
- Se a gardas durante un período prolongado, asegúrate de que a batería estea parcialmente cargada (arredor do 50 %) para prolongar a súa vida útil.
- Keep the lens covered to prevent dust accumulation.
5.3 Coidado coa batería
- Evite descargar completamente a batería con frecuencia.
- Cargue a batería regularmente, mesmo se non a está a usar, para manter o seu estado.
- Non expoña a batería a altas temperaturas.
6 Solución de problemas
- Sen enerxía:
- Ensure the battery is charged. Connect the microscope to a power source and try again.
- Comprobe a conexión do cable de alimentación.
- Imaxe borrosa:
- Adjust the focus wheel carefully.
- Adjust the height of the microscope unit on the stand.
- Ensure the object is properly illuminated by adjusting the LED lights.
- Clean the lens if smudges or dust are present.
- Cannot Capture Photos/Videos:
- Ensure a TF card is inserted and properly formatted.
- Check if the TF card has sufficient storage space.
- Verify the device is in the correct photo or video capture mode.
- PC Not Recognizing Device:
- Ensure the USB cable is securely connected to both the microscope and the PC.
- Proba cun porto USB diferente no teu ordenador.
- Restart both the microscope and the PC.
- Ensure your PC is running Windows 7/8/10.
7. Especificacións
| Característica | Detalle |
|---|---|
| Nome do modelo | SUGON-Digital Microscope |
| Tamaño da pantalla | LCD de 7 polgadas |
| Ampliación | 10X-1200X |
| Resolución da cámara | 12 MP |
| Resolución de vídeo | 1080p |
| Almacenamento | 64GB TF Card (Max 128GB supported) |
| Iluminación | 8 luces LED |
| Capacidade da batería | Polímero de litio de 3000 mAh |
| Duración da batería | Ata 6 horas (aprox.) |
| Compatibilidade PC | Windows 7/8/10 |
| Material | Metal, Plástico |
| Peso do elemento | 2.44 libras (1.11 kg) |
| Dimensións do paquete | 9.8 x 8.19 x 3.35 polgadas |
8. Garantía e soporte
UF-TOOLS provides the following warranty and support for this product:
- Período de devolución: 45 days limited product return period.
- Política de intercambio: 18 months exchange for product defects.
For technical support or warranty claims, please contact UF-TOOLS customer service through the retailer where the product was purchased or visit the official UF-TOOLS websitio para información de contacto.
Nota: Os termos da garantía poden variar segundo a rexión e o establecemento. Garda o comprobante de compra.