
ALINX AXU2CGB
ALINX AXU2CGB Zynq UltraScale+ MPSoC Development Board User Manual
Model: AXU2CGB
1. Introdución
The ALINX AXU2CGB is a high-performance development board based on the AMD Zynq UltraScale+ MPSoC ZU2CG. This board is designed for advanced applications requiring significant processing power and programmable logic, such as Artificial Intelligence, Industrial IoT, 4K video processing, and high-speed data communication. It integrates a dual-core ARM Cortex-A53 and dual-core Cortex-R5 processor with 16nm FinFET+ technology, offering a robust platform for complex embedded systems development.
This manual provides essential information for setting up, operating, and maintaining your ALINX AXU2CGB development board. Please read it thoroughly before use to ensure proper functionality and to maximize the board's capabilities.
2. Características clave
- Procesador: AMD Zynq UltraScale+ MPSoC ZU2CG with Dual-Core ARM Cortex-A53 and Dual-Core Cortex-R5.
- Memoria: 2 GByte (64-bit) DDR4 SDRAM on PS, 32 MB QSPI Flash, 8 GB eMMC Flash.
- Conectividade: 1 x PCIe Gen2 ×1 (PS), 1 x Gigabit Ethernet (PS), 4 x USB3.0 (PS).
- Video & Display: 1 x DP Interface (PS), 2 x 2-lane MIPI (PL).
- Ampliación: 2 x 40-pin Expansion Ports, 1 x Micro SD slot.
- Depuración: 1 x UART on PS, JTAG porto.
- Aplicacións: Suitable for Artificial Intelligence, Video Processing, Industrial Control, Sensor Fusion, and IoT.
3. Board Components Overview
Familiarize yourself with the various components and interfaces of the ALINX AXU2CGB development board.

Figura 3.1: Arriba view of the ALINX AXU2CGB Development Board, showing the overall layout of components.

Figura 3.2: Detallado view of the top side components, including 40-Pin Expansion Ports (3.3V), Mini DP Interface, USB 3.0 ports, FPGA, Gigabit Ethernet, and Power Input.

Figura 3.3: Further labeled components on the top side, highlighting DDR4 memory, MIPI Camera Interfaces, EMMC Flash, JTAG, USB UART, and PCIe Interface.

Figura 3.4: Abaixo view of the ALINX AXU2CGB Development Board, showing the QSPI Flash and Micro SD Card Slot.
4. Instrucións de configuración
Follow these steps to set up your ALINX AXU2CGB development board.
- Desembalaxe: Carefully remove the development board and included accessories from the packaging. Ensure all components listed in the packing list are present.
- Conexión de alimentación: Connect the appropriate power adapter to the board's power input port. Ensure the power supply meets the board's voltage e requisitos actuais. (Refer to specifications for details).
- Cooling Fan Installation: Attach the provided cooling fan to the designated area on the board. Ensure it is securely mounted and connected to the fan header.
- Conexións periféricas:
- Connect a display to the Mini DP Interface if visual output is required.
- Connect a USB keyboard and mouse to the USB 3.0 ports for basic interaction.
- For network access, connect an Ethernet cable to the Gigabit Ethernet port.
- Insert a Micro SD card into the Micro SD slot if external storage is needed.
- Entorno de software: Install the necessary development tools and SDKs (e.g., Xilinx Vitis, Vivado) on your host PC. Refer to the official ALINX documentation or Xilinx resources for detailed software setup guides.
- Primeiro encendido: Once all connections are secure, apply power to the board. Observe the status LEDs for initial boot sequence.
5. Instrucións de funcionamento
This section outlines general operating procedures for the ALINX AXU2CGB development board.
5.1. Funcionamento básico
- Encendido/apagado: Use the power switch or disconnect the power adapter to power off the board. Always ensure proper shutdown procedures are followed to prevent data corruption.
- Arranque do sistema: The board will typically boot from the eMMC Flash or QSPI Flash. If a bootable image is present on the Micro SD card, it may boot from there depending on the boot mode settings.
- Acceso ao sistema:
- Via DisplayPort: If a display is connected, the graphical user interface (if available) will be shown.
- Via USB UART: Connect a USB-to-serial adapter to the USB UART port and use a terminal emulator (e.g., PuTTY, Tera Term) on your host PC to access the serial console.
- Vía Ethernet: Access the board via SSH or other network protocols once an IP address is assigned.
5.2. Programación e Depuración
- FPGA Programming: Use Xilinx Vivado or Vitis to compile and load FPGA bitstreams onto the Zynq UltraScale+ PL (Programmable Logic) section.
- Desenvolvemento de software: Develop applications for the ARM processors using Xilinx Vitis IDE. This includes bare-metal applications, Linux-based applications, and AI acceleration with Vitis AI.
- JTAG Depuración: Connect a JTAG debugger to the JTAG port for hardware debugging of both the PS (Processing System) and PL.
- Portos de expansión: Utilize the 40-pin expansion ports to connect various ALINX modules, such as camera modules, TFT LCD screens, or custom peripherals.
6. Mantemento
Proper maintenance ensures the longevity and reliable operation of your ALINX AXU2CGB development board.
- Limpeza: Keep the board clean and free from dust. Use a soft, dry brush or compressed air to remove dust from components and connectors. Avoid using liquids or abrasive cleaners.
- Condicións ambientais: Operate the board within the specified working temperature range (0°C to 70°C). Avoid extreme humidity, direct sunlight, or environments with excessive vibrations.
- Actualizacións de firmware: Regularly check the ALINX official website for firmware, driver, and software updates. Keeping your board's software up-to-date can improve performance and stability.
- Manexo: Always handle the board by its edges to avoid touching sensitive components. Use anti-static precautions (e.g., anti-static wrist strap) when handling to prevent electrostatic discharge (ESD) damage.
- Almacenamento: When not in use, store the board in its original anti-static packaging or a suitable anti-static container in a cool, dry place.
7 Solución de problemas
Esta sección ofrece solucións a problemas comúns cos que podes atoparte.
- Issue: Board does not power on.
-
- Solución: Verify the power adapter is correctly connected and providing the specified voltage and current. Check the power cable for damage. Ensure the power switch (if present) is in the ON position.
- Issue: No display output via Mini DP.
-
- Solución: Ensure the display cable is securely connected to both the board and the monitor. Check if the monitor is set to the correct input source. Verify that the software running on the board is configured to output to the DisplayPort. An ALINX customized DP to HDMI cable may be required (sold separately).
- Issue: USB devices are not recognized.
-
- Solución: Try connecting the USB device to a different USB 3.0 port. Ensure the device drivers are installed on the board's operating system (if applicable). Check the power consumption of the USB device; some high-power devices may require an external power source.
- Issue: Cannot connect to the board via Ethernet.
-
- Solución: Verify the Ethernet cable is properly connected. Check network settings on both the board and your host PC. Ensure the board's operating system has the correct network drivers and configurations. Confirm that the network switch or router is functioning correctly.
- Issue: FPGA programming fails.
-
- Solución: Ensure the JTAG cable is correctly connected and recognized by your development software (Vivado/Vitis). Verify that the bitstream file is valid and compatible with the ZU2CG device. Check for any error messages in the development environment for specific guidance.
8. Especificacións técnicas
Detailed technical specifications for the ALINX AXU2CGB development board.
8.1. Main Parameters Comparison (AXU2CGA vs AXU2CGB)
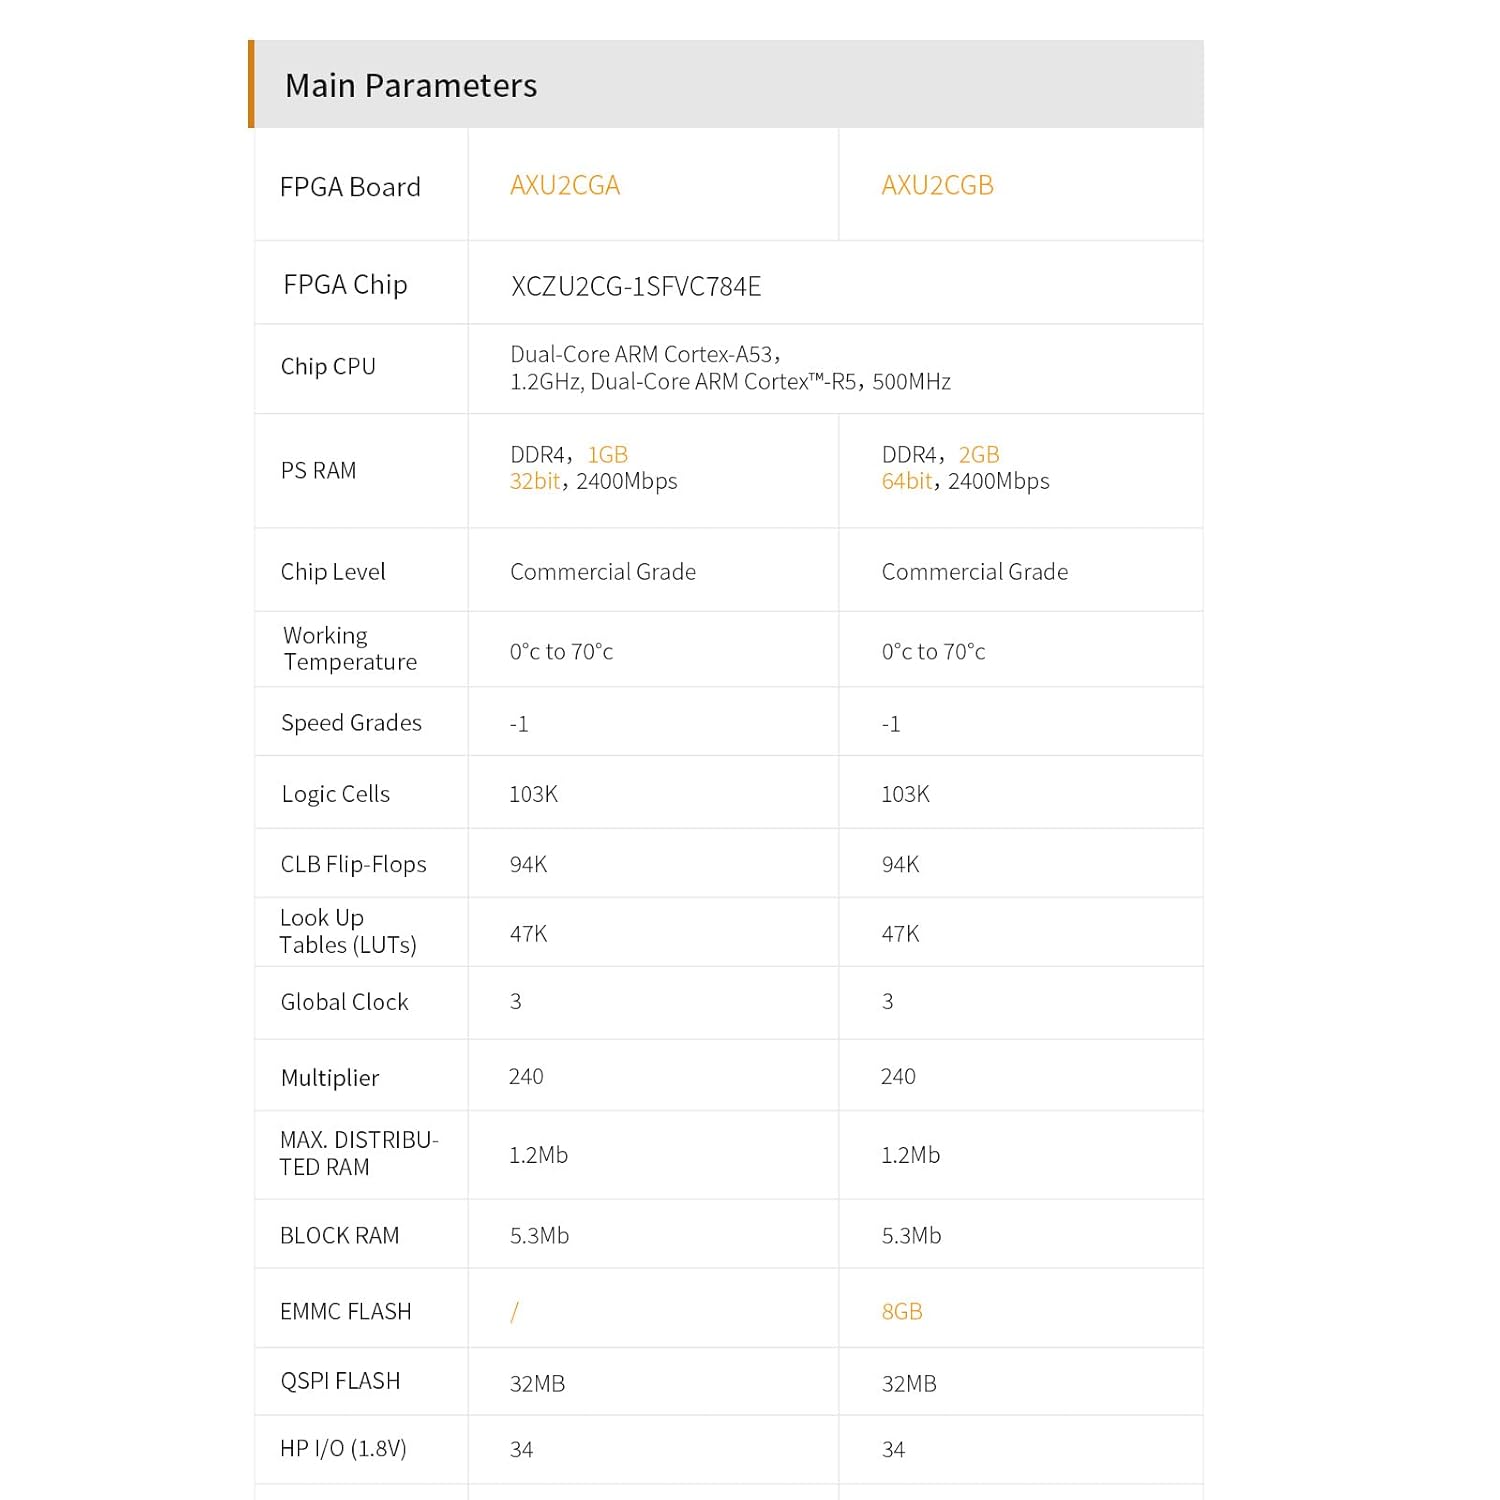
Figura 8.1: Comparison of key parameters between AXU2CGA and AXU2CGB models.
8.2. Interface and Function Overview

Figura 8.2: Acabadoview of interfaces and their functions on the ALINX AXU2CGB.
8.3. Especificacións xerais
| Característica | Descrición |
|---|---|
| Marca | ALINX |
| Modelo | AXU2CGB |
| Procesador | AMD Zynq UltraScale+ MPSoC ZU2CG (Dual-Core ARM Cortex-A53, Dual-Core ARM Cortex-R5) |
| PS RAM | 2 GB DDR4 (64-bit) |
| QSPI Flash | 32 MB |
| eMMC Flash | 8 GB |
| Interface PCIe | 1 x PCIe Gen2 ×1 (PS) |
| Ethernet | 1 x Gigabit Ethernet (PS) |
| Portos USB | 4 x USB3.0 (PS) |
| Interface de visualización | 1 x DP Interface (PS) |
| Interface MIPI | 2 x 2-lane MIPI (PL) |
| Portos de expansión | 2 x 40-pin Expansion Ports |
| Micro SD | 1 x Ranura Micro SD |
| UART | 1 x UART on PS |
| EEPROM | 1 x EEPROM (24LC04) on PS |
| JTAG | 10-pin 0.1-inch Standard JTAG Porto |
| Dimensións (LxWxH) | 10.01 x 8.76 x 1.52 cm |
| Temperatura de traballo | 0°C a 70°C |
| Accesorios incluídos | Ventilador de refrixeración |
9. Soporte e Recursos
For further assistance, documentation, and development resources, please refer to the following:
- Documentación oficial: ALINX provides comprehensive resources including schematics, user manuals in PDF format, Verilog HDL demos, and experiment guidelines. These can typically be found on the official ALINX product page or support portal.
- Xilinx Resources: As the board is based on Zynq UltraScale+ MPSoC, Xilinx's official documentation, forums, and development tools (Vivado, Vitis, Vitis AI) are invaluable resources for development.
- Soporte técnico: For specific technical inquiries or issues not covered in this manual, please contact ALINX customer support through their official websitio.
Ask a question about this manual
Ask about setup, troubleshooting, compatibility, parts, safety, or missing instructions. Manuals+ will review the question and use this page’s manual context to help answer it.