
PowMr ML2440
Manual do usuario do controlador de carga solar MPPT PowMr 40A
Modelo: ML2440
1. Introdución
This manual provides essential information for the safe and efficient operation of your PowMr 40A MPPT Solar Charge Controller, model ML2440. Please read this manual thoroughly before installation and use to ensure optimal performance and longevity of the product.
2. Instrucións de seguridade
- Ensure all wiring is correctly connected and secured to prevent short circuits or damage.
- Always connect the battery to the charge controller first, then the solar panels, and finally the load. Disconnect in the reverse order.
- Do not attempt to repair or modify the controller yourself. Contact qualified personnel for service.
- Instale o controlador nunha zona ben ventilada, lonxe de materiais inflamables e da luz solar directa.
- Usar o equipo de protección individual (EPI) axeitado cando se traballe con sistemas eléctricos.
- Asegúrese de que o sistema voltage matches the controller's specifications (12V/24V auto-detection).
3. Produto rematadoview
The PowMr 40A MPPT Solar Charge Controller is designed to efficiently manage power from your solar panels to charge various battery types, including Lithium, Sealed, Gel, and Flooded batteries. It features Maximum Power Point Tracking (MPPT) technology for optimized solar energy harvesting, automatic 12V/24V system voltage detection, and a clear LCD display for monitoring system status.
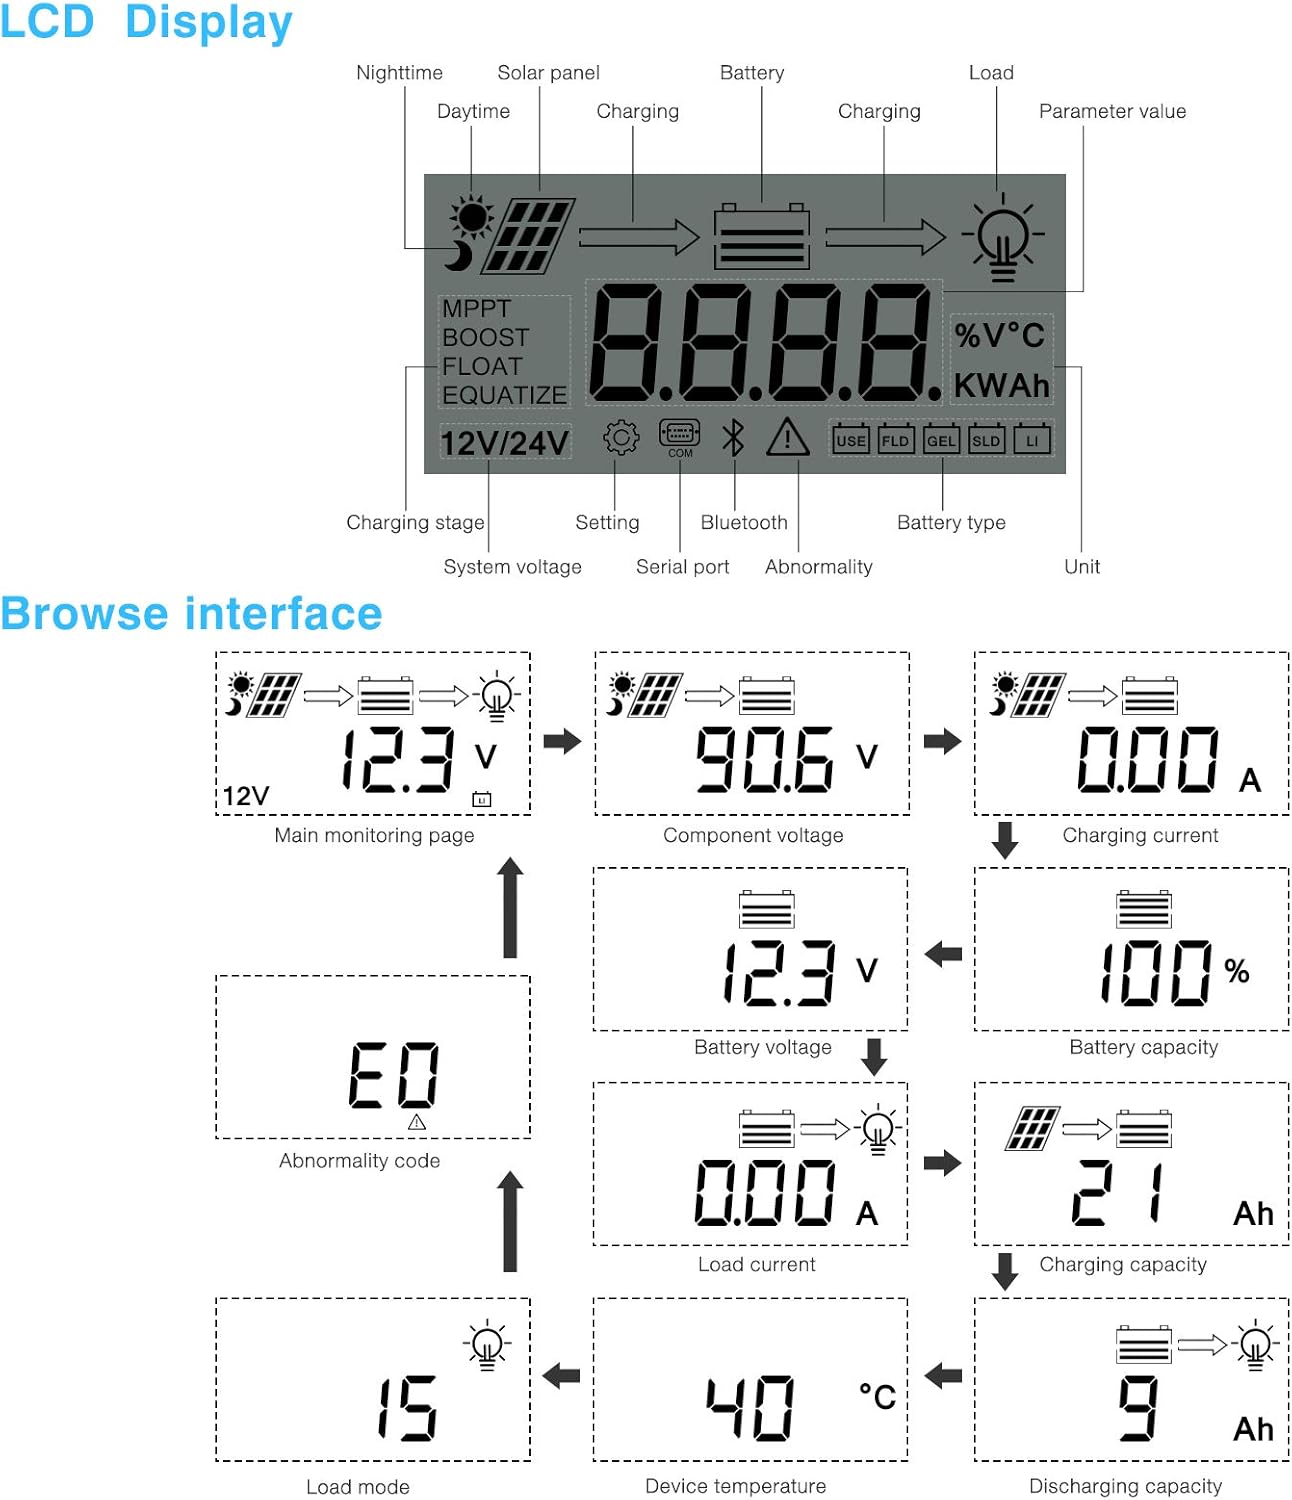
Figura 3.1: Fronte view do controlador de carga solar MPPT PowMr 40A.
This image shows the main unit of the PowMr 40A MPPT Solar Charge Controller, highlighting its compact design and integrated LCD screen.
The controller supports a maximum solar input voltage of 100V and a maximum input power of 1100W for a 24V system (550W for 12V). It also includes temperature compensation for accurate charging across varying environmental conditions.

Figura 3.2: Temperature compensation feature.
This image illustrates the temperature compensation capability of the controller, ensuring optimal battery charging performance in both hot and cold environments.
4. Instalación e cableado
Unha instalación axeitada é fundamental para o funcionamento seguro e eficiente do seu controlador de carga solar. Siga estes pasos atentamente.
4.1 Diagrama de cableado

Figura 4.1: Wiring diagram for the PowMr MPPT Solar Charge Controller.
This diagram illustrates the correct connection order for the battery, solar panels, DC load, and optional inverter. A temperature sensor is also shown.
4.2 Pasos de conexión
- Conecta primeiro a batería: Connect the battery to the charge controller's battery terminals. Ensure correct polarity. The controller will auto-detect 12V or 24V system voltage.
- Conectar paneis solares: Connect the solar panels to the PV input terminals. Ensure correct polarity. The controller will begin charging if sufficient sunlight is available.
- Conectar a carga de CC (opcional): If using a DC load directly from the controller, connect it to the load terminals.
- Conectar o inversor (opcional): If using an inverter, connect it to the battery terminals (not directly to the load terminals of the controller).
- Conectar o sensor de temperatura: For accurate temperature compensation, connect the provided temperature sensor to the designated port on the controller and place the sensor near the battery.
Disconnection Order: To disconnect the system, always follow the reverse order: Disconnect load, then solar panels, then battery.
5. Instrucións de funcionamento
This section details how to monitor and configure your charge controller using its integrated LCD display and the optional Bluetooth mobile application.
Pantalla LCD 5.1view

Figura 5.1: LCD Display and Browse Interface.
This image shows the various icons and parameters displayed on the LCD screen, along with the navigation flow through different monitoring pages.
The LCD provides real-time information about your solar system. Key indicators include:
- Cargando Stage: MPPT, Boost, Float, Equalize.
- Sistema Voltage: 12V/24V auto-detected.
- Tipo de batería: Icons for Lithium (Li), Sealed (SLD), Gel (GEL), Flooded (FLD).
- Indicadores de estado: Solar panel activity, battery charging, load status, abnormality.
- Valor do parámetro: Mostra voltage, current, capacity, temperature, etc.
Use the buttons below the LCD to navigate through different screens to view parameters such as main monitoring page, component voltage, corrente de carga, vol. bateríatage, battery capacity, load current, charging capacity, device temperature, discharging capacity, abnormality codes, and load mode.
5.2 Bluetooth Mobile Application
The controller supports an optional Bluetooth module (BT-1) for remote monitoring and parameter adjustment via a mobile application (available for Apple iOS and Android devices). The Bluetooth module connects to the RS232 port on the controller.

Figura 5.2: Controller with optional Bluetooth module.
This image displays the PowMr MPPT Solar Charge Controller alongside its optional BT-1 Bluetooth communication module and connecting cable.

Figura 5.3: BT-1 Bluetooth module.
Un detallado view of the BT-1 Bluetooth module, which enables wireless communication with the solar charge controller for remote monitoring and settings adjustments.

Figura 5.4: Bluetooth Mobile Interface Display.
This image shows various screens from the mobile application, including real-time monitoring, data records, energy records, and parameter settings.
The mobile application allows you to:
- Monitor real-time system data (voltage, current, power, temperature).
- View historical data and energy records.
- Adjust various charging parameters and battery settings.
- Restaurar a configuración predeterminada de fábrica.
6. Mantemento
Un mantemento regular garante a lonxevidade e o rendemento óptimo do seu controlador de carga.
- Limpeza: Periodically clean the controller's exterior with a dry cloth to remove dust and debris. Ensure ventilation openings are clear.
- Conexións: Annually check all wiring connections for tightness and corrosion. Loose connections can cause overheating and poor performance.
- Ambiente: Ensure the installation environment remains within the specified operating temperature range and is free from excessive moisture or dust.
7 Solución de problemas
This section provides guidance for common issues. Refer to the LCD display for abnormality codes.
- Sen pantalla/Sen alimentación:
- Comprobe as conexións da batería e asegúrese de que o volume da bateríatage está dentro do rango operativo.
- Verify that the battery fuse (if installed) is intact.
- Sen carga:
- Ensure solar panels are connected correctly and receiving sufficient sunlight.
- Comprobe o panel solar voltage e corrente.
- Verify that the battery is not fully charged or in a protection state.
- Carga non funciona:
- Check load connections and ensure the load current does not exceed the controller's rating.
- Verifique que a batería voltage está por riba do baixo voltagconfiguración de desconexión electrónica (LVD).
- Check for any abnormality codes on the LCD related to load output.
- Abnormality Codes (e.g., "E0"):
- Refer to the specific abnormality code displayed on the LCD. Consult the full product manual or manufacturer's support for detailed explanations and solutions for each code.
8. Especificacións
Technical specifications for the PowMr 40A MPPT Solar Charge Controller (Model ML2440).

Figura 8.1: Product Specifications Table.
This table provides detailed technical parameters for the ML2420, ML2430, and ML2440 models. The ML2440 column is relevant for this 40A controller.
| Parámetro | Value (ML2440) |
|---|---|
| Modelo | ML2440 |
| Vol. Do sistematage | 12V / 24V automático |
| Perda sen carga | 0.7 W a 1.2W |
| Batería voltage | 9 a 35 V |
| Máx. entrada solar voltage | 100 V (25 °C), 90 V (-25 °C) |
| Máx. power point voltagrango | Batería voltage +2V a 75V |
| Corrente de carga nominal | 40A |
| Intensidade de carga nominal | 20A |
| Máx. capacidade de carga capacitiva | 10000 uF |
| Máx. potencia de entrada do sistema fotovoltaico | 550W/ 12V, 1100W/ 24V |
| Eficiencia de conversión | ≤ 98 % |
| Eficiencia de seguimento MPPT | > 99% |
| Factor de compensación de temperatura | -3.0mv/ °C/ 2V (default) |
| Temperatura de funcionamento | -35 °C a +45 °C |
| Grao de protección | IP32 |
| Peso | 2 kg |
| Método de comunicación | RS232 |
| Altitude | ≤ 3000 m |
| Dimensións do produto | 238*173*72.5 mm |
9. Garantía e soporte
For warranty information, please refer to the documentation included with your product packaging or visit the official PowMr website. If you encounter any issues not covered in this manual or require further assistance, please contact PowMr customer support.
PowMr Official Websitio: Visita a tenda PowMr en Amazon
Ask a question about this manual
Ask about setup, troubleshooting, compatibility, parts, safety, or missing instructions. Manuals+ will review the question and use this page’s manual context to help answer it.