
1. Instrucións de seguridade importantes
Please read all instructions carefully before using the Inventum OV307B convection oven to ensure safe and efficient operation. Keep this manual for future reference.
- Seguridade eléctrica: Asegúrate de que o forno estea conectado a unha toma de corrente con conexión a terra e o voltaxe correctotage. Do not immerse the cord, plug, or oven in water or other liquids.
- Superficies quentes: The oven's exterior and interior surfaces become very hot during operation. Always use oven mitts when handling hot items or reaching into the oven.
- Supervisión: Close supervision is necessary when the oven is used by or near children. Do not leave the oven unattended during operation.
- Ventilación: Ensure adequate space around the oven for proper ventilation. Do not block any ventilation openings.
- Materiais inflamables: Do not place flammable materials (e.g., paper, plastic, cloth) on or near the oven.
- Limpeza: Desconecte sempre o forno e déixeo arrefriar completamente antes de limpalo.
- Danos: Do not operate the oven if it has a damaged cord or plug, or if it has been dropped or damaged in any way. Contact customer support for assistance.
2. Produto rematadoview
Familiarize yourself with the components and controls of your Inventum OV307B convection oven.
2.1 Oven Exterior and Controls
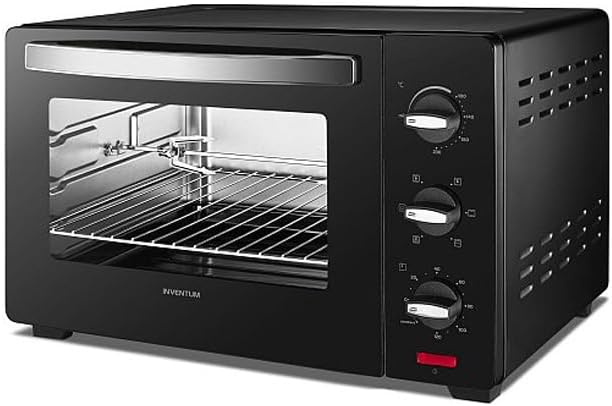
Imaxe 1: Fronte view of the Inventum OV307B convection oven, showcasing its black finish, glass door, and control panel with three rotary knobs on the right side.
The Inventum OV307B features a compact design with a durable black exterior. The front includes a large glass door for easy viewing of food during cooking. On the right side, a control panel houses three rotary knobs for adjusting temperature, cooking function, and timer settings.
2.2 Interior do forno e accesorios
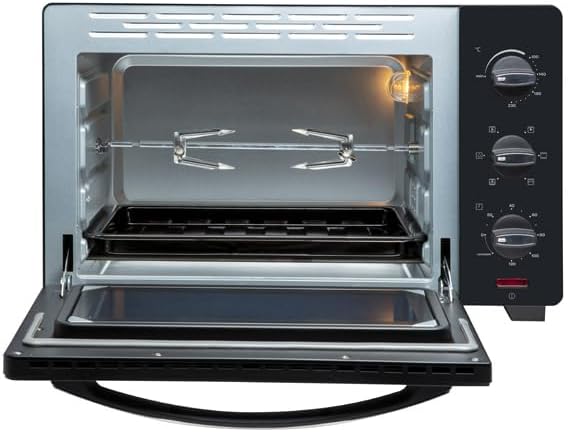
Imaxe 2: Interior view of the Inventum OV307B convection oven with the door open, showing the oven rack, crumb tray, and rotisserie spit assembly.
The oven interior is designed for efficient heat distribution. It includes a removable oven rack for placing baking dishes and a crumb tray at the bottom to collect drips and crumbs, making cleaning easier. A rotisserie spit assembly is also visible, indicating the oven's rotisserie function.
2.3 Funcións do panel de control
- Botón de control de temperatura: Úsase para axustar a temperatura de cocción desexada.
- Botón selector de funcións: Used to choose the cooking mode (e.g., top heat, bottom heat, convection, rotisserie).
- Botón do temporizador: Used to set the cooking duration. May include a 'stay on' function.
2.4 Accesorios incluídos
- Parrilla de forno: For supporting baking pans, dishes, or food directly.
- Bandexa de migas: Placed at the bottom to catch food particles and drips.
- Spit de asador: For roasting poultry or other meats evenly.
3. Configuración
3.1 Desembalaxe e colocación
- Carefully remove all packaging materials, including any internal packing or protective films.
- Coloque o forno sobre unha superficie estable, resistente á calor e nivelada.
- Ensure there is at least 10-15 cm (4-6 inches) of clear space on all sides and above the oven for proper ventilation. Do not place the oven directly against a wall or under cabinets.
- Non coloque o forno preto de materiais inflamables ou fontes de calor.
3.2 Antes do primeiro uso
- Wash the oven rack, crumb tray, and rotisserie spit in warm, soapy water. Rinse thoroughly and dry completely.
- Limpe o interior e o exterior do forno con anuncioamp pano.
- To eliminate any manufacturing odors, operate the oven empty for approximately 15 minutes at the highest temperature setting (e.g., 230°C) using the convection function. Ensure the room is well-ventilated during this process. A slight odor or smoke is normal during this initial burn-off.
- Allow the oven to cool completely before its first use with food.
4. Instrucións de funcionamento
4.1 Funcionamento básico
- Conectar: Connect the oven to a suitable power outlet.
- Comida do lugar: Place food on the oven rack or in a suitable baking dish, then insert it into the oven. Ensure the crumb tray is in place at the bottom.
- Temperatura establecida: Xire o botón de control da temperatura á temperatura de cocción desexada.
- Seleccionar función: Turn the Function Selector Knob to choose the appropriate cooking mode (e.g., top heat, bottom heat, top and bottom heat with convection, rotisserie).
- Establecer temporizador: Turn the Timer Knob to the desired cooking time. The oven will begin heating. A bell will sound when the timer expires, and the oven will turn off automatically. For continuous operation, select the 'stay on' position if available.
4.2 Uso da función de asado
- Skewer the food (e.g., whole chicken) onto the rotisserie spit, securing it with the forks.
- Introduza o espeto do asador nas ranuras designadas dentro do forno.
- Select the rotisserie function using the Function Selector Knob.
- Set the temperature and timer as required for your recipe.
4.3 Prequecemento
For best results, preheat the oven to the desired temperature before placing food inside. Set the temperature and function, then allow the oven to heat for 5-10 minutes, or until the indicator light (if present) turns off, signaling the temperature has been reached.
5. Mantemento e Limpeza
Unha limpeza regular garante un rendemento óptimo e prolonga a vida útil do teu forno.
- Desconectar sempre: Antes de limpalo, desconecte sempre o forno da toma de corrente e déixeo arrefriar completamente.
- Exterior: Limpe as superficies exteriores cun suave, damp cloth. Do not use abrasive cleaners or scouring pads, as they can damage the finish.
- Interior: Limpe as paredes interiores con anuncioamp cloth and mild detergent. For stubborn stains, a non-abrasive oven cleaner designed for convection ovens can be used, following the product instructions carefully. Ensure all cleaner residue is removed.
- Accesorios: The oven rack, crumb tray, and rotisserie spit can be washed in warm, soapy water. Rinse and dry thoroughly.
- Porta de cristal: Limpar a porta de vidro cun limpador de cristais ou con anunciosamp pano.
- Non mergullo: Nunca mergulle o corpo do forno, o cable ou a ficha en auga ou en ningún outro líquido.
6 Solución de problemas
If you encounter issues with your Inventum OV307B, refer to the table below for common problems and solutions.
| Problema | Causa posible | Solución |
|---|---|---|
| O forno non acende. | Non conectado; apagadotage; temporizador non configurado. | Ensure the oven is securely plugged into a working outlet. Check your household circuit breaker. Turn the timer knob to a desired cooking time. |
| A comida non se cociña de xeito uniforme. | Oven not preheated; food placed too close to heating elements; overcrowding. | Preheat the oven before placing food inside. Ensure proper spacing around food for air circulation. Avoid overcrowding the oven. |
| Exceso de fume durante a cocción. | Food spills; grease buildup; initial burn-off. | Clean the oven interior and crumb tray thoroughly. Ensure the crumb tray is clean before each use. If it's the first use, some smoke is normal during burn-off. |
| Rotisserie spit not rotating. | Spit not correctly installed; rotisserie function not selected. | Ensure the rotisserie spit is properly seated in its drive mechanism. Select the rotisserie function using the Function Selector Knob. |
If the problem persists after attempting these solutions, please contact Inventum customer support.
7. Especificacións
Key technical details for the Inventum OV307B convection oven:
- Marca: Inventum
- Modelo: OV307B
- Cor: Negro
- Tipo de control: Botóns rotativos
- Fonte de enerxía: Eléctrico
- Compoñentes incluídos: Oven rack, Crumb tray, Rotisserie spit
- Número de estantes: 1
- ASIN: B09C8VFFC7
8. Garantía e soporte
8.1 Información da garantía
Your Inventum OV307B convection oven comes with a standard manufacturer's warranty. Please refer to the separate warranty card included with your purchase for specific terms, conditions, and duration. Keep your proof of purchase for warranty claims.
8.2 Atención ao cliente
For technical assistance, spare parts, or any questions regarding your Inventum OV307B, please contact Inventum customer support. Contact details can typically be found on the official Inventum websitio web ou na documentación da súa garantía.