
1. Produto rematadoview
Thank you for choosing the Arlux Lighting Onyx R2 Round Recessed LED Spot Light. This product is designed for indoor use, providing efficient and modern illumination. This manual provides essential information for the safe installation, operation, and maintenance of your new LED spot light.
Información de seguridade
- Lea atentamente todas as instrucións antes da instalación e uso.
- Installation must be performed by a qualified electrician in accordance with local electrical codes and regulations.
- Asegúrese de desconectar a alimentación eléctrica no disyuntor principal antes da instalación, mantemento ou limpeza.
- Non modifique o produto de ningún xeito. As modificacións non autorizadas poden anular a garantía e supoñer riscos para a seguridade.
- Este produto está deseñado só para uso en interiores. Non o expoña á humidade nin a temperaturas extremas.
- Non mire directamente á fonte de luz LED cando estea acesa, xa que isto pode causar fatiga ou danos oculares.
- Manter os materiais de embalaxe fóra do alcance dos nenos.
2. Contido do paquete
Verifique que todos os compoñentes estean presentes e sen danos antes de continuar coa instalación.
- 1 x Arlux Lighting Onyx R2 Round Recessed LED Spot Light
- 1 x LED Driver (Power Supply)
- Hardware de montaxe

Image 2.1: The Arlux Lighting Onyx R2 Recessed LED Spot Light shown with its separate LED driver (power supply) and connecting cable.
3. Especificacións
| Marca | Arlux Lighting |
| Modelo | Onyx R2 |
| Tipo | Recessed LED Spot Light |
| Forma | Redondo |
| Consumo de enerxía | 18 vatios |
| Fluxo luminoso | 1550 lúmenes |
| Temperatura da cor | 4000 Kelvin (branco neutro) |
| Material | Aluminio |
| Cor | Branco |
| Peso do elemento | 390 gramos |
| Tipo de instalación | Soporte de teito (empotrado) |
| Fonte de enerxía | Eléctrico con cable |
| Usos específicos | Ceiling illumination for indoor spaces |
4. Configuración e instalación
4.1 Lista de verificación previa á instalación
- Ferramentas necesarias: Drill, hole saw (appropriate diameter for recess), wire strippers, screwdriver, voltagprobador.
- Fonte de alimentación: Ensure the electrical circuit is compatible with the spot light's power requirements (18W).
- Ceiling Space: Verify sufficient clearance above the ceiling for the fixture and driver.
- A seguridade primeiro: Always turn off the main power supply at the circuit breaker before starting any electrical work.
4.2 Pasos da instalación
- Preparar o teito: Using an appropriate hole saw, cut a circular opening in the ceiling at the desired installation location. Refer to the product specifications for the exact cutout diameter (typically around Ø200-210mm for a Ø225mm fixture).
- Connect the Driver: Connect the AC input wires from your household electrical supply to the input terminals of the LED driver. Ensure correct polarity (Live, Neutral, Earth) as indicated on the driver. Secure connections firmly.
- Connect the Spot Light: Plug the DC output cable from the LED driver into the corresponding input port on the back of the Onyx R2 spot light. This connection is typically a simple plug-and-play connector.
- Insert the Spot Light: Gently push the spring clips on the sides of the spot light upwards and insert the fixture into the prepared ceiling opening. The spring clips will hold the light securely in place.
- Verificación final: Ensure the spot light is flush with the ceiling surface and securely mounted.
- Restaurar enerxía: Volva a conectar a alimentación principal no disyuntor.
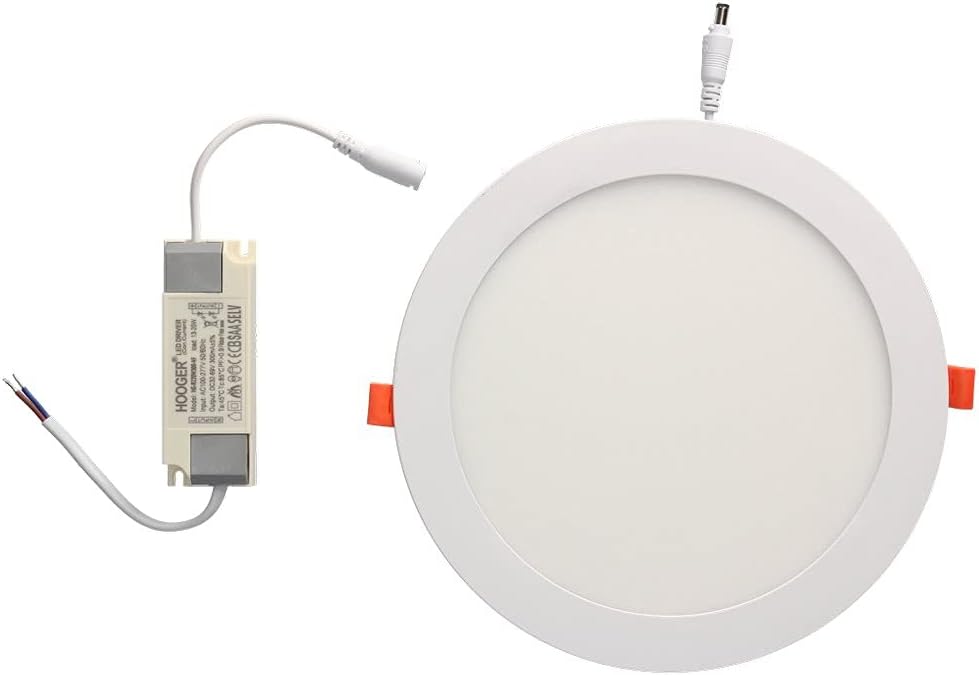
Image 4.1: The Arlux Lighting Onyx R2 Recessed LED Spot Light shown installed flush within a ceiling, providing ambient lighting.
5. Instrucións de funcionamento
The Arlux Lighting Onyx R2 Recessed LED Spot Light operates immediately upon receiving power. It is typically controlled by a standard wall switch connected to the electrical circuit.
- Activar/Desactivar: Usa o interruptor de parede conectado á lámpada para acender ou apagar a luz.
- Adormecer: This model is not specified as dimmable. Attempting to use it with a non-compatible dimmer switch may cause damage or malfunction.
6. Mantemento
The Arlux Lighting Onyx R2 LED Spot Light requires minimal maintenance.
- Limpeza: Ensure the power is off before cleaning. Wipe the surface of the light with a soft, dry, or slightly damp pano. Non empregue produtos de limpeza abrasivos, solventes nin produtos químicos agresivos, xa que poden danar o acabado ou os compoñentes eléctricos.
- Lonxevidade do LED: LED lights have a long lifespan and do not require bulb replacement. If the light stops functioning, refer to the troubleshooting section.
7 Solución de problemas
If you encounter issues with your Arlux Lighting Onyx R2 LED Spot Light, please consult the following table before contacting support.
| Problema | Causa posible | Solución |
|---|---|---|
| A luz non se acende | Sen fonte de alimentación Conexión de cableado solta Driver LED defectuoso Faulty light fixture | Comprobe o disxuntor e o interruptor de parede. Verify all wiring connections are secure (power off first). Test the driver if possible, or replace it. If driver is functional, the fixture may be faulty; contact support. |
| Luz parpadea | Fonte de alimentación inestable Cableado solto Incompatible dimmer switch (if used) | Ensure stable power. Check for loose connections. Remove dimmer switch if not compatible, or replace with a compatible LED dimmer. |
| A luz é débil | Alimentación incorrecta Voltagcae | Ensure the correct LED driver is used. Consult an electrician to check for voltage issues in your electrical system. |
8. Garantía e soporte
Information regarding specific warranty terms for the Arlux Lighting Onyx R2 Round Recessed LED Spot Light is not available in the provided product details. For warranty inquiries or technical support, please contact your retailer or the manufacturer directly.
Spare parts availability information is also not available. Please contact your point of purchase for assistance with replacement components.