
Freeman G2XL31
Freeman G2XL31 2nd Generation Pneumatic 3-in-1 Finish Nailer/Stapler User Manual
Model: G2XL31
1. Introdución
The Freeman G2XL31 2nd Generation Pneumatic 3-in-1 Finish Nailer/Stapler is a versatile and durable air-powered tool designed for a wide range of finishing projects. Its re-engineered internal components and optimized airflow provide enhanced driving power with less air consumption, making it suitable for tasks such as crown molding, baseboards, window casing, chair rails, furniture assembly, and cabinetry.
As características principais inclúen:
- Next-Generation 3-in-1 Design: Capable of driving 18 gauge brad nails (5/8" – 2"), 16 gauge straight finish nails (3/4" – 2"), and 18 gauge 1/4" narrow crown staples (5/8" – 1-5/8").
- Upgraded Internal Parts: Optimized air flow for enhanced driving power with less air consumption.
- Construído para durar: Features a one-piece hardened steel drive blade for increased durability.
- Integrated Dual Mode Trigger: Allows for quick switching between single sequential firing for precision and bump firing for speed.
- Tool-Free Depth Adjust: Enables precision flush or countersink nailing in various materials.
- No Mar Safety Tip: Protects working surfaces from damage.
- Textured Rubber Grip: Provides maximum comfort and control.
- Powder Coated Exterior: Resists scratches and enhances longevity.
- Adjustable Metal Belt Hook: Para unha cómoda portabilidade.
- 1/4" NPT Air Connector: Standard connection for air supply.
2. Información de seguridade
Always prioritize safety when operating power tools. Failure to follow safety instructions can result in serious injury.
- Protección ocular: Use sempre lentes de seguridade con proteccións laterais homologadas pola norma ANSI Z87.1.
- Protección auditiva: Wear hearing protection to prevent hearing damage.
- Protección das mans: Wear gloves to protect hands from splinters and sharp objects.
- Proper Air Pressure: Do not exceed the maximum recommended air pressure for the tool. Refer to specifications.
- Desconectar o aire: Always disconnect the tool from the air supply before loading fasteners, making adjustments, clearing jams, or performing maintenance.
- Peza de traballo segura: Ensure the workpiece is stable and secure before fastening.
- Evitar disparos accidentais: Keep fingers away from the trigger when not actively fastening. Never point the tool at yourself or others.
- Ler o manual: Read and understand the complete instruction manual before operating the tool.
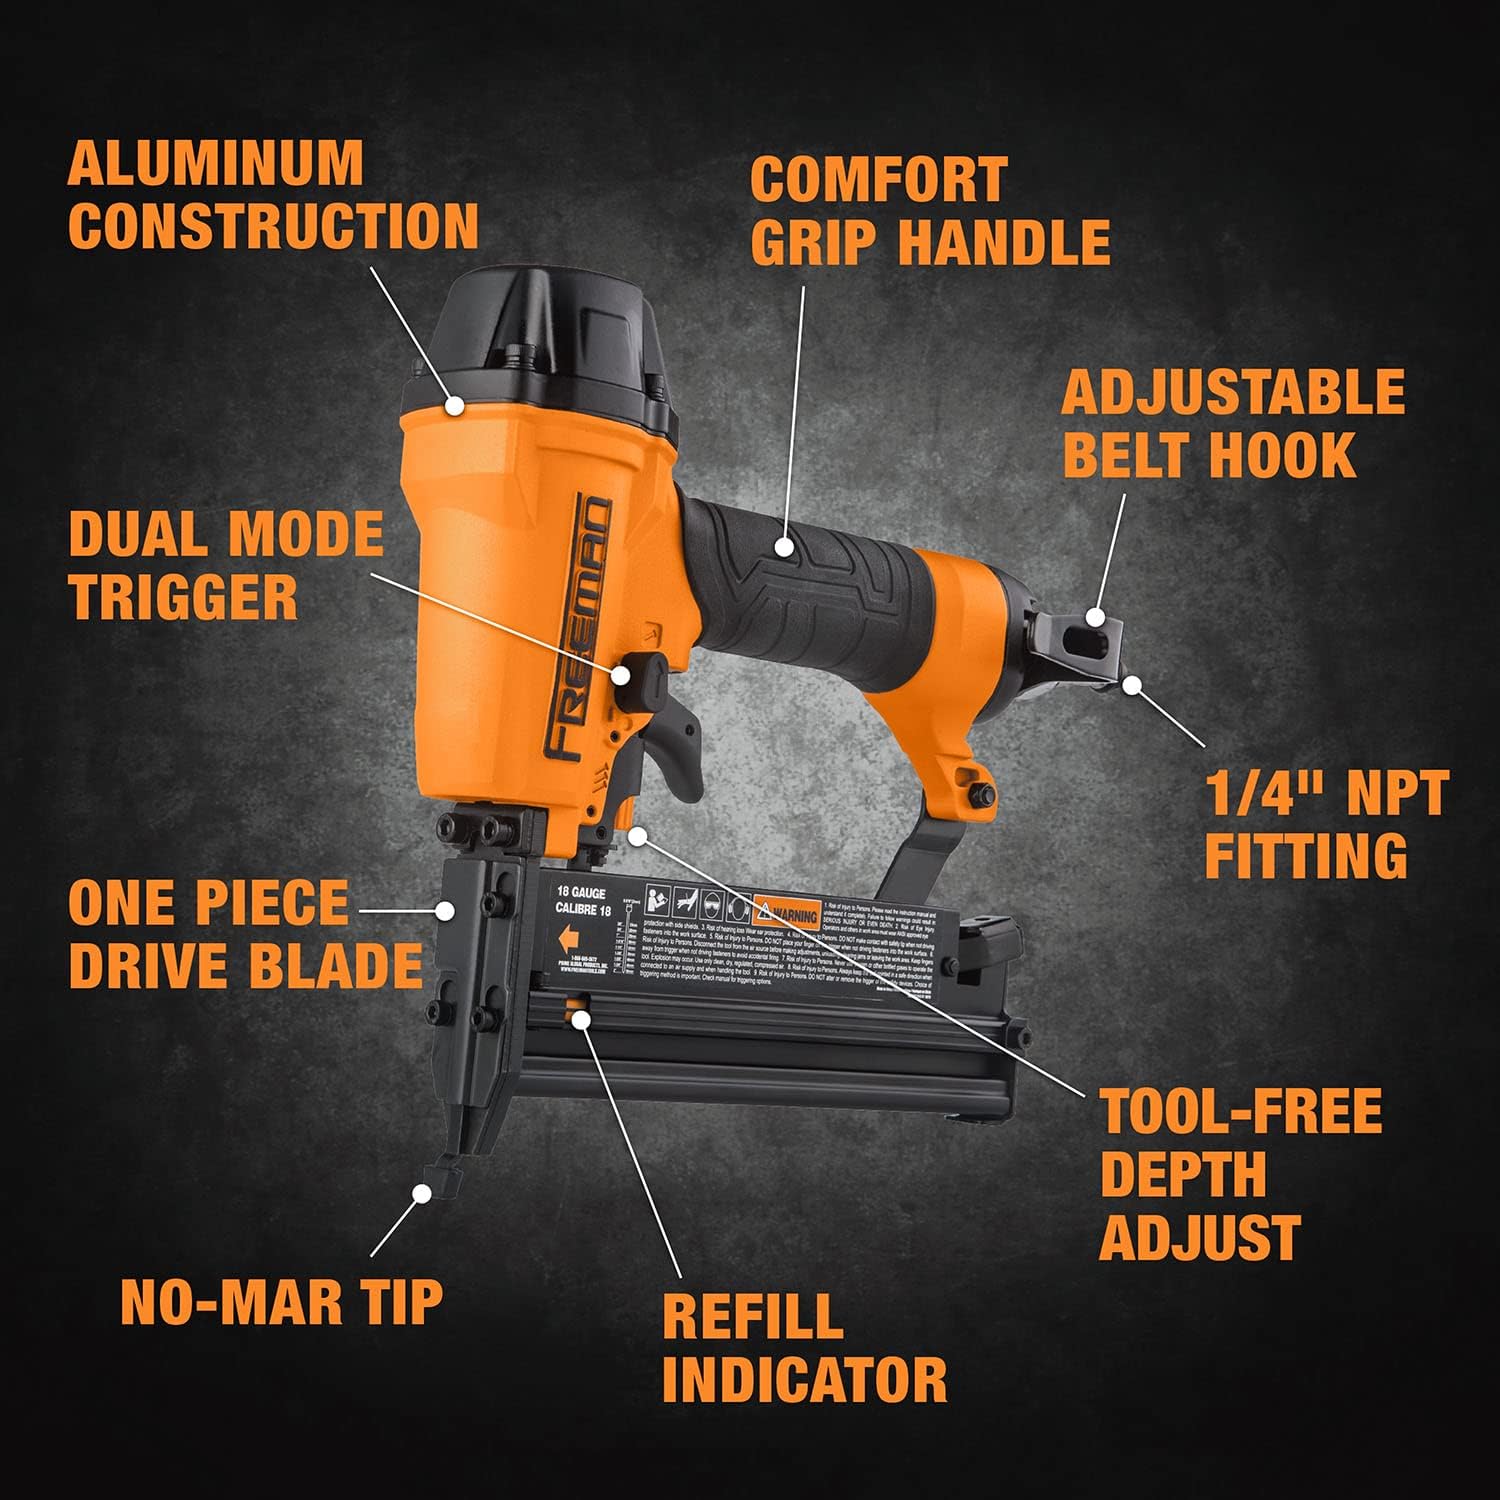
Figure 2.1: Close-up of the trigger and safety mechanism, highlighting areas to keep clear when not in use.
3. Que hai na caixa
Ao abrir o paquete, comproba que todos os elementos estean presentes e sen danos:
- 2nd Generation Pneumatic 3-in-1 16-Gauge and 18-Gauge Nailer / Stapler (Model G2XL31)
- Adjustable Metal Belt Hook
- 1/4" NPT Connector
- Ferramentas de axuste

Figure 3.1: The Freeman G2XL31 Nailer/Stapler.
4. Especificacións
| Especificación | Valor |
|---|---|
| Marca | Freeman |
| Número de modelo | G2XL31 |
| Peso do elemento | 3.15 libras |
| Dimensións do produto | 9.25 x 2.63 x 9.5 polgadas |
| Tipo de material | One piece hardened steel drive blade |
| Número de fixadores | 3 (16-Ga Finish Nails, 18-Ga Brad Nails, 18-Ga Narrow Crown Staples) |
| Modo de operación | Automático |

Figure 4.1: Annotated diagram of the Freeman G2XL31's features.

Figure 4.2: Fastener compatibility chart for the G2XL31.
5. Configuración
5.1 Conexión á subministración de aire
- Asegúrate de que o compresor de aire estea apagado e que o depósito de aire estea baleiro.
- Attach the 1/4" NPT air connector to the tool's air inlet.
- Connect an air hose from your compressor to the tool.
- Set the air compressor's output pressure to the recommended operating pressure (refer to tool markings or specifications, typically 70-120 PSI). Do not exceed maximum pressure.
- Acenda o compresor de aire e deixe que acumule presión.

Figure 5.1: Connecting the air hose to the tool.

Figure 5.2: Nailer connected to an air compressor.
5.2 Loading Fasteners
- Ensure the tool is disconnected from the air supply.
- Tire do seguidor do cargador cara atrás ata que encaixe no seu lugar.
- Insert a strip of compatible nails or staples into the magazine. Ensure the fasteners are oriented correctly with the points facing down.
- Release the magazine follower, allowing it to push the fasteners forward.
- Check the refill indicator to ensure fasteners are properly loaded.

Figura 5.3: Example of collated fasteners.
5.3 Axuste da profundidade de penetración
The tool-free depth adjustment allows you to control how deep the fastener is driven into the material.
- Locate the depth adjustment dial or lever on the tool.
- Rotate the dial or move the lever to increase or decrease the driving depth. Test on a scrap piece of material to achieve the desired flush or countersink finish.
6. Instrucións de funcionamento
6.1 Firing Modes
The Freeman G2XL31 features an integrated dual-mode trigger for versatile operation:
- Single Sequential Firing: For precise fastener placement. Depress the safety contact tip against the workpiece, then pull the trigger to drive a single fastener. Release both the tip and trigger before the next fastener.
- Bump Firing (Contact Actuation): For rapid fastening. Hold the trigger, then depress the safety contact tip against the workpiece to drive a fastener. Lift the tool and repeat for subsequent fasteners.
6.2 Funcionamento xeral
- Ensure the tool is properly connected to the air supply and loaded with fasteners.
- Position the tool firmly against the workpiece, ensuring the safety contact tip is fully depressed.
- Tire o gatillo para accionar a fixación.
- Utilize the no-mar safety tip to prevent damage to delicate surfaces.

Figure 6.1: Using the nailer for trim work.

Figura 6.2: Fronte view of the tool, highlighting the contact tip.

Figura 6.3: Lateral view of the tool, showing the textured grip for comfort and control.
7. Mantemento
Regular maintenance ensures optimal performance and extends the life of your tool. Always disconnect the tool from the air supply before performing any maintenance.
7.1 Lubricación
Apply 5-10 drops of pneumatic tool oil into the air inlet daily before use. This lubricates internal components and prevents wear. Do not use detergent oil or automotive oil.
7.2 Limpeza
- Manteña a ferramenta limpa e libre de residuos. Limpe o exterior cun pano limpo.
- Periodically clean the magazine to ensure smooth fastener feeding.
- Check the air filter (if applicable) and clean or replace as needed to maintain proper airflow.
7.3 Inspección
- Regularly inspect the tool for loose screws, worn parts, or air leaks. Tighten screws and replace worn components as necessary.
- Check the safety contact tip and trigger for proper function.
8 Solución de problemas
Esta sección ofrece solucións para problemas comúns que podes atopar. Para problemas que non aparecen na lista, ponte en contacto co servizo de atención ao cliente.
| Problema | Causa posible | Solución |
|---|---|---|
| Tool not firing | No air supply, low air pressure, empty magazine, jammed fasteners, safety not engaged. | Check air connection and pressure, reload fasteners, clear jam (disconnect air first), ensure safety tip is fully depressed. |
| Os fixadores non se conducen completamente | Low air pressure, incorrect depth setting, wrong fastener length for material, worn driver blade. | Increase air pressure, adjust depth setting, use appropriate fastener length, inspect and replace driver blade if worn. |
| Air leak from tool | Loose fittings, worn O-rings or seals. | Tighten all air fittings. If leak persists, internal seals may need replacement (contact service center). |
| Fasteners jamming frequently | Damaged fasteners, bent magazine, incorrect fastener size, debris in magazine. | Use only high-quality, undamaged fasteners. Clean magazine. Ensure correct fastener size is used. |
Vídeo 8.1: Un overview of Freeman pneumatic and cordless power tools, demonstrating various applications and features. This video highlights the versatility and performance of Freeman tools, including nailers and staplers.
9. Garantía e soporte
The Freeman G2XL31 2nd Generation Pneumatic 3-in-1 Finish Nailer/Stapler is backed by an industry-leading 7 anos de garantía profesional e a Garantía de pezas usables de 90 días.
For warranty claims, technical support, or to purchase replacement parts, please visit the official Freeman websitio web ou póñase en contacto co seu departamento de atención ao cliente. Garde o comprobante de compra para a validación da garantía.
Recursos en liña: Visit the Freeman Store on Amazon
Ask a question about this manual
Ask about setup, troubleshooting, compatibility, parts, safety, or missing instructions. Manuals+ will review the question and use this page’s manual context to help answer it.