
1. Introdución
Welcome to the user manual for your new Cheerlux C50 Projector. This guide provides essential information on setting up, operating, maintaining, and troubleshooting your device. Please read this manual thoroughly before using the projector to ensure optimal performance and safety. Keep this manual for future reference.
2. Instrucións de seguridade
Para evitar incendios, descargas eléctricas ou lesións, observe as seguintes precaucións de seguridade:
- Non bloquee as aberturas de ventilación. Asegúrese de que haxa espazo suficiente arredor do proxector para un fluxo de aire axeitado.
- Do not expose the projector to rain or moisture. Avoid placing objects filled with liquids, such as vases, on the projector.
- Non abra o proxector casing. Encomende todo o mantemento a persoal de servizo cualificado.
- Empregue só o adaptador de corrente subministrado co proxector.
- Evite mirar directamente a lente do proxector cando o lamp está acendido, xa que a luz brillante pode danar os ollos.
- Coloque o proxector sobre unha superficie estable e nivelada para evitar que caia.
- Desconecte o proxector da toma de corrente durante tormentas eléctricas ou cando non o use durante períodos prolongados.
3. Contido do paquete
Comprobe que todos os elementos estean presentes e en bo estado:
- Proxector Cheerlux C50
- Control remoto
- Cable de alimentación
- Cable HDMI
- Cabo AV
- Manual de usuario
4. Produto rematadoview
Familiarize yourself with the components and ports of your Cheerlux C50 Projector.

This image displays the Cheerlux C50 Projector from a front-top angle, highlighting its lens, focus ring, and control panel buttons on the top surface. The projector features a white and grey casing.
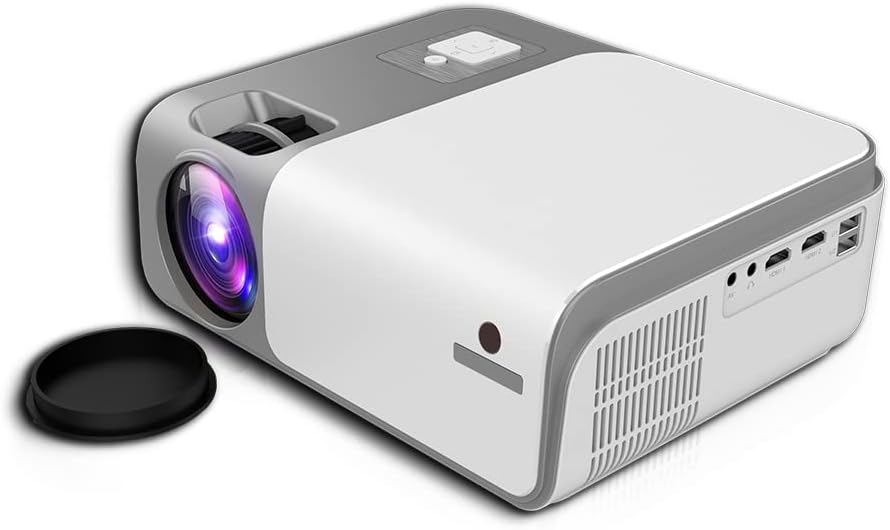
This image shows the rear and side of the Cheerlux C50 Projector, revealing various input/output ports such as HDMI, USB, and AV, along with ventilation grilles. A lens cap is visible next to the lens.
4.1. Panel frontal
- Lente de proxección: Emite a imaxe.
- Anel de enfoque: Axusta a nitidez da imaxe.
4.2. Panel superior
- Botóns de control: Power, Menu, Source, Navigation (Up/Down/Left/Right), OK.
4.3. Panel traseiro
- Entrada de enerxía: Conéctase ao cable de alimentación.
- Portos HDMI (x2): Connect to HDMI-enabled devices (laptops, gaming consoles, Blu-ray players).
- Portos USB (x2): Conecta unidades USB para reproducir contido multimedia.
- Porto AV: Connect to older devices using an AV cable.
- Saída de son (3.5 mm): Conecta altofalantes ou auriculares externos.
- Receptor IR: Para sinais de control remoto.
5. Configuración
5.1. Conexión de alimentación
- Conecte o cable de alimentación ao porto de entrada de alimentación do proxector.
- Conecta o outro extremo do cable de alimentación a unha toma de corrente.
- A luz indicadora de acendido do proxector acenderase.
5.2 Colocación
Position the projector on a stable, flat surface. The ideal projection distance for the Cheerlux C50 is between 1.5 to 6 meters, depending on the desired screen size. Ensure the projector is centered with your projection screen or wall.
5.3. Enfoque e corrección Keystone
- Axuste do foco: Turn the focus ring on the front of the projector until the projected image appears sharp and clear.
- Keystone Correction (4P): If the projected image appears trapezoidal (wider at the top or bottom), use the 4P keystone correction function. This can typically be accessed via the projector's menu or dedicated buttons on the remote control. Adjust each of the four corners independently to achieve a perfectly rectangular image.
6. En funcionamento
6.1. Acendido/apagado
- Encendido: Press the power button on the projector or the remote control. The projector will start up, and the lamp iluminará.
- Apagado: Press the power button again. Confirm shutdown if prompted. Allow the projector to cool down before unplugging it.
6.2. Fontes de entrada
Connect your desired device to the projector using the appropriate cable (HDMI, AV, USB). Then, press the 'Source' button on the projector or remote control to select the corresponding input source.
- HDMI: For high-definition video and audio from laptops, game consoles, etc.
- USB: Para reproducir medios files (photos, videos, music) directly from a USB flash drive.
- DE: For standard definition video and audio from older devices like DVD players.
6.3. Wireless Connectivity (WiFi & Bluetooth)
The Cheerlux C50 Projector features built-in WiFi and Bluetooth for enhanced connectivity.
- Conexión WiFi: Navigate to the 'Settings' menu, select 'Network' or 'WiFi Settings'. Choose your desired WiFi network from the list and enter the password.
- Conexión Bluetooth: In the 'Settings' menu, select 'Bluetooth'. Turn on Bluetooth and pair with your Bluetooth-enabled speakers or headphones.
6.4. Espello da pantalla
The projector supports wireless screen mirroring from compatible smartphones and tablets.

This image illustrates the Cheerlux C50 Projector wirelessly connected to a smartphone. The phone's screen, displaying a movie scene, is being mirrored to the projector, indicated by a Wi-Fi signal icon between the devices.
- Ensure both your projector and mobile device are connected to the same WiFi network.
- On the projector, select the 'Screen Mirroring' or 'Wireless Display' option from the main menu.
- On your mobile device, activate its screen mirroring feature (e.g., 'Smart View' for Samsung, 'Screen Mirroring' for Android, 'AirPlay' for iOS).
- Select the projector's name from the list of available devices on your phone.
- The mobile device's screen content will now be projected.
6.5. Navegación por menús
Use the navigation buttons (Up, Down, Left, Right) and 'OK' button on the projector or remote control to browse through the on-screen menu. The 'Menu' button typically opens the main settings, and the 'Return' or 'Exit' button closes menus.
7. Mantemento
7.1. Limpeza
- Lente: Usa un pano suave e sen fiapos deseñado especificamente para lentes ópticas. Non empregues produtos de limpeza abrasivos.
- Casing: Limpe o exterior do proxector cun pano suave e seco. Para a sucidade persistente, dóreo lixeiramenteampen o pano con auga.
- Reixas de ventilación: Periodically clean the vents with a soft brush or compressed air to prevent dust buildup, which can affect cooling.
7.2. Almacenamento
When not in use for extended periods, store the projector in a cool, dry place, away from direct sunlight and extreme temperatures. Cover the lens with its cap to protect it from dust and scratches.
8 Solución de problemas
Se tes problemas co teu proxector, consulta os seguintes problemas e solucións comúns:
| Problema | Causa posible | Solución |
|---|---|---|
| Non se proxecta ningunha imaxe | Power cable loose, incorrect input source, device not connected. | Check power connection, select correct input source, ensure source device is on and connected. |
| A imaxe está borrosa | Focus not adjusted, projector too close/far. | Adjust the focus ring. Reposition the projector within the recommended distance. |
| A imaxe é trapezoidal | Proxector non perpendicular á pantalla. | Use the 4P keystone correction function in the menu. |
| Sen son | Volume too low, external speakers not connected, source device muted. | Increase projector volume, check external speaker connection, unmute source device. |
| O control remoto non funciona | Batteries dead, obstruction, not pointing at IR receiver. | Substitúa as pilas, retire as obstrucións e apunte o mando a distancia directamente ao receptor de infravermellos do proxector. |
9. Especificacións
Technical specifications for the Cheerlux C50 Projector:
| Característica | Especificación |
|---|---|
| Nome da marca | Generic (Cheerlux C50) |
| Tecnoloxía de conectividade | Wi-Fi, Bluetooth |
| Resolución nativa | 1920 x 1080 |
| Brillo | 4000 lúmenes |
| Factor de forma | Portátil |
| Tipo de montaxe | Soporte de mesa |
| Tipo de controlador | Control remoto |
| Distancia máxima de lanzamento | 6 metros |
| Wattage | 3 vatios |
| Características especiais | Built In Wi Fi, Portable, Wireless, 4P Keystone Correction |
10. Garantía e soporte
The Cheerlux C50 Projector comes with a standard manufacturer's warranty. Please refer to the warranty card included in your package for specific terms and conditions, including warranty period and coverage details. For technical support, service, or further inquiries, please contact your retailer or the manufacturer's customer service department.
Garda o teu recibo de compra como xustificante de compra para reclamacións de garantía.